You are using an out of date browser. It may not display this or other websites correctly.
You should upgrade or use an alternative browser.
You should upgrade or use an alternative browser.
GranSport Giallo Granturismo thread
- Thread starter gotcha
- Start date
gotcha
Member
- Messages
- 102
This weekend I don´t have too much time for GS so I tried to do only a small job. Nevertheless, took me 1,5h.
On of my windows buttons was peeling off, but more importantly it was broken and the button itself was just laying loosely on top of the switch.
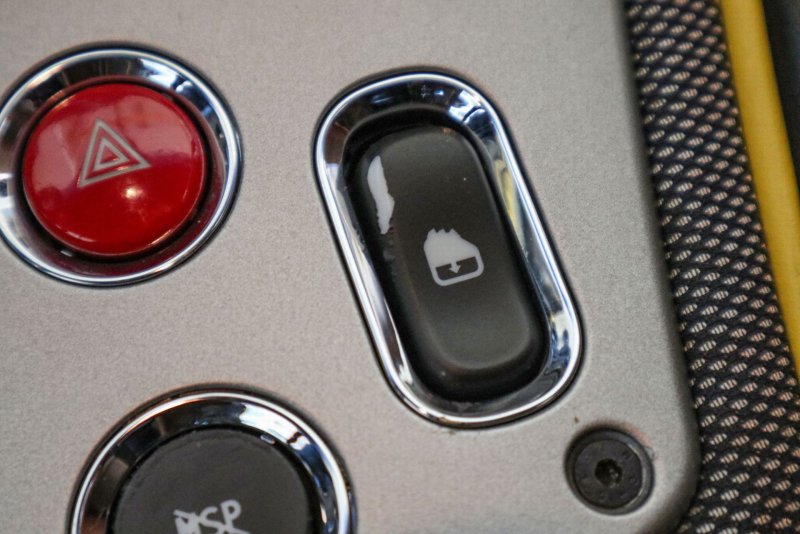
I did replace both buttons and during the process I cleaned all the other ones and got rid of the remains of the sticky rubber coating off them.
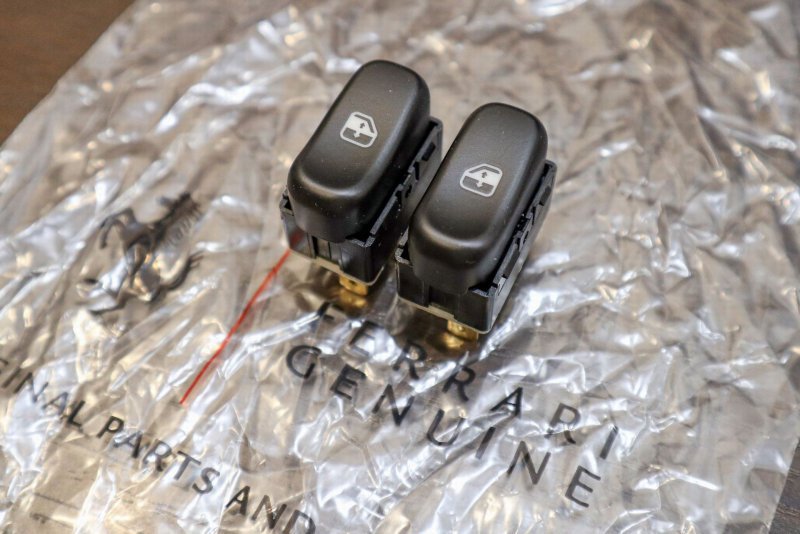
I used as replacement F430 buttons that are identical, just in different case. Part numbers 67970400 & 67970500
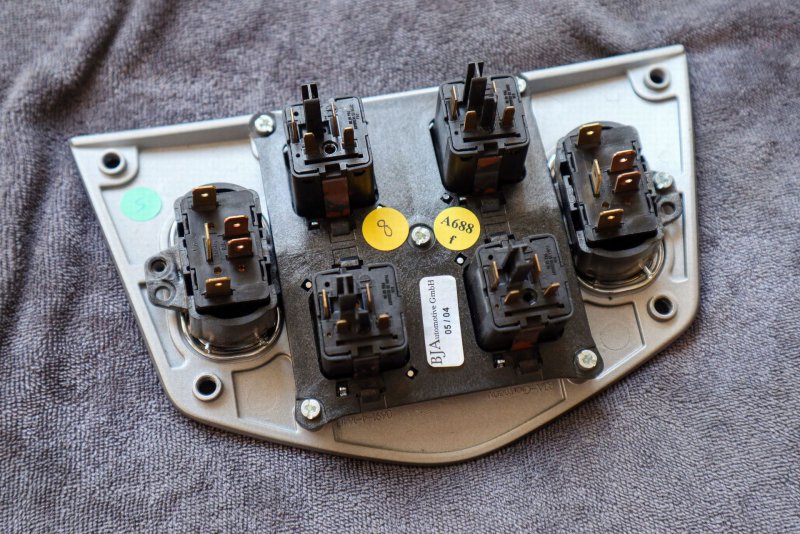
If anybody is interested, all the GS switch gear in the alu panels are made in Germany by BJA Automotive:
Here are the Ferrari buttons:
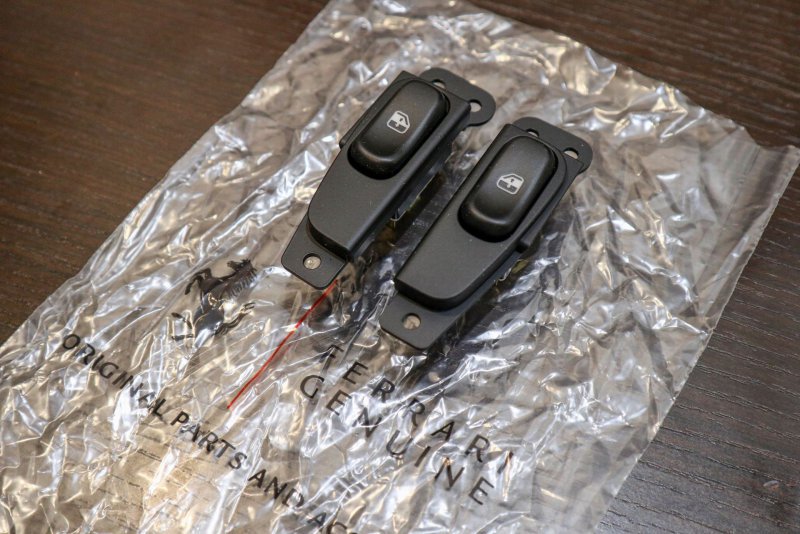
All what is needed is to take them out of F430 panels with help of a tiny flat screwdriver and we get GS buttons:
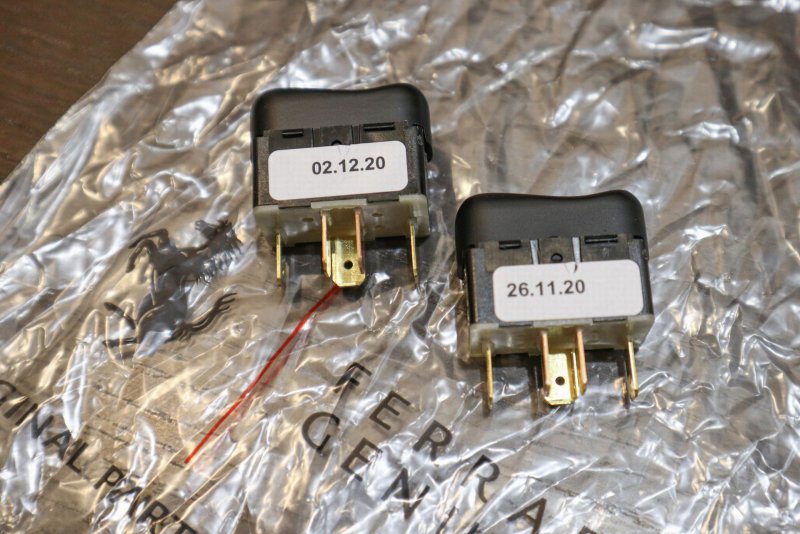
My buttons were made in 2020. That is a big shame for Maserati. Apparently, BJA Automotive is still manufacturing them, or at least was still making them 2 years ago. The only difference is that Ferrari did bother to order a batch of spare parts but Maserati didn't and leaves the window buttons as not available. Shame.
Switch panel is out. Window buttons are held by 2 screws, but the inner screws are under the big panel with the 4 buttons so this one needs to be removed first.
The GS buttons is siting in a small plastic housing and needs to be removed first. The easiest way is to squeeze it strongly from top and bottom like in the picture, the plastic will bend slightly into a barrel shape and the button will fall out.
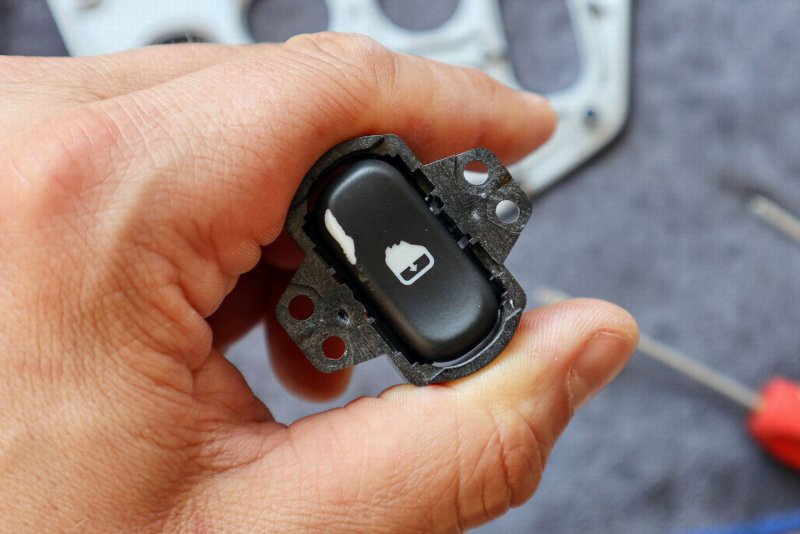
Mine immediately fell into pieces, the hinge of the button was broken:
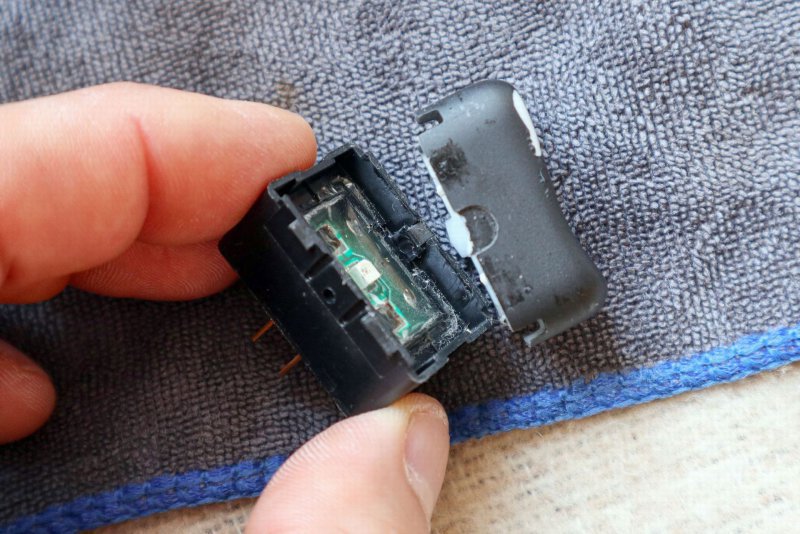
The new button just clips in the plastic housing and job done.
As I was already there, I decided to disassemble all the other buttons as well. They were dirty, still sticky from the rubber coating and accumulated a lot of dust and dirt around them:
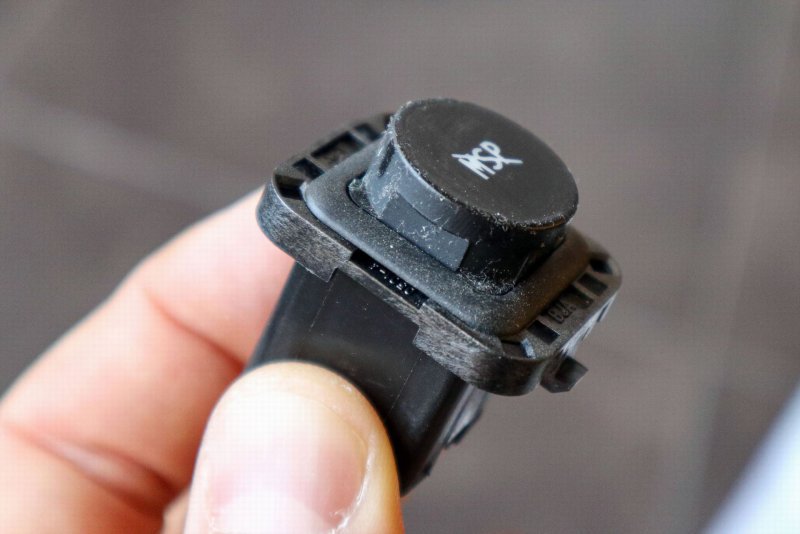
A minute with microfiber, small brush and isopropylalkohol:
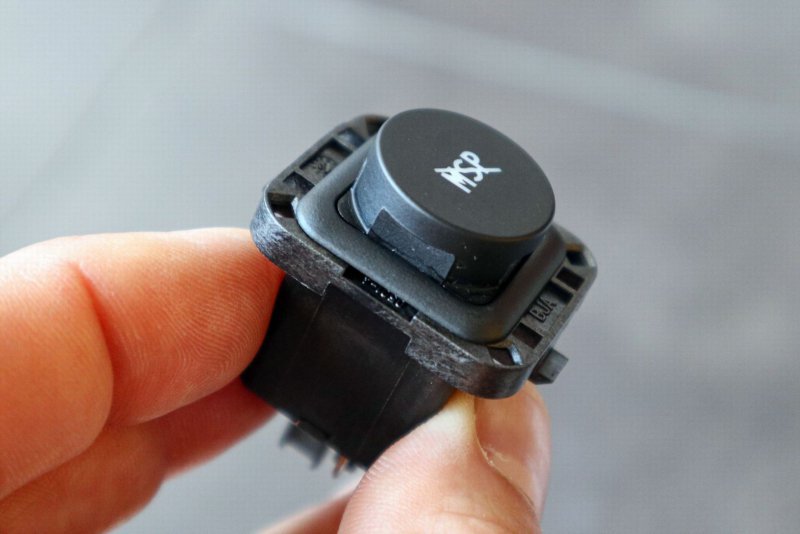
On of my windows buttons was peeling off, but more importantly it was broken and the button itself was just laying loosely on top of the switch.

I did replace both buttons and during the process I cleaned all the other ones and got rid of the remains of the sticky rubber coating off them.
I used as replacement F430 buttons that are identical, just in different case. Part numbers 67970400 & 67970500
If anybody is interested, all the GS switch gear in the alu panels are made in Germany by BJA Automotive:
Here are the Ferrari buttons:

All what is needed is to take them out of F430 panels with help of a tiny flat screwdriver and we get GS buttons:

My buttons were made in 2020. That is a big shame for Maserati. Apparently, BJA Automotive is still manufacturing them, or at least was still making them 2 years ago. The only difference is that Ferrari did bother to order a batch of spare parts but Maserati didn't and leaves the window buttons as not available. Shame.

Switch panel is out. Window buttons are held by 2 screws, but the inner screws are under the big panel with the 4 buttons so this one needs to be removed first.

The GS buttons is siting in a small plastic housing and needs to be removed first. The easiest way is to squeeze it strongly from top and bottom like in the picture, the plastic will bend slightly into a barrel shape and the button will fall out.

Mine immediately fell into pieces, the hinge of the button was broken:

The new button just clips in the plastic housing and job done.
As I was already there, I decided to disassemble all the other buttons as well. They were dirty, still sticky from the rubber coating and accumulated a lot of dust and dirt around them:

A minute with microfiber, small brush and isopropylalkohol:

gotcha
Member
- Messages
- 102
All clean and ready for assembly:
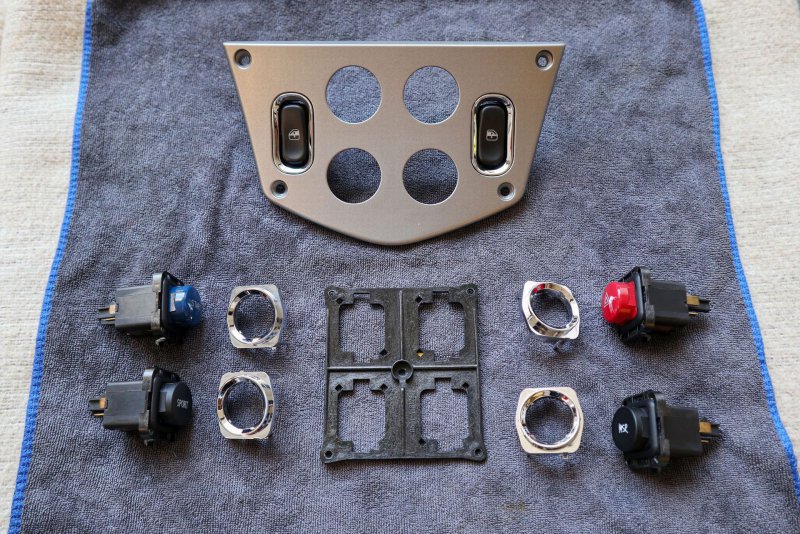
The silver rings do look also nice and shiny properly cleaned from the years of finger grease and dust, basically a new panel:
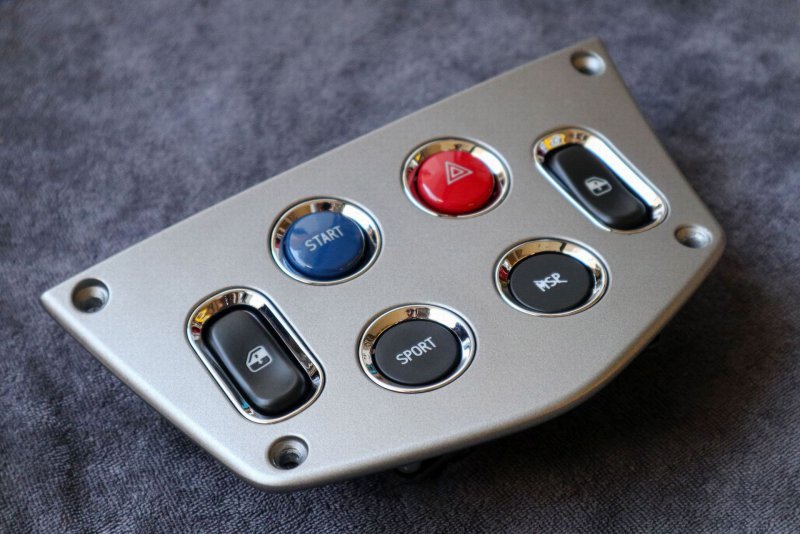
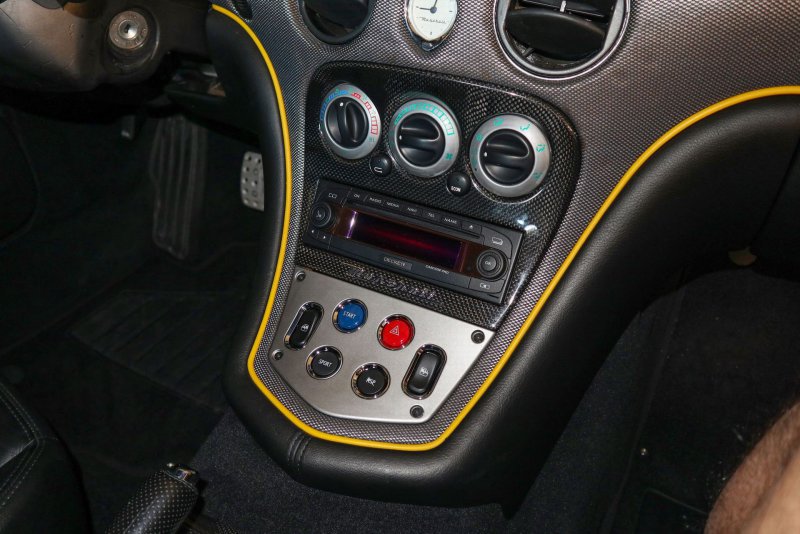
As it all showed up so nicely, I decided to do the central console buttons as well:
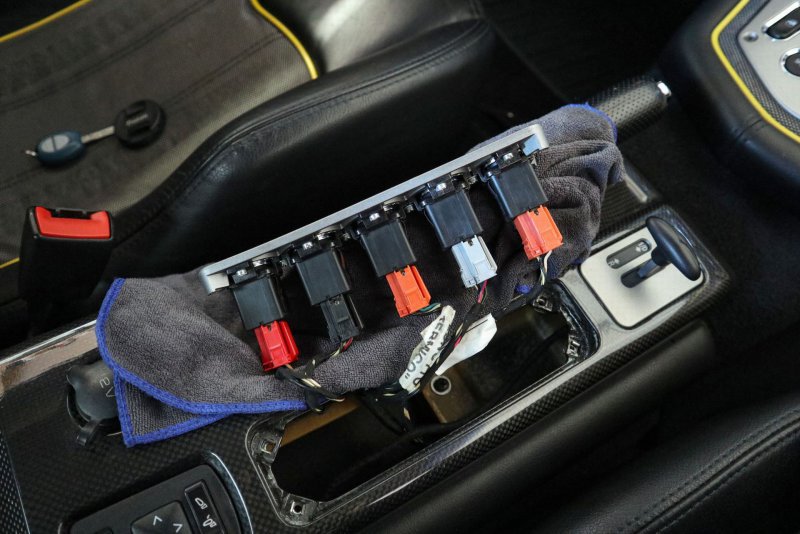
They did also accumulate a bit of dirt over the years, gross:
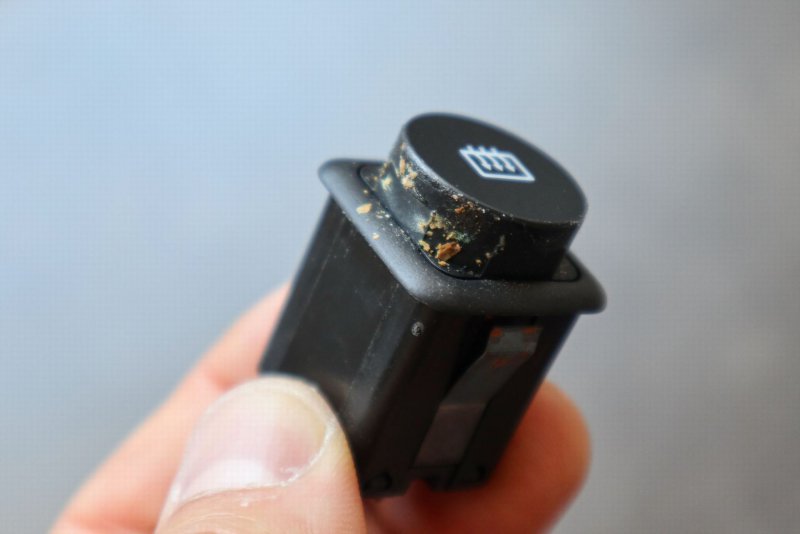
It was a bit time consuming as the buttons are held by 16 screws but the result well pays off:
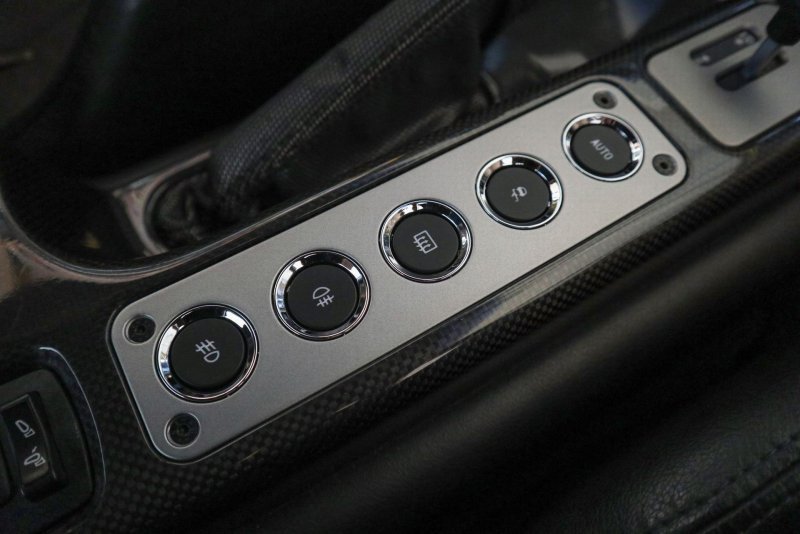

The silver rings do look also nice and shiny properly cleaned from the years of finger grease and dust, basically a new panel:


As it all showed up so nicely, I decided to do the central console buttons as well:

They did also accumulate a bit of dirt over the years, gross:

It was a bit time consuming as the buttons are held by 16 screws

BennyD
Sea Urchin Pate
- Messages
- 15,094
Whilst I admire your efforts to restore your GS to former glories, I feel obligated to point out a glaring error; f*cking Pirelli Zero Grips. Tbh, you'd have been better off chancing Chinese ditch finders because that way, you'd have ended up with something much better. Whilst I applaud your OCD efforts, putting those black rings of misery on your pride and joy is fraught with what ifs. Please, ffs, don't drive on wet or cold roads. If you find yourself about to go out on wet and cold roads, write a will before you go.
gotcha
Member
- Messages
- 102
Whilst I admire your efforts to restore your GS to former glories, I feel obligated to point out a glaring error; f*cking Pirelli Zero Grips. Tbh, you'd have been better off chancing Chinese ditch finders because that way, you'd have ended up with something much better. Whilst I applaud your OCD efforts, putting those black rings of misery on your pride and joy is fraught with what ifs. Please, ffs, don't drive on wet or cold roads. If you find yourself about to go out on wet and cold roads, write a will before you go.
I cannot comment much on them yet as I made maybe only 150kms sice I got them. Around 2015 I had PZero Neros on my 159 and they were OK. Nevertheless, dry grip is all will ask from them as GS is dry weekend car. Once in few years I may be surprised by unexpected sudden summer storm, but generally the only occasion when the car will see water is when I am washing it. Cold dry grip is more of a concern as I take my weekend cars out also during winter if the weather is sunny and roads are fully dry. So dry roads but with 5-15 degrees outside can happen. But I have Michelin Cup2 on my Afla GTA and at 5-10 degrees outside they can be scary as well as on country road in winter I can never get enough heat into them to grip.
gotcha
Member
- Messages
- 102
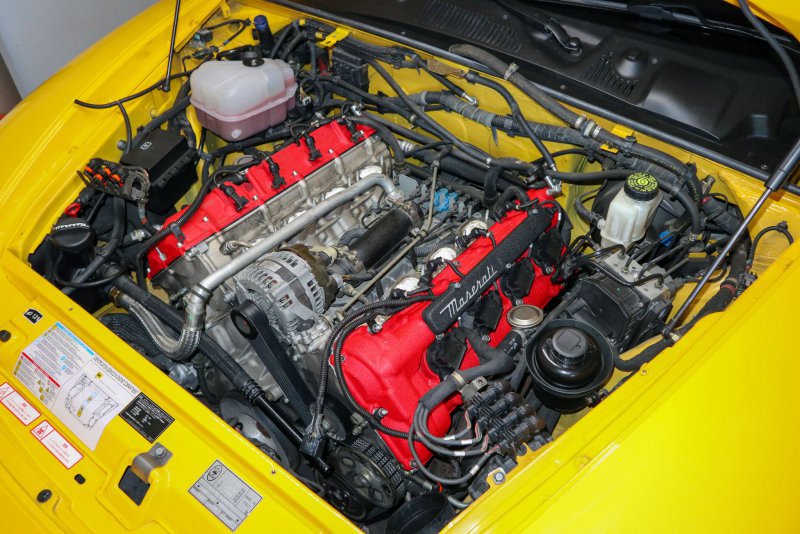
After almost a month focusing on other projects, today I got back to the GS and this time I focused on the engine. The plan was:
There are some excellent guides available, so I wont upload pictures of all the steps and in the correct order, more walk through my day.
I started by removing all the beauty covers:
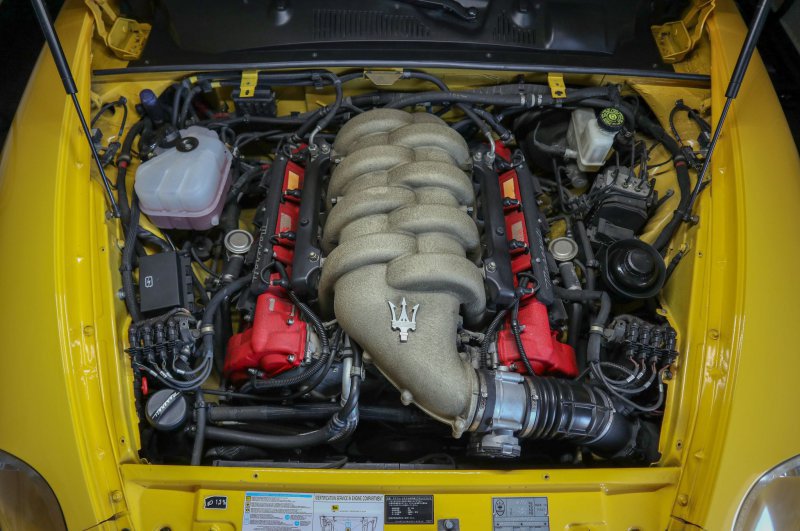
I started with the left bank. I removed the Intake from TB to MAF, black cover with Maserati logon on the wiring loom, disconnected the coil packs, disconnected the fuel rail and pulled it out.
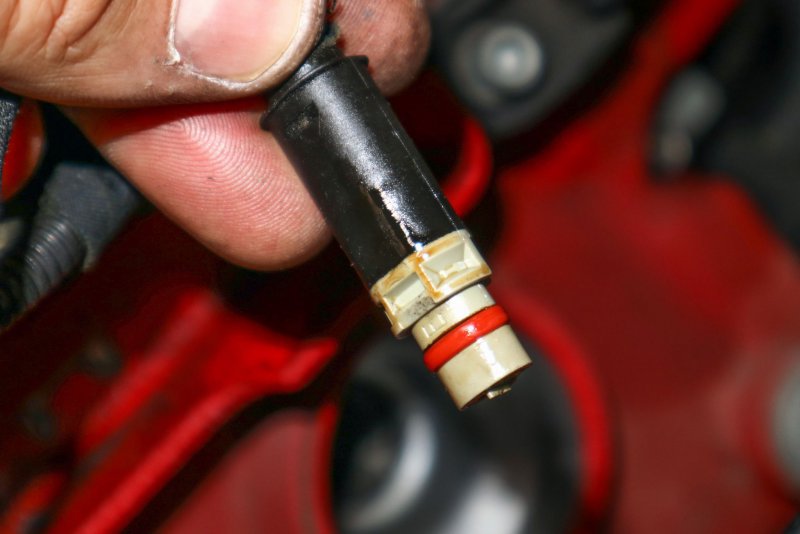
Than I disconnected the variator solenoid plug. A bit silly one, two very thin screwdrivers are needed to lift the tiny latches and disconnect it. Mine was soaked in oil that was going over the wire up to the plug. Then I realized I forgot to buy the solenoid wire seals. Oh great....
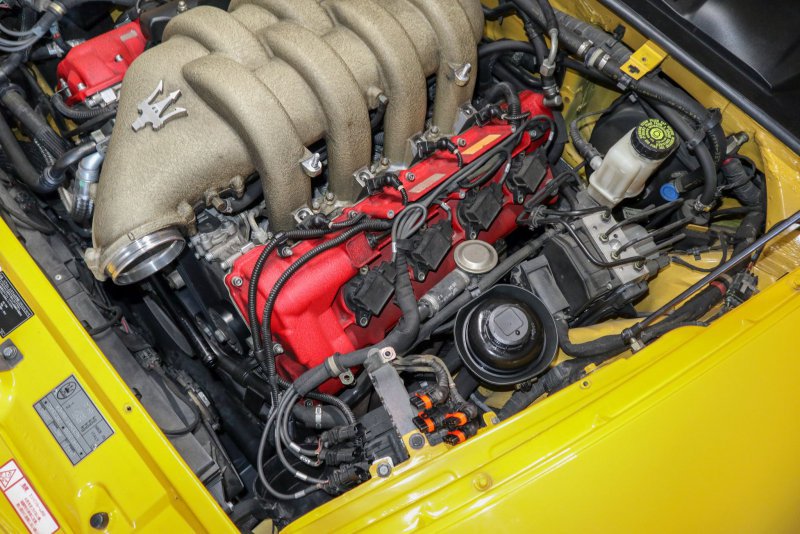
I pulled out the coil packs, disconnected the vacuum lines from the plenum and removed all its bolts:
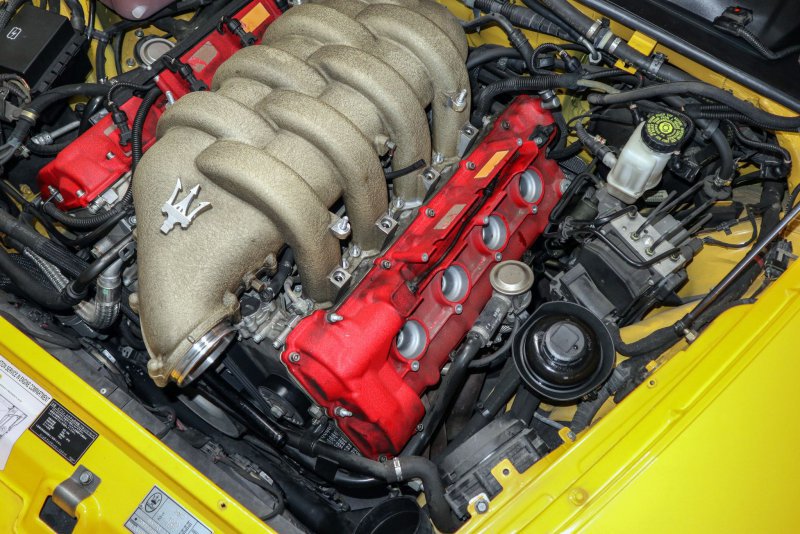
And I lifted the plenum. There was of course some dirt like dry leaves, pieces of wiring loom tape, some red piece of plastic and even something surprising what I identified as apricot stone but most importantly the whole area was just dusty but I cannot see any leaks (except those coming from cam covers) or any other issues:
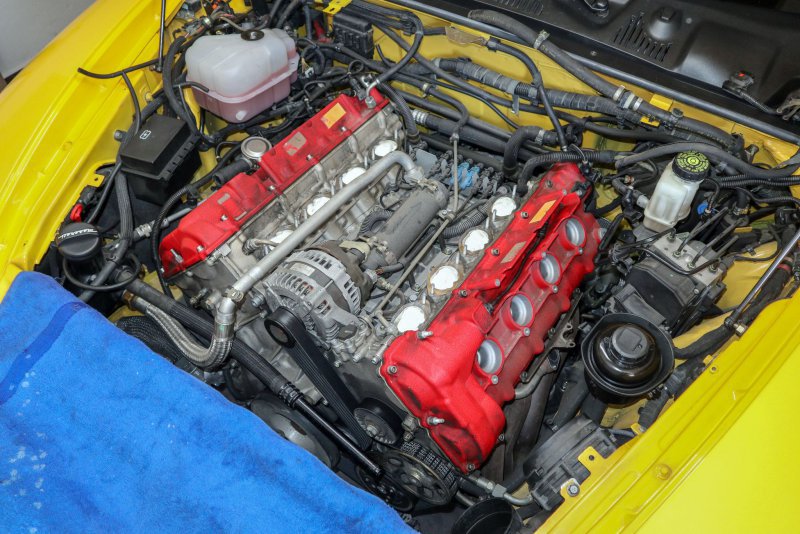
The tough part is the secondary air pump valves above the exhaust manifolds. They have to be removed to access one cam cover bolt and to do this, 4 screws need to go. Two accessible from the top, holding the pipe on the exhaust manifold and two upside down going into the valves from the bottom. These are a bit pain to be removed. I guess they always cost a bit of skin and scratches. After that all the cam cover bolts are accessible. There is still a Seeger ring on the variator wiring releasing it and allowing to pull the wire through the opening when removing the cover and cam position sensor at the back of the intake cam.
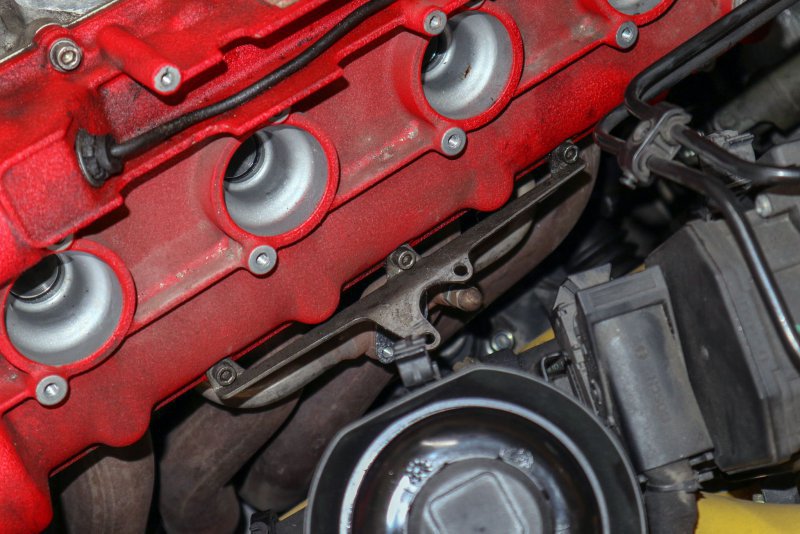
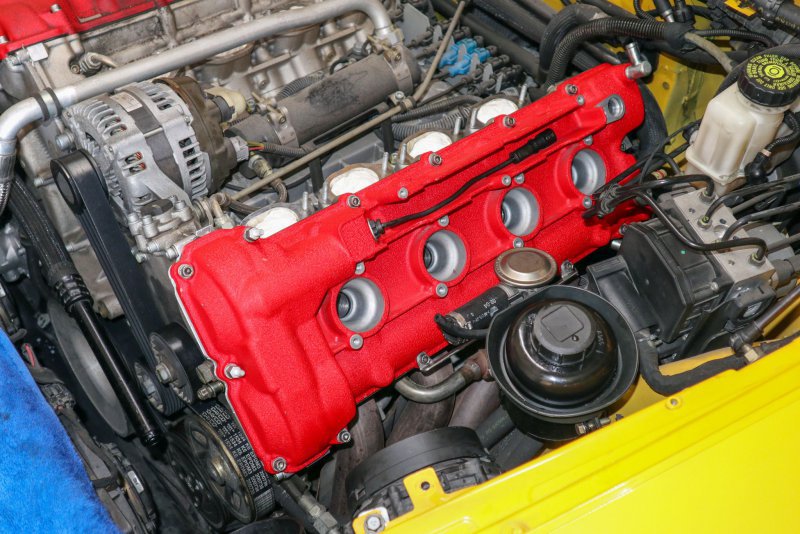
Cover is off:
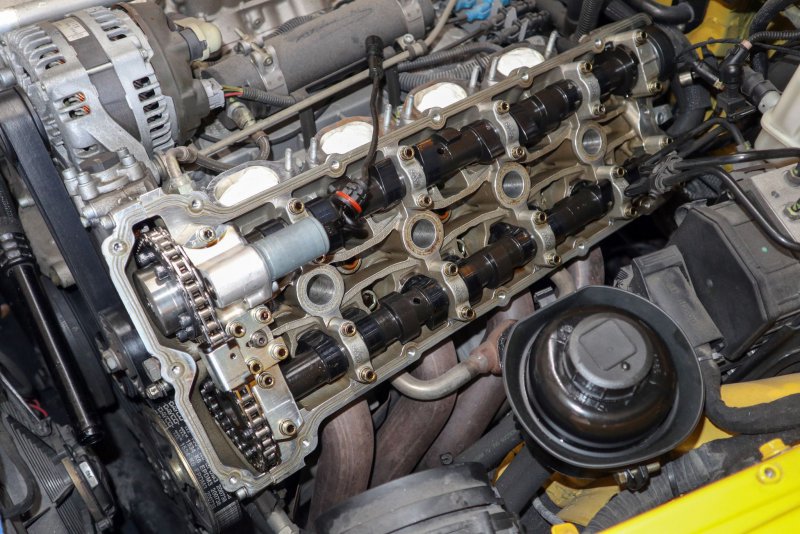
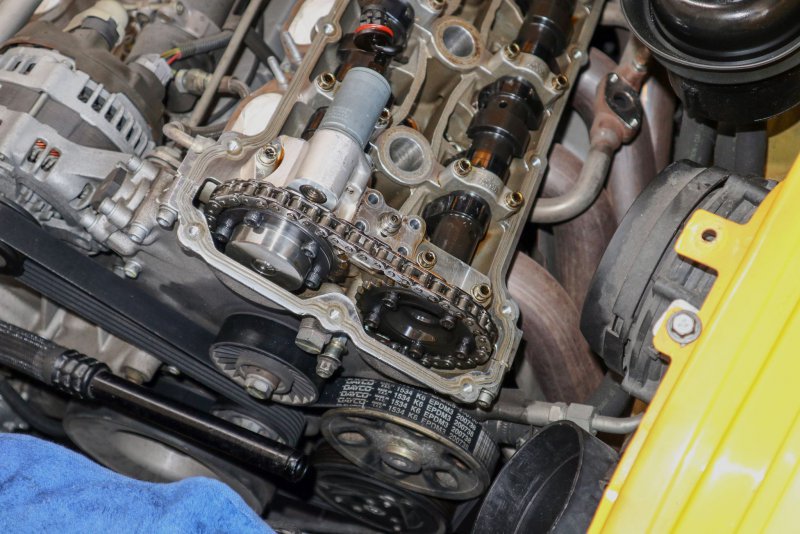
I started with replacing the fine oil filter feeding the variator. I have not seen this done too much on the forums and I believe it should be part of preventive maintenance. It is easy to do and the filter costs less than one spark plug. It is hidden in the center, between the cams, right under the dual cam cap / bridge holding also the solenoid.
First the 4 bolts around the check valve need to be removed and the upper chain guide will slide forwards.
Than there are three more bolts and the camshafts cap with solenoid can be lifted and removed. The filter is screwed in right in the middle between the four bolts.
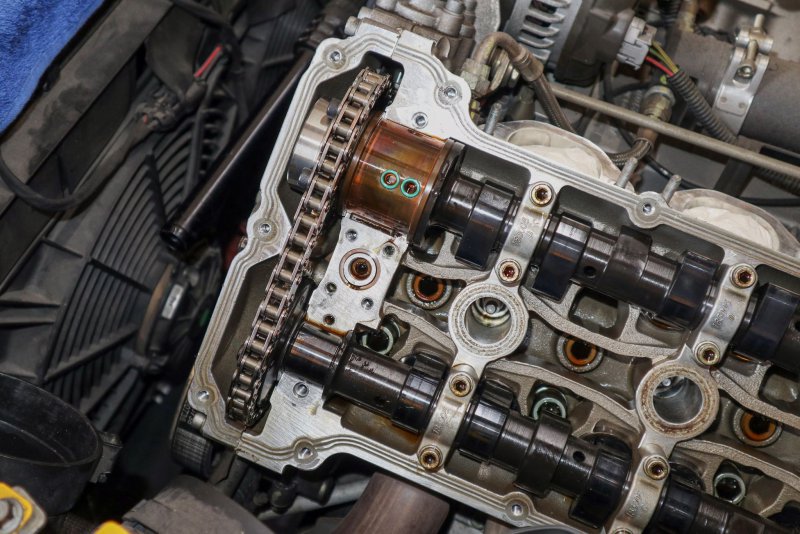
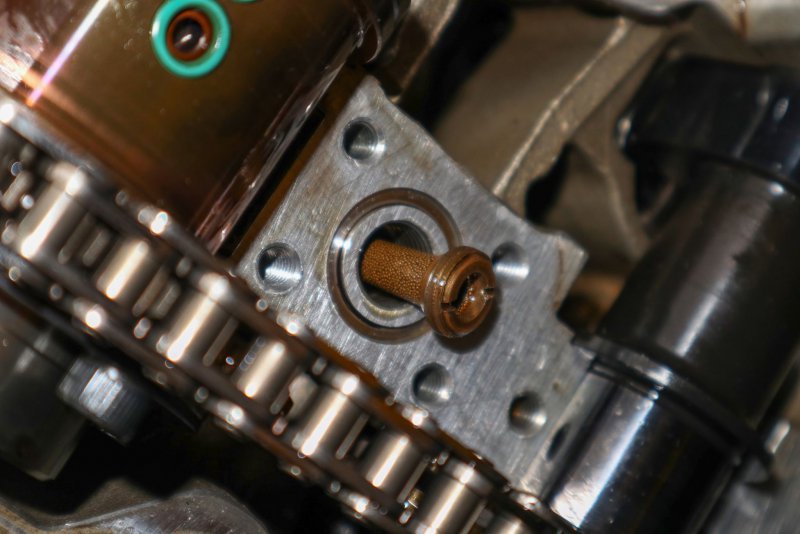
And here it goes out:
- replace cam cover gaskets due to slight oil leaking
- replace spark plugs
- replace variator feed oil filters
- replace oil pressure sensor
- replace injector seals
- clean the intake plenum, cam covers and engine bay a bit
There are some excellent guides available, so I wont upload pictures of all the steps and in the correct order, more walk through my day.
I started by removing all the beauty covers:

I started with the left bank. I removed the Intake from TB to MAF, black cover with Maserati logon on the wiring loom, disconnected the coil packs, disconnected the fuel rail and pulled it out.

Than I disconnected the variator solenoid plug. A bit silly one, two very thin screwdrivers are needed to lift the tiny latches and disconnect it. Mine was soaked in oil that was going over the wire up to the plug. Then I realized I forgot to buy the solenoid wire seals. Oh great....

I pulled out the coil packs, disconnected the vacuum lines from the plenum and removed all its bolts:

And I lifted the plenum. There was of course some dirt like dry leaves, pieces of wiring loom tape, some red piece of plastic and even something surprising what I identified as apricot stone but most importantly the whole area was just dusty but I cannot see any leaks (except those coming from cam covers) or any other issues:

The tough part is the secondary air pump valves above the exhaust manifolds. They have to be removed to access one cam cover bolt and to do this, 4 screws need to go. Two accessible from the top, holding the pipe on the exhaust manifold and two upside down going into the valves from the bottom. These are a bit pain to be removed. I guess they always cost a bit of skin and scratches. After that all the cam cover bolts are accessible. There is still a Seeger ring on the variator wiring releasing it and allowing to pull the wire through the opening when removing the cover and cam position sensor at the back of the intake cam.

Cover is off:

I started with replacing the fine oil filter feeding the variator. I have not seen this done too much on the forums and I believe it should be part of preventive maintenance. It is easy to do and the filter costs less than one spark plug. It is hidden in the center, between the cams, right under the dual cam cap / bridge holding also the solenoid.
First the 4 bolts around the check valve need to be removed and the upper chain guide will slide forwards.

Than there are three more bolts and the camshafts cap with solenoid can be lifted and removed. The filter is screwed in right in the middle between the four bolts.

And here it goes out:

gotcha
Member
- Messages
- 102
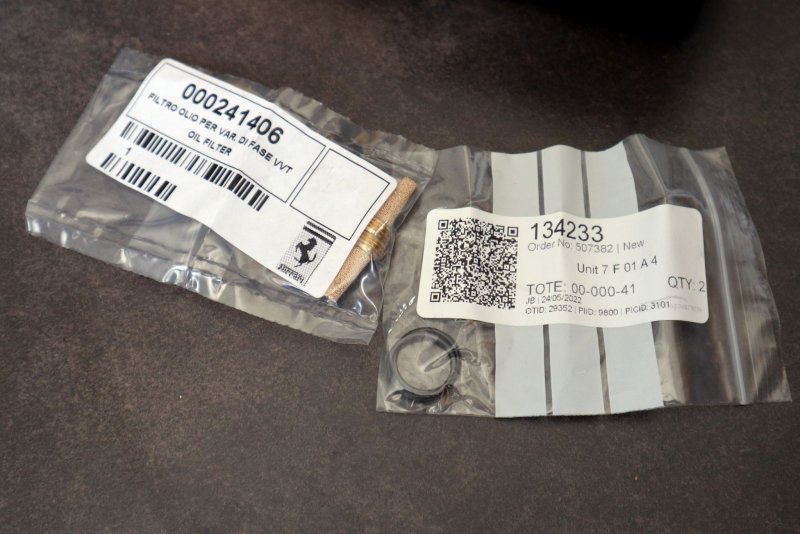
The necessary filter and seal have these numbers:
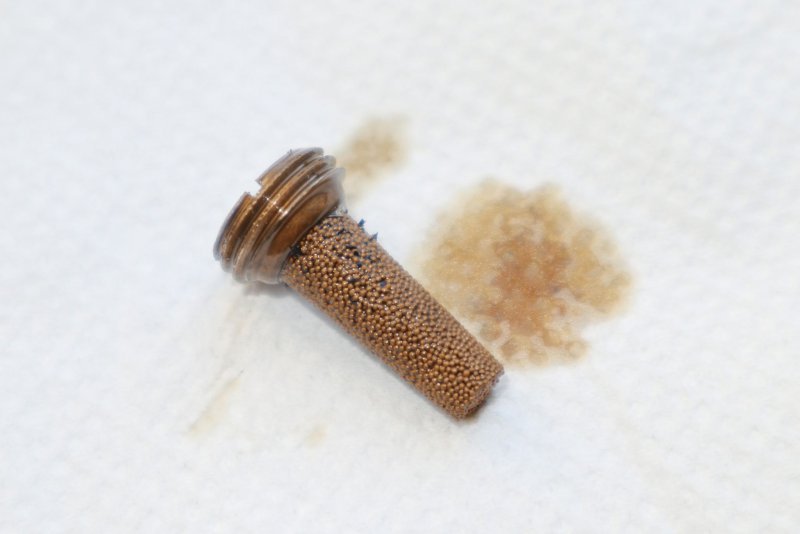
My filter was not horrible, but a bit dirty. At close inspection you can see some black particles. And who knows what all is in the microscopic openings in its brass mesh
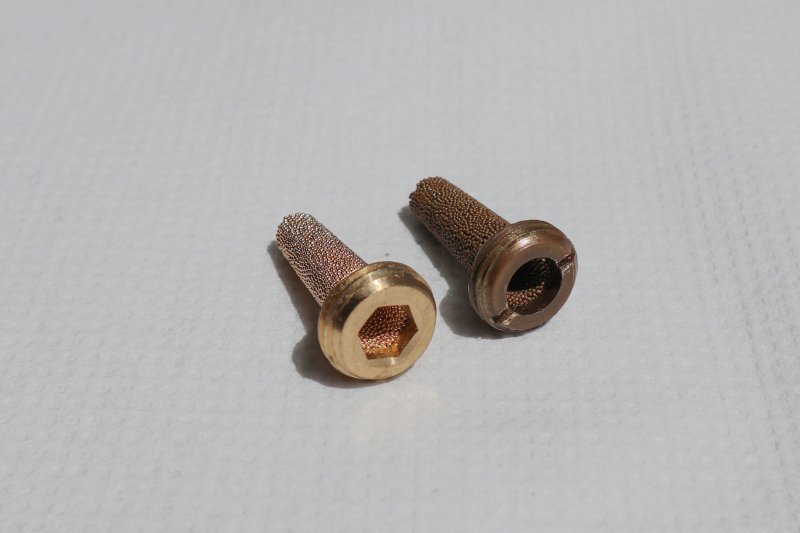
There was actually a difference between the filter on my car and the new ones I got. The old ones do have a slot to be unscrewed and the new one have a hex hole. Old vs new:
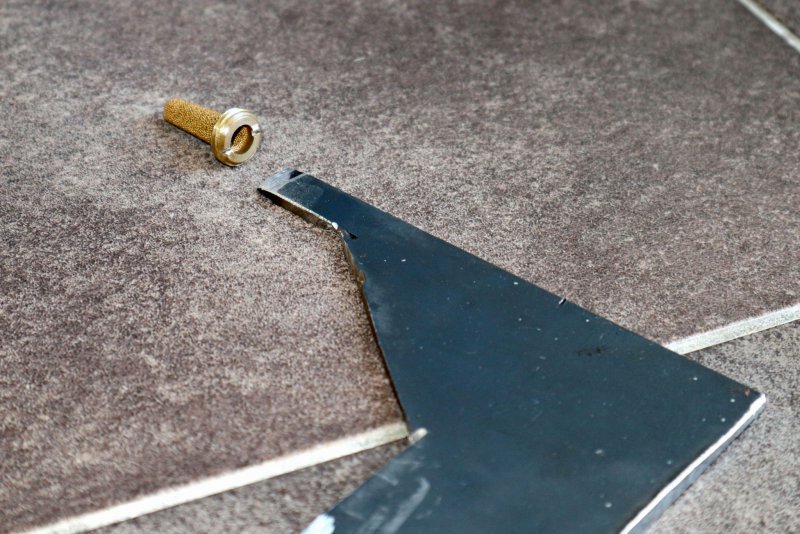
The old design is actually a pain. It looks like it can be removed with a flat screwdriver, but I doubt most people would have a suitable one. The biggest one I had had a 7mm wide tip. It was still not wide enough. The filter is at least 10mm wide. And the really big screwdrivers will not fit the tiny groove anyway. So I had to manufacture a tool from a piece of steel. I just cut it out with angle grinder with about 10mm wide tip and sharpened it so that it fit the groove. Then I used it as a screwdriver:
Needless to say the newer hex filter is a much better design and goes in nicely.
With a seal around it and some squirt of oil both into the filter and variator holes to pre-fill them for the start I installed back the camshafts cap and upper chain guide. Te bolts should be tightened at 10Nm.
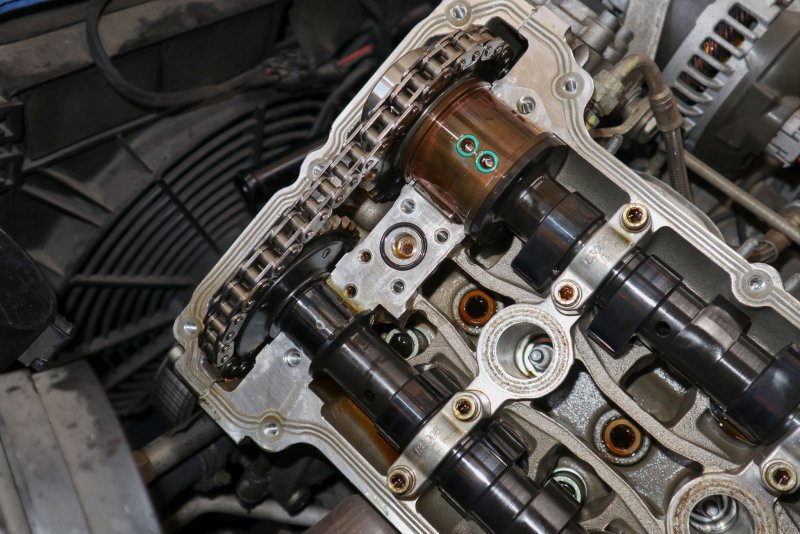
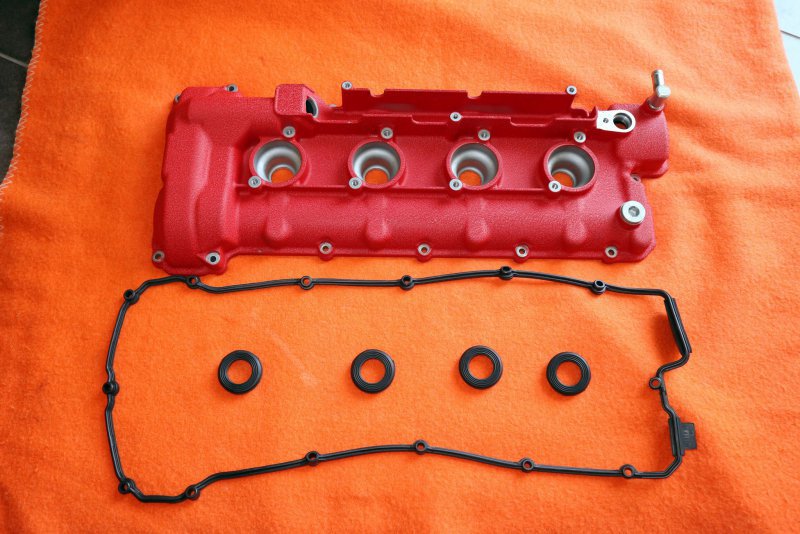
I cleaned the cam cover and installed new spark plug and perimeter seal. It came out nicely and the wrinkle is chipped only at few tiny places.
At the install I decided to modify the secondary air valve bracket. This is how it looks like. The pain is the middle of the three bolts that is not accessible.
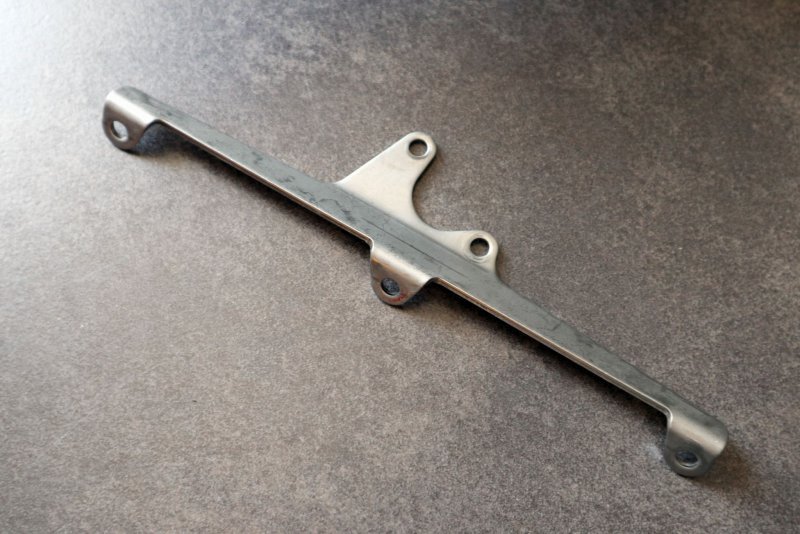
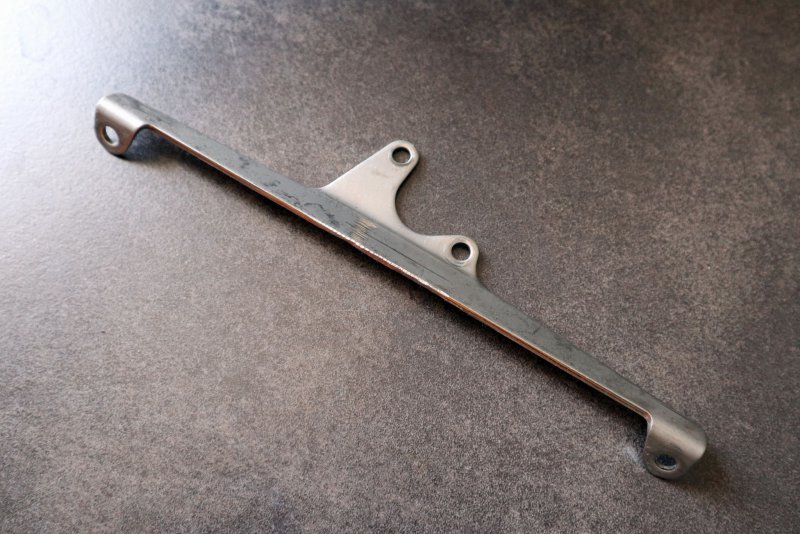
I decided that the stainless steel bracket is solid enough and I don´t need the central bolt. So I cut it off:
Here is the assembly:
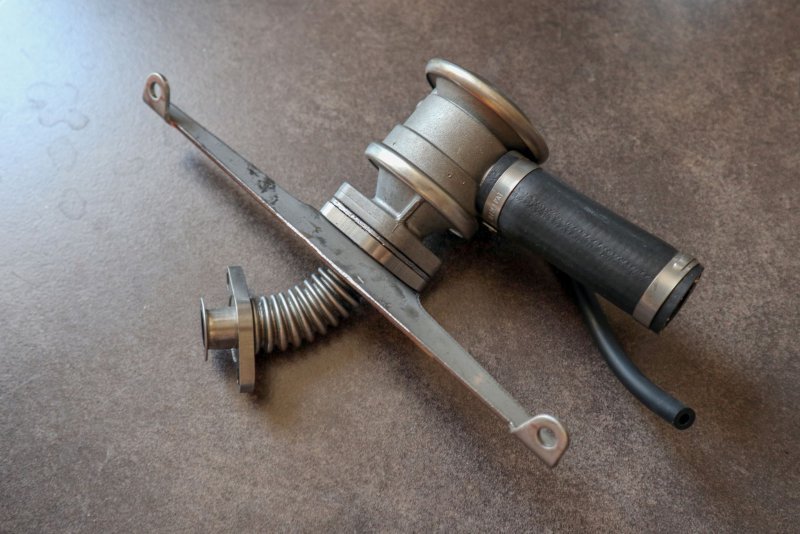
For this time I still had to put it together in the old fashioned (difficult) way with tightening all the bolts individually because I had to find the correct angle for the steel pipe. But what my mod will allow me in the future is much faster and easier disassembly. I will not need to remove the two bolts that are upside down anymore. When I remove the valve in the future I will just remove the two bolts that hold the bracket on the cam cover, the two bolts that are easy to remove and hold it to the exhaust manifold and than I will slide all the assembly pictured above backwards in one piece. I will not have to bother with valve-from-pipe removal and those two ugly upside down bolts.

My filter was not horrible, but a bit dirty. At close inspection you can see some black particles. And who knows what all is in the microscopic openings in its brass mesh

There was actually a difference between the filter on my car and the new ones I got. The old ones do have a slot to be unscrewed and the new one have a hex hole. Old vs new:

The old design is actually a pain. It looks like it can be removed with a flat screwdriver, but I doubt most people would have a suitable one. The biggest one I had had a 7mm wide tip. It was still not wide enough. The filter is at least 10mm wide. And the really big screwdrivers will not fit the tiny groove anyway. So I had to manufacture a tool from a piece of steel. I just cut it out with angle grinder with about 10mm wide tip and sharpened it so that it fit the groove. Then I used it as a screwdriver:

Needless to say the newer hex filter is a much better design and goes in nicely.
With a seal around it and some squirt of oil both into the filter and variator holes to pre-fill them for the start I installed back the camshafts cap and upper chain guide. Te bolts should be tightened at 10Nm.

I cleaned the cam cover and installed new spark plug and perimeter seal. It came out nicely and the wrinkle is chipped only at few tiny places.

At the install I decided to modify the secondary air valve bracket. This is how it looks like. The pain is the middle of the three bolts that is not accessible.

I decided that the stainless steel bracket is solid enough and I don´t need the central bolt. So I cut it off:

Here is the assembly:

For this time I still had to put it together in the old fashioned (difficult) way with tightening all the bolts individually because I had to find the correct angle for the steel pipe. But what my mod will allow me in the future is much faster and easier disassembly. I will not need to remove the two bolts that are upside down anymore. When I remove the valve in the future I will just remove the two bolts that hold the bracket on the cam cover, the two bolts that are easy to remove and hold it to the exhaust manifold and than I will slide all the assembly pictured above backwards in one piece. I will not have to bother with valve-from-pipe removal and those two ugly upside down bolts.

Last edited:
gotcha
Member
- Messages
- 102
Than I replaced the spark plugs. Nothing special there, except they are tiny narrow thread ones that are tightened only to 10Nm. From my other cars I am used to about 25Nm, so there are really almost finger tight. Also the old ones were surprisingly loose.
I used Denso instead of the OEM NGK. Generally I have NGK in all my other cars, but I ready a lot good about these Densos and they were cheap so I decided to try
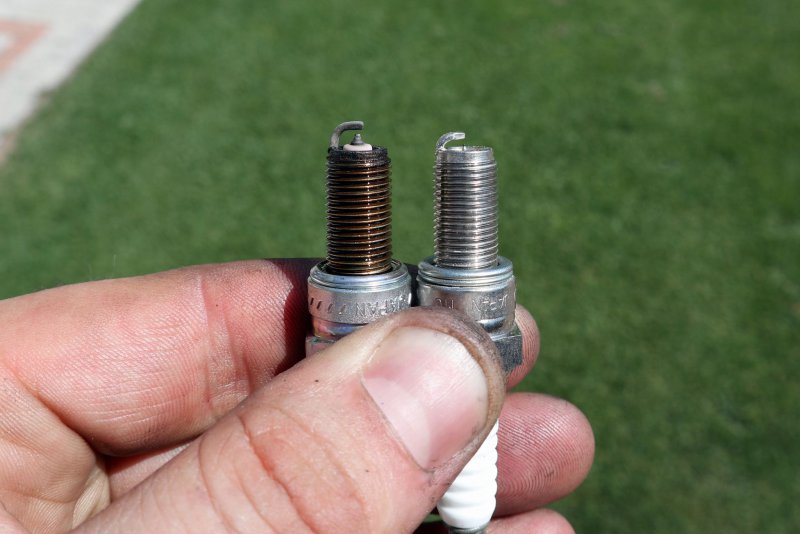
However, I have to say I was disappointed out of the the box. With the second plug I installed I noticed the coil pack contact was a bit loose.
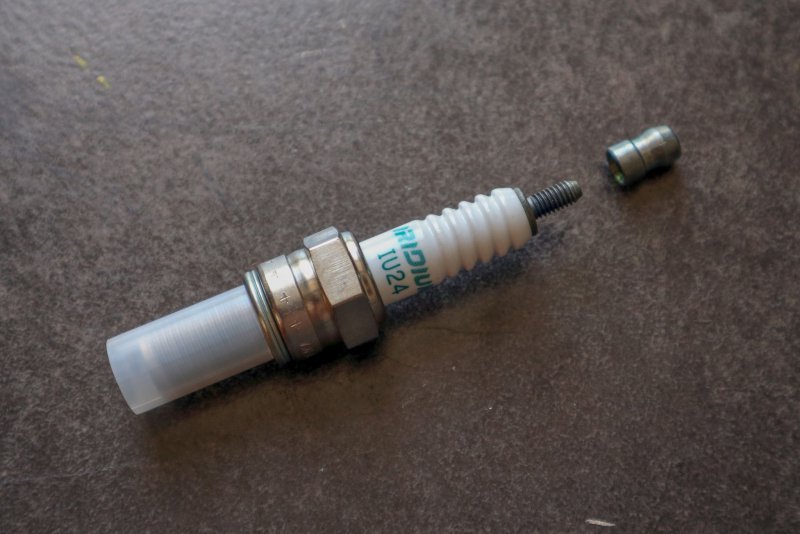
I went back and pulled out the first plug I installed and it was loose as well. I had to tighten most of the plugs. Not sure if I have a bad batch or if this is normal, but does not give me much confidence. I don´t regret buying Denso (yet) but I am sure this would not be the case with NGK (sorry, favorite brand I use for years with only good experinece).
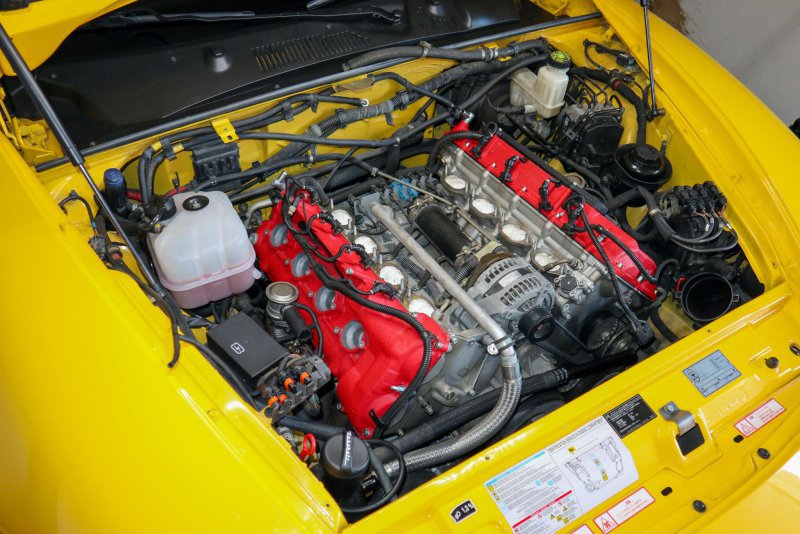
With the left head done, I repeated all the steps above on the right head.
This is where I got today and I will have to finish the job sometimes in the next days
I used Denso instead of the OEM NGK. Generally I have NGK in all my other cars, but I ready a lot good about these Densos and they were cheap so I decided to try

However, I have to say I was disappointed out of the the box. With the second plug I installed I noticed the coil pack contact was a bit loose.

I went back and pulled out the first plug I installed and it was loose as well. I had to tighten most of the plugs. Not sure if I have a bad batch or if this is normal, but does not give me much confidence. I don´t regret buying Denso (yet) but I am sure this would not be the case with NGK (sorry, favorite brand I use for years with only good experinece).
With the left head done, I repeated all the steps above on the right head.
This is where I got today and I will have to finish the job sometimes in the next days


boomerang
Member
- Messages
- 551
Great topic, only discovered it now!
And indeed, this yellow color suits the car sooo well.
It reminded me again, that I do not know any modern car, that looks more gorgeous then this model, especially in GranSport trim.
Then, a lot of your work, I also did through the years.
Funny how we run into the same kind of (small) issues , to be solved or improved.
One thing I would like to ask; do you know or thought of a simple method, for testing the efficiency of the accumulator in the variator oil circuit?
It is an often forgotten service part, that tends to wear without thinking about the part ever.
It does wear earlier in our cars, because of its faulty positioning.
(This type of accumulator should be placed in a vertical position)
Because of its horizontal position, the bottom of the seal inside, will have some oil surrounding it, but the top will get dry, especially when the car is not used over a long period.
The top of the cilinder and seal will wear a lot faster because of this.
According to accumulator specialists, this is the main cause for loosing its preload pressure.
“First start rattle“ wil be the first sign of this, often followed by exchanging variators with no improvement of course.
While you exchanged them tiny oil filters, I was wondering If you maybe had this 1-2 seconds ratlle now and then.
Btw; there also is a small non return valve in the LH cilinder head, preventing variator circuit oil flowing back into the main feed line after engine shut off.
This tiny valve was not 100% perfect in mine.
Anyway, my pre lube system prevented any noises after installation, but still think the accumulator has to be exchanged.
Problem is, if you order a “new“ one, how long was it in stock, does it still have its factory nitrogen pressure, or is it down already before even mounted
Also, why did they not use the blatter type accumulator?
That seems better suited for horizontal mounting.
boomerang
Member
- Messages
- 551
Asked Hydac, provided with the numbers on the accumulator, if they could tell what the preloaded nitro pressure of this type of accumulator was, but they could not tell.
That is a pity, it would open up possibilities to experiment with the correct blatter type accumulator in the future and be able to restore preload pressure again, when needed after a few years
Funny, that other accumulator, also placed horizontal, in the gearbox hydraulics, IS often being exchanged at daler workshops.
But then, when this system is being tested with SD2, test sequence has a pressure test that clearly points to the accumulator when certain values are not correct.
For the engine there is no test sequence that I know of, that would ever be able to point at the variator circuit accumulator.
gotcha
Member
- Messages
- 102
I have actually never thought much about the accumulator. Maybe because I have not noticed that it would be mentioned as frequent failure point, on the other side if it fails it may be difficult to identify correctly. What you say about its design makes sense, with one difference to the cambiocorsa accumulator. The gearbox system works with 40-50 bars of pressure, so the nitrogen behind the pistons is also under significant pressure. Te engine oil pressure can go to 5-6 bars so the variator accumulator have a much easier life.
But I don´t think there is any way how to test it except on a pressure testing bench and you would still need to know the values of the good/new one to have a reference for your results.
But I have an idea if you are really worried about top part of the seal wearing out. I need to have a better look once again in garage if my idea is possible, but the accumulator is a simple cylinder and its outlets are perfectly against each other. If you disconnect the two hoses from the sides, you can twist the accumulator in its mount by 180 degrees and reconnect the hoses again. This way the top of the piston becomes the bottom. If you are really pedantic, it could be done maybe once every 3-5 years as preventive maintenance. Removing the intake plenum is much simpler than it looks, should not be a big job.
boomerang
Member
- Messages
- 551
Thanks for your thoughts!
But I am not sure that the variator circuit oil pressure is max 6 bar.
Since there is that secondary oil pump connected to the lh cam shaft, providing pressure for the variator oil circuit, pressure could well be over 6 bar.
Tough I have no complaints regarding noises after mounting the variator pre lube system, I am pretty sure my accumulator is bad.
That could mean pressure peaks in the system ar not being equalized.
Will do some pressure measurements in this circuit at different temps and rpms soon.
Maybe that gives us a little more insight in what is happening in this circuit.
Black Mazerati
Junior Member
- Messages
- 55
I am also interested in this! Unfortunately your link will not work for me. I have been wondering for awhile if anyone has installed a prelube system giving many of our cars sit quite a bit between the fun!
Zep
Moderator
- Messages
- 9,879
Asked Hydac, provided with the numbers on the accumulator, if they could tell what the preloaded nitro pressure of this type of accumulator was, but they could not tell.
That is a pity, it would open up possibilities to experiment with the correct blatter type accumulator in the future and be able to restore preload pressure again, when needed after a few years
Funny, that other accumulator, also placed horizontal, in the gearbox hydraulics, IS often being exchanged at daler workshops.
But then, when this system is being tested with SD2, test sequence has a pressure test that clearly points to the accumulator when certain values are not correct.
For the engine there is no test sequence that I know of, that would ever be able to point at the variator circuit accumulator.
Honestly, I think the operating parameters for the gearbox CC hydraulics are much finer; from what Ive read anyay- its not the sort of variation that would likely even notice given the function of the pressured oil bag in the top end...!?
gotcha
Member
- Messages
- 102
I continued my top end refresh by replacing the oil pressure sender. Mine was faulty, just with the ignition on climbed to 2 bar and was slowly creeping upwards. With engine running it was permanently stuck at the top end of the scale.
I knew it is a bit of pain to replace. I removed all the connectors and brackets around to make some space but I was not able to loosen it or get any wrench on it. I even tried to grip it with pliers and I managed to turn it indeed, but only the top part. The bottom parts was firmly stuck.
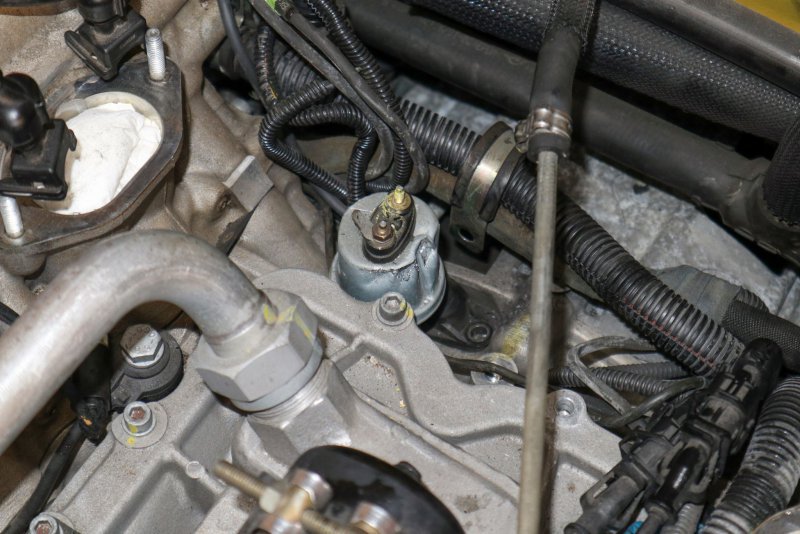
Its design is also truly excellent, because crank position sensor is right under it. You cannot remove the crank sensor with pressure sensor in place as it is impossible to slide up. And the wire from the crank sensor obstructs the access to the 24mm hex at the bottom of the pressure sensor. There is very good chance to damage the crank sensor wiring when trying to grip the pressure sensor.
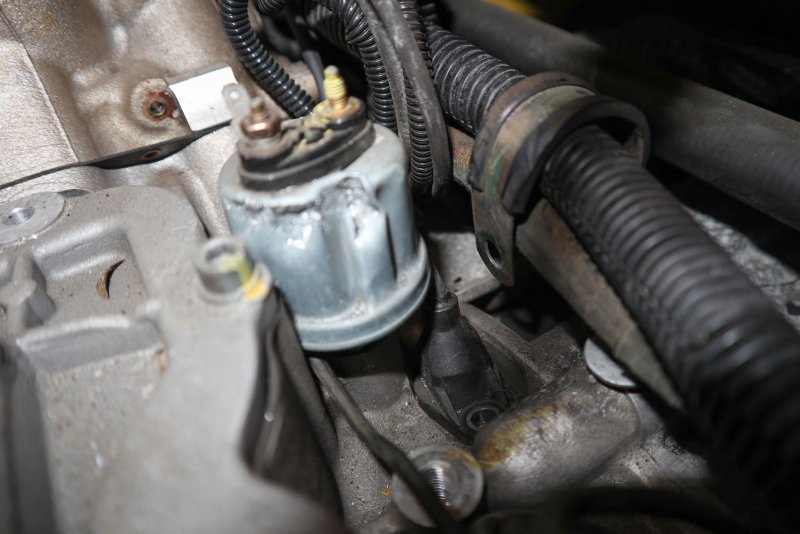
In the end I gave up. The only way I see to remove it is using a crowfoot wrench that I don't have, so same as with the engine mounts I had to drive to a friend with welding machine and make one from a 24mm spanner and 1/2" extension.
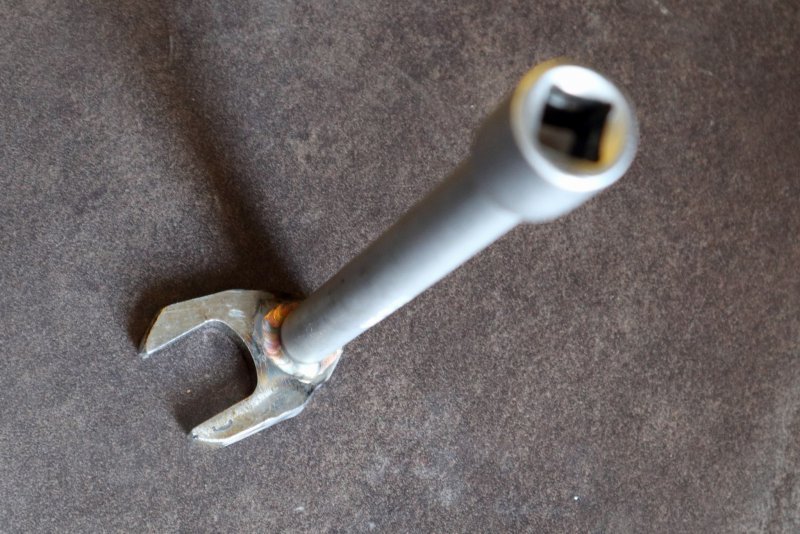
Probably the only suitable big enough 24mm tool that can fit in and get it out.
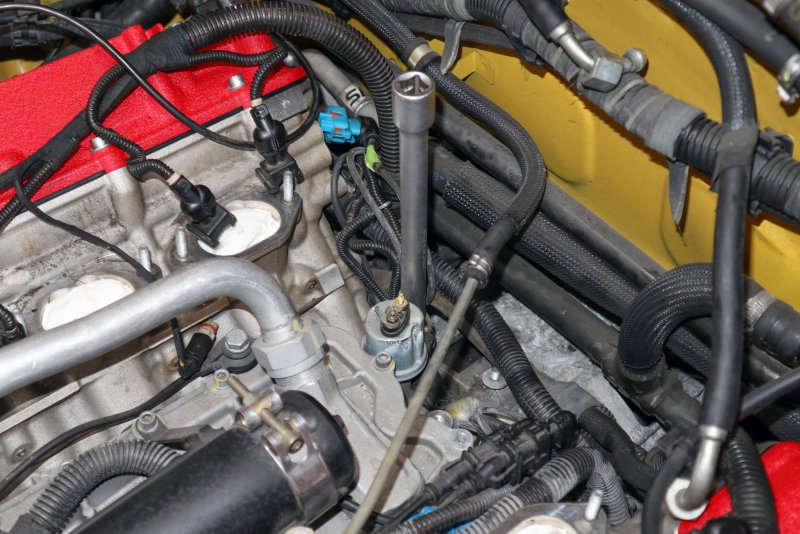
And here is the "excellent" design of the crank sensor and oil sensor holes side by side and angled towards each other on a collision course. I am sure it was impossible for the engineers to move them 1cm apart.... Or to make a small extension for the oil sensor to sit few millimeters higher, this would allow to remove the crank sensor and get to its hex easier....
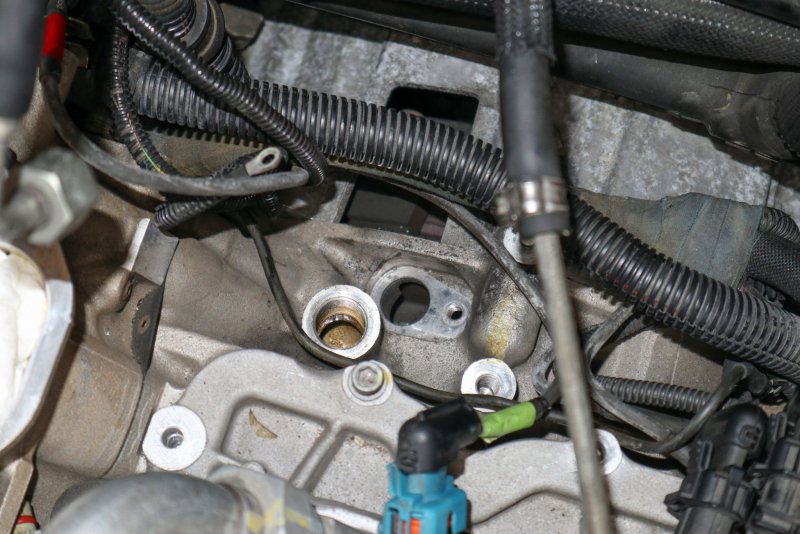
After a small victory and being excited that I got the old sensor out, I put the new one in, attached the wiring, tightened the tiny nut that holds it and messed up badly and snapped it...... Totally stupid me!!!!!! Full of excitement about the progress, with big hands and small brain I snapped the pin on the sensor that attached the wire. Great..... I ordered a new one from Germany, and all progress stopped until I get it. Money and time wasted due to my stupidity.
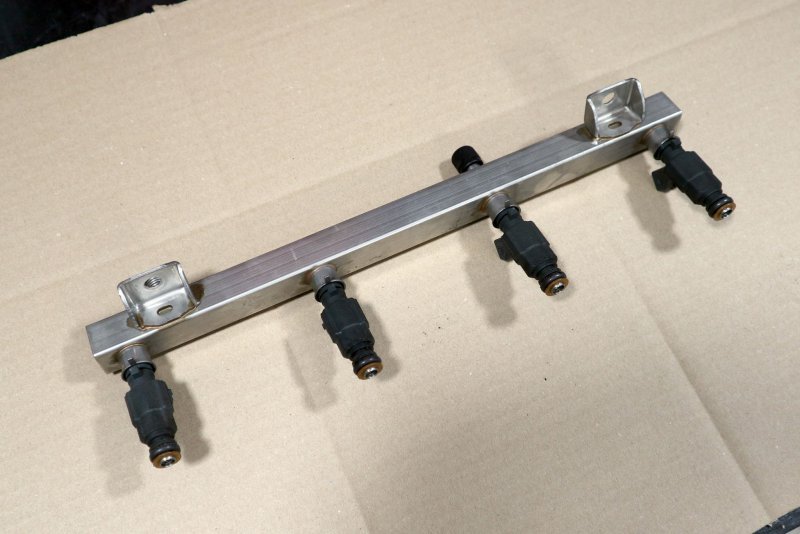
In the meantime while being stuck I refurbed the fuel rails and injectors as I had them out anyway.
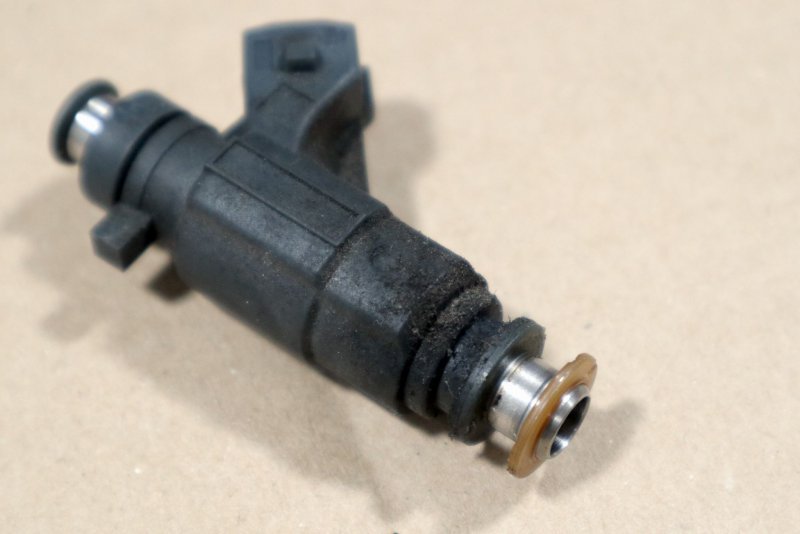
The seals on the injectors were old and hard and I had some blow by through them. Here is one dirty one, with both seals removed. I really recommend cutting the old seal in half and removing that way as it is close to impossible to stretch the old rubber over that fine plastic protector plate by the nozzle without damaging it. I did break some in the past...
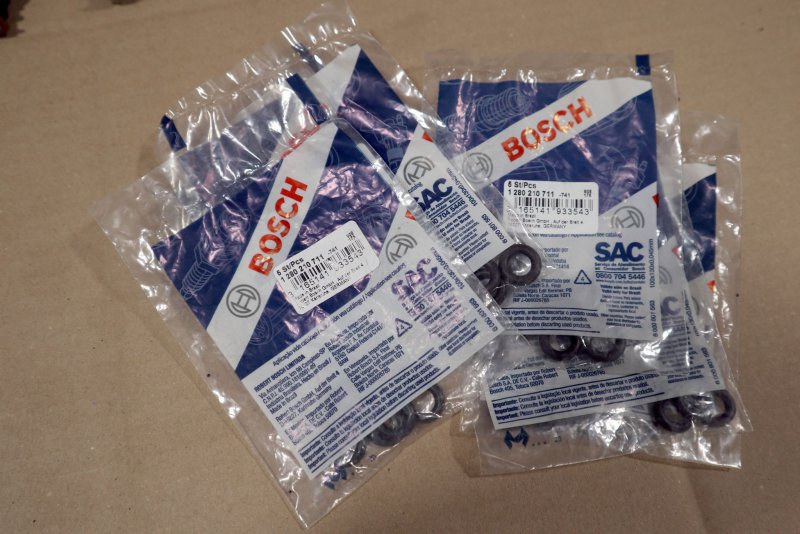
New injector seals are available from Maserati/Ferrari as part nr 133902 for 6-7€/piece what is pretty crazy for rubber O-rings once you realize you need 16 of them. Luckily, Bosch sells them under the number 1 280 210 711 and I found them locally for 0,70€/piece. So at this price I bought 32 of them to have some spare ones at home
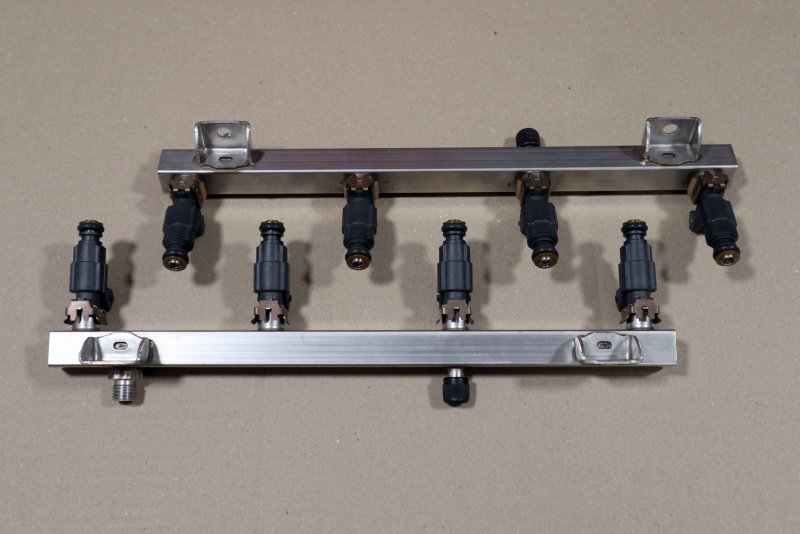
And here are the rails with cleaned injectors with new seals.
I knew it is a bit of pain to replace. I removed all the connectors and brackets around to make some space but I was not able to loosen it or get any wrench on it. I even tried to grip it with pliers and I managed to turn it indeed, but only the top part. The bottom parts was firmly stuck.

Its design is also truly excellent, because crank position sensor is right under it. You cannot remove the crank sensor with pressure sensor in place as it is impossible to slide up. And the wire from the crank sensor obstructs the access to the 24mm hex at the bottom of the pressure sensor. There is very good chance to damage the crank sensor wiring when trying to grip the pressure sensor.

In the end I gave up. The only way I see to remove it is using a crowfoot wrench that I don't have, so same as with the engine mounts I had to drive to a friend with welding machine and make one from a 24mm spanner and 1/2" extension.

Probably the only suitable big enough 24mm tool that can fit in and get it out.

And here is the "excellent" design of the crank sensor and oil sensor holes side by side and angled towards each other on a collision course. I am sure it was impossible for the engineers to move them 1cm apart.... Or to make a small extension for the oil sensor to sit few millimeters higher, this would allow to remove the crank sensor and get to its hex easier....

After a small victory and being excited that I got the old sensor out, I put the new one in, attached the wiring, tightened the tiny nut that holds it and messed up badly and snapped it...... Totally stupid me!!!!!! Full of excitement about the progress, with big hands and small brain I snapped the pin on the sensor that attached the wire. Great..... I ordered a new one from Germany, and all progress stopped until I get it. Money and time wasted due to my stupidity.
In the meantime while being stuck I refurbed the fuel rails and injectors as I had them out anyway.

The seals on the injectors were old and hard and I had some blow by through them. Here is one dirty one, with both seals removed. I really recommend cutting the old seal in half and removing that way as it is close to impossible to stretch the old rubber over that fine plastic protector plate by the nozzle without damaging it. I did break some in the past...

New injector seals are available from Maserati/Ferrari as part nr 133902 for 6-7€/piece what is pretty crazy for rubber O-rings once you realize you need 16 of them. Luckily, Bosch sells them under the number 1 280 210 711 and I found them locally for 0,70€/piece. So at this price I bought 32 of them to have some spare ones at home

And here are the rails with cleaned injectors with new seals.


