Soft touch remover > Sticky button magic

RoaryRati

Member
Messages
1,614
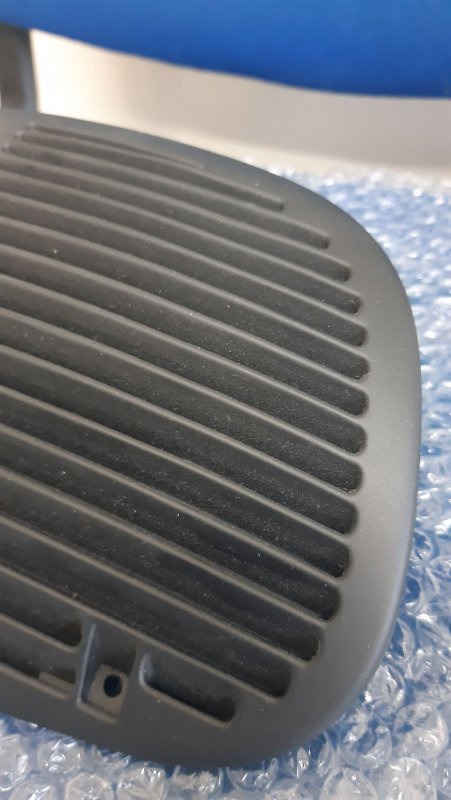
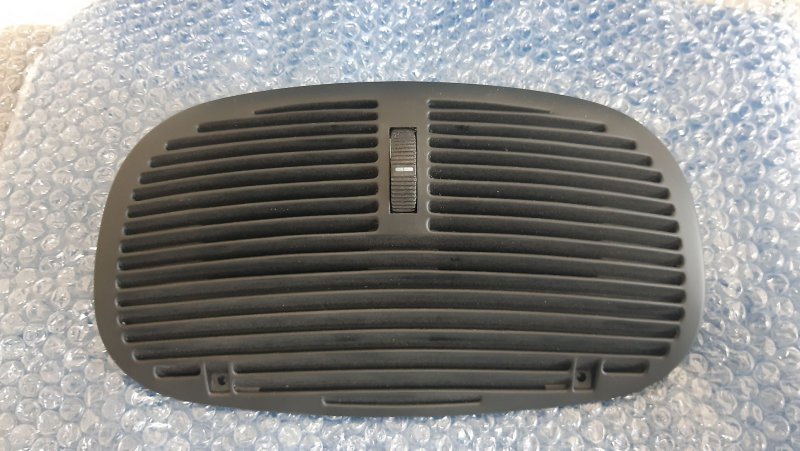
I have been chatting with a nearby 4200 coupe owner about the sticky button issue. He's in the older/classic car restoration business (RetroMarques) and in the early stages of sorting the problem - he has already done an excellent restoration on a central air vent I massacred (I'll try and bring it to show you when I collect Roary Matt) and is keen to trial more parts. So if someone has some spare buttons – window switches, vents etc - and are happy to take part in the trial contact Mark at RetroMarques to discuss.
 

MarkMas

Chief pedant
Messages
8,899
I have Ray Ban Wayfarer sunglasses that went sticky and I tried alcohol, acetone, white spirit, glue remover and any other solvents I had lying around.

Some of the sticky layer came off, returning to the shiny original, but only in some areas, so it became even worse, really, with a mottled effect.

In desperation I put the glasses (minus lenses!) in a bag with some white spirit for 10 minutes, and now I have unique Wayfarers, with a consistent matt black finish! Not sticky, but also not shiny.
 

sionie1

Member
Messages
1,316
The buttons are white plastic and then the black rubberised coating over the top.

They are then laser etched the icons so this if you remove the sticky and the black coat you end up with a white button.

SportsItaia (ie me) are considering doing this but it is incredibly labour intensive as Roland/Stickplastics does not appear to be doing this anymore…probably due to the mess and the time to do it.

Someone in the UK needs to be doing this and there is a business opportunity here for anyone interested.

But it is a very involved job and not for the faint hearted
Do the buttons come off - wouldn't a better idea to be to get a load of black buttons made up, laser etch and finish as required? Or is that too simplistic a view on how the buttons go together?
 

Devonboy

Member
Messages
1,291
So we've got something new on the shelf,
A friend of ours and the shop detailer has after tons of tinkering managed to do a specially formulated compound for Maserati/Ferrari/Lamborghini soft touch paint.
Luckily I've got tons of trashed Maserati bits to experiment on.

Alright so this cleaner reacts with the transparent "soft touch" clear coat layers and acts as a removing agent without touching the lower layers.
This makes it possible to remedy sticky buttons and trim DIY you'll just need a good quality microfiber cloth and some spare time.

At the moment we're selling it in 250ml bottles which should get you very far in a interior, pictures below if 4200/3200GT trim and a few QPV/612 bits.
€29,95 a bottle, and you'll need a bunch of common microfiber wipes.

I do need to check with my shipping agent if we can just fly over chemicals the UK.

View attachment 97726View attachment 97727
View attachment 97728View attachment 97729
Put me down for 1 unit! Let us know when we can order
 

rs48635

Member
Messages
3,181
will be interested once it is proven here in UK.
Could SportsItalia act as sole importer?
 

Mark-RetroM

New Member
Messages
6
Morning all. Apologies for coming in to this thread so late but seeing where things are going I thought it might be helpful to chip in!
I run RetroMarques Ltd, a classic car workshop and with our own bodyshop in Malvern. I started talking to paint specialists/suppliers about 2 years ago to see whether we could do something with the sticky-button affliction.
I'm pleased to say that we've finished the first part of the trial, first removing the stickiness - as luck would have it with a locally-produced detailing product - and then re-finishing with soft-touch lacquer. Annie (also on here) loaned me a dash-top vent and that's what we finished a few weeks ago - see pics.
Not wishing to step on toes or anyone else's initiatives but I feel we're close to offering a complete refinishing service, including for anyone needing it, removal of the parts from the car (in our rebuild workshop). Hope the pics are of interest (excuse the dust!!). Mark
 

Attachments

  • 20220323_Mas Grille Refinished Detal.jpg
    20220323_Mas Grille Refinished Detal.jpg
    56.4 KB · Views: 54
  • 20220323_Mas Grille Refinished.jpg
    20220323_Mas Grille Refinished.jpg
    80.6 KB · Views: 54

TimR

Member
Messages
2,731
Morning all. Apologies for coming in to this thread so late but seeing where things are going I thought it might be helpful to chip in!
I run RetroMarques Ltd, a classic car workshop and with our own bodyshop in Malvern. I started talking to paint specialists/suppliers about 2 years ago to see whether we could do something with the sticky-button affliction.
I'm pleased to say that we've finished the first part of the trial, first removing the stickiness - as luck would have it with a locally-produced detailing product - and then re-finishing with soft-touch lacquer. Annie (also on here) loaned me a dash-top vent and that's what we finished a few weeks ago - see pics.
Not wishing to step on toes or anyone else's initiatives but I feel we're close to offering a complete refinishing service, including for anyone needing it, removal of the parts from the car (in our rebuild workshop). Hope the pics are of interest (excuse the dust!!). Mark
Good to know...!
Can I ask what, if anything, you propose to do to reinstate the factory lettering and symbol markings that appear on the various buttons for us Maserati owners...!?
The issue is that the sticky goes bad, taking the paint with it - this leaves a blank white button, that needs a total restoration. New black, new soft touch, and importantly, etched symbol designation that denotes the purpose of each switch from the console...
cheers
 

Ebenezer

Member
Messages
4,487
Good to know...!
Can I ask what, if anything, you propose to do to reinstate the factory lettering and symbol markings that appear on the various buttons for us Maserati owners...!?
The issue is that the sticky goes bad, taking the paint with it - this leaves a blank white button, that needs a total restoration. New black, new soft touch, and importantly, etched symbol designation that denotes the purpose of each switch from the console...
cheers
This ^^
Eb
 

Mark-RetroM

New Member
Messages
6
The grille was black underneath and only needed the soft-touch (there is a prep stage by the way, as well as the lacquer itself). For white buttons we'd paint them first and then lacquer - as with any normal 'modern' paint process. The soft-touch is quite flexible, two of the trial items were glass coasters, painted in different colours and then finished in soft-touch - looked great.
We've previously had button logos printed off (early 911 for example) and then lacquered over the top. This is the next stage of the trial, I feel, as I'd like to make sure we can provide an OEM-comparable finish. Anything without a decal - air vents etc - shouldn't be an issue. If someone has a couple of buttons out of a car already then I'm happy to do them as a trial run 'freebie', otherwise we'll probably remove those from my own '04 Coupe. Mark
 

mowlas

Member
Messages
1,732
Maserati, Ferrari etc. would add this extra coating layer on top of the buttons and plastic mouldings to give a softer, flatter, more premium look - obviously not realising or minding the long term consequences that we all see.

So far I have removed the sticky coating from the infotainment system in the centre dash (sides and buttons) and the panel and buttons to the left and right of the steering wheel. 3 hours in total. As A.S. Motorsports and others have said, you need a good product, good microfibre cloths and a lot of patience. I wouldn't mind trying the purpose-made solution that A.S. Motorsport mention. At the time, I used "ValetPRO Citrus Pre-Wash Cleaner with citrus oils" which is used as a pre-wash for exterior dirt and grime. I used it undiluted, which gives you sufficient concentration to remove the sticky layer.

Boy oh boy, you do need nerve, patience and persistence! And you need to keep in your mind, all the time, the idea is that all you are doing is diluting and gently agitating that top surface coating layer. You need to maintain your faith that if that is all you are doing, the underlying button/moulding will retain its image and finishing. Start by gently agitating with the solution for a while to further dilute and weaken it. Only then, should you start removing it - it will come off with the microfibre cloth on the buttons; on flat plastic moulding surfaces such as the infotainment surround, I used a small very soft plastic scraper the size of a 20p coin. There should be no expectation or resignation to the notion of going back to a white plastic button! Start by experimenting and honing your technique on one of the less visible buttons and your confidence and technique will grow to tackle other areas.

After removing, you get a decent looking matt finish that, in my view, still looks premium. I finished it off with a coating of matt finish UV protector, which helps with retaining the premium finish. My next jobs to tackle are the window switches (which may need to be removed first as you do not want the solution to enter the electrics) and the climate control panel and buttons.

For the front centre and side air vents, the plastic doesn't look great once you've removed the sticky layer. They seem to be of lower quality plastic than the infotainment system and other plastic panels. I simply re-ordered new ones as they are so easy to replace. However Mark-RetroM's solution could be a more cost-effective solution for the vents.
 
Last edited:

Mark-RetroM

New Member
Messages
6
Been offered some switches/parts to further trial (thank you), so will get onto those as soon as we have them and post updates then, all. Mark
 

williamsmix

Member
Messages
566
I've just had a go at various sticky bits in my 3200 with isopropyl alcohol and a microfibre cloth, which has worked very well in terms of removing stickiness. I'm particularly please with the ECON and Circ switches and the vents which are now completely clean and usable. However, the nice original slightly textured matt black finish has been completely lost, so I'm thinking about respraying the vents. The ones in the back also have chrome damage to the rims, so I'm going to remove those for respraying with chrome paint. And I was wondering if that would work on the rim of the clock which is badly chipped(?). Does anyone know how the clock comes out; does it just pull out? The door pulls were quite difficult to clean in situ, but they're not too bad; I think I can live with those for the time being.

98423

984209842198422
 

Scaf

Member
Messages
6,555
Has anyone tried refinishing using plastidip as it would give a feel closer to OEM than spaypaint and is surprisingly hard wearing.

I plan to use it on some interior parts of my TR6
 

TimR

Member
Messages
2,731
Has anyone tried refinishing using plastidip as it would give a feel closer to OEM than spaypaint and is surprisingly hard wearing.

I plan to use it on some interior parts of my TR6
I just did the steering column shroud using it..No primer, no glossifier...just 3 or 4 coats onto the stripped back plastic. Im not going to try the buttons as the stripping process wasnt easy enough for those delicate buttons IMO...Im waiting for a proven remover. Or get a pro to do them...
I wanted a match with existing trim. God knows why- its freeking 'orrible..! :welcome1:
 
Last edited:

Scaf

Member
Messages
6,555
I just did the steering column shroud using it..No primer, no glossifier...just 3 or 4 coats onto the stripped back plastic. Im not going to try the buttons as the stripping process wasnt easy enough for those delicate buttons IMO...Im waiting for a proven remover. Or get a pro to do them...
I wanted a match with existing trim. God knows why- its freeking 'orble..! :welcome1:
As you say it’s easy to use, interesting how it’s stands up to wear, but I suspect it will be fine.

I have done the faded plastic chin spoiler on my TR6 - looks great and I expect it will stand up well to Road rash, my sons Golf spoiler was perfect after a few years of use.