F1 Bleeding

Evo Cymru

Member
Messages
688
Hi all,

Hope someone may be able to help here!

Having changed my pump in the last few months and getting the transmission all working again, I recently found a leak under the car. After changing one of the pipes for the pump and connecting back together I tried to fill it back up and get it going again. This time, however, it is not going so well!

The pump primes well enough but over time seems to struggle more and more (over several door openings) until the pump doesn't work at all. There are not any obvious leaks from any of the pipes or connections now and I can bleed air out of the system and repeat the process but the same happens again. Each time the pump returns to priming OK so I assume this is OK?? Can anyone guide me through the bleeding process just in case I'm doing it wrong?

Basically I fill up the fluid then open the car with the remote key which primes the pump. As this happens I open the bleed screw and allow any air out. When the pimp finishes ( about 5/6 secs) I then close the bleed screw completely. I repeat this several times to make sure I get all the air out (I think!).

I'm starting to think I got lucky the first time and I'm doing something wrong-so I'm thinking:

Should I be using someone to open the door instead to prime the pump - is there any difference?
Should I try to close the bleed screw before the pump stops?
Is there more than one bleed screw?
Or (even worse!) have I somehow got air into the accumulator part of the system?
Or ultimately do you need a Maserati diagnostic tool do bleed the system properly?

Sorry for the long post but I'm really starting to get ****** off now!

Thanks for any help,

Olly
 

conaero

Forum Owner
Messages
34,630
Wish I could help but I have never had to do it. I am sure someone will be along shortly to tell you how its done.
 

CatmanV2

Member
Messages
48,781
I imagine Craig will be able to describe the process. He's probably full of turkey right now, though

C
 

voicey

Member
Messages
660
Where are you? If you can get the car to SE3 this weekend I'll put the diag on it and bleed it properly (FOC).
 

Evo Cymru

Member
Messages
688
Thanks for the offer - sadly I'm many miles away in Wales! Not so much traffic though.....!

olly
 

CraigWaterman11

Sponsor
Messages
762
Not full of turkey just yet.... I'm trying to figure out what part of the system you are trying to bleed out. It seems you are speaking about just bleeding air out of the actuator itself but this isn't going to be sufficient if there's air in the hydraulic system up to the pump reservoir. Let me also say be careful not to over heat your pump while bleeding the actuator out. The first thing I think you should have done is bled the system through the bleed valve next to the quick disconnect usually has a black rubber dust cover on it. It looks identical to a brake bleed valve on the back of a brake caliper, only its bigger. Stick a brake vacuum bleeder on there the same way you would for bleeding the brakes out. There's actually two bleed valves on that part of the hydraulic system one by the quick disconnect and one on the bell housing on the left side opposite side from the F1 system wire harness. Some models have it right on the bottom of the bell housing as you look up. I think by trying to bleed it first from the actuator you probably pushed air into the hydraulic system. You need to start actually by bleeding one of those those two separate bleed valves first. If you would have done this you wouldn't of needed to bleed the actuator at all.

So let's start from the beginning of this scenario..... after doing the pump if you would have just bled the system by the bleed valve by the quick disconnect coupler you would have been fine. All you need is a good vacuum bleeder. Just like your brakes there cannot be any air in the hydraulic system or you could possibly damage something. A system like the Leonardo, is basically pulsing the F1 pump creating pressure so that you can open the bleed valves and press out all the air. This is similar to having your friend pump the brakes hold the pedal to bleed them out. However, after studying the F1 system I realized it doesn't have intermediary stop valves to control hydraulic fluid. So if you create a vacuum at the bleed valves, just like brakes, it will suck all the fluid down removing any air bubbles that have been trapped. This will also keep you from taxing your F1 pump or over heating it if you are doing it without the computer. As always just make sure you keep the reservoir topped off while doing this. Now the bleed valve on the bell housing is there so that after you replace the clutch and split the hydraulic lines you can bleed all the air out from that point. Additionally, when you decide to flush your entire system this bleed valve can be used. For your situation do this....... bleed the system from the bell housing. This will completely bleed the hydraulic system all the way out.

Put a Mity Vac or the like vacuum bleeder (you can use a pneumatic one as well which will make it much easier) on the nipple of the bell housing bleed valve. Don't use the caliper bleed nipple connectors just use the clear hose that comes with the kit. You will see that the hose will fit tight like it's supposed to. Open the bleed valve it's 12 mm I think or maybe 14mm I cannot remember off hand. Continue to suck all the fluid out until the reservoir is almost empty. Fill the reservoir up again, suck it down half way. Fill it to the top and you will be done. Now to be honest only about half of that reservoir needs to be empty before you have bled it all the way out. I'm using an over abundance of caution on the internet for you because I really don't know what you have done there. Now what you are going to think is that you want to bleed the line until you no longer see air bubbles from the clear tube, however bubbles will be created from around the bleed valve as it begins to vacuum. Don't worry about those slight bubbles, go by the volume of liquid I'm asking you to remove from it. You are only going to open the bleed valve enough until you see the fluid flowing through that tube. Don't open it so much that you see that bleed nipple loose and moving back and forth. It doesn't need to be open that much. After you have removed this much fluid, create a good vacuum on the pump by slightly closing it a little at a time, and then tighten it all the way down. After wards see if your pump is up and operational. What I am hoping is you will be good to go. You can then attempt to bleed the air from the actuator if you wish (might not be necessary but not sure if you actually pushed aerated hydraulic fluid through to the actuator or not). As you have noticed this is different from bleeding air out of the actuator. I would have uploaded photos here for you to show you the valves and where/why the valves are in the places they are but I'm with family in another state for Thanksgiving. You can look for the thread I started on changing the clutch out under the title "torque tube and bell housing removed". I actually show photos of how I did it there I think. I will check back here periodically to see how you get on or whether you have any other questions. If some of this seems unreadable, or confusing please forgive me I am typing on a tablet.
 

Evo Cymru

Member
Messages
688
Thanks Craig - that great! Will check your other post and have a good look under the car tomorrow!

Olly
 

Evo Cymru

Member
Messages
688
Quick update!

I have drained the oil out completely and checked the pump operation independently - this seems OK so hopefully I haven't damaged it. I have reconnected all the pipes after checking for any possible blockages (just in case) and am just waiting to get some more oil now. I have located the other bleed nipple as mentioned by Craig so should be good to try again.

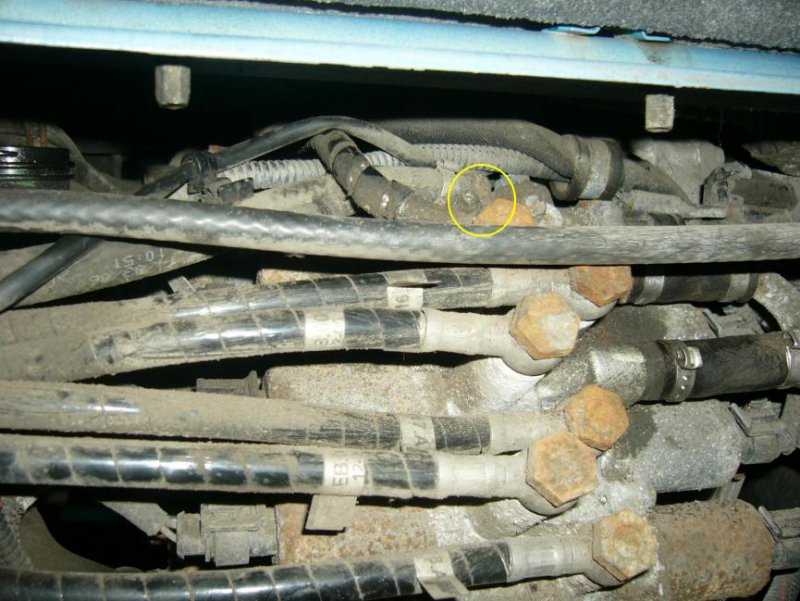
Just to clarify this is the other bleed valve I could find and used before:

Bleed Valve.jpg

Olly
 

CraigWaterman11

Sponsor
Messages
762
Olly, the bleed nipple is directly behind the quick disconnect coupler. If you are looking from the view in that photo you posted it is to the left directly under the Actuator. The quick disconnect coupler is right in front of the bleed nipple. I really wish I had access to a regular Lap top right now, I have tons of photos. That resembles a bleed nipple but it's not, I remember when I completely changed the hydraulic pack (Solenoid block, Actuator, Accumulator, etc.) off of a newer lower mileage Quattroporte with my Spyder, I thought it was one to. I inspected it only to find it wasn't. It is not on the solenoid block at all. That one line by the yellow circle you used going to the top is actually the hydraulic line that goes up, and back down to the quick disconnect coupler, and bleed nipple. The other five lines are going to the actuator. Follow that top line and you will see the quick disconnect coupler and the bleed nipple sits behind it.
 

Evo Cymru

Member
Messages
688
Cheers Craig - I have found the other one and will be using that to bleed the entire system next.

Olly
 

CraigWaterman11

Sponsor
Messages
762
Okay let me know how you get along, I will check back and forth periodically as I know sometimes it's a pain diagnosing things over the web. I have tons of pics brother, I'm sorry I just didn't bring my laptop, cutting and pasting links to upload the URLs are a pain on this Surface Pro.
 

Evo Cymru

Member
Messages
688
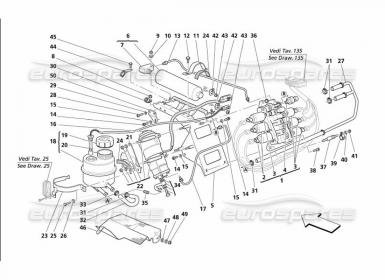
Thanks again Craig! This has got me thinking now about what I was adjusting!? This seems to be connected to the pressure switch (4) - see diagram below:

F1 Pump.jpg

Is this a bolt to close off the system for changing the fluid or in case of leaks? In which case by screwing this all the way in was I simply cutting off the system?? This would explain why the pump found it harder and harder to build more pressure...:frusty5:

Olly
 

CraigWaterman11

Sponsor
Messages
762
Oh Olly! Yes, I thought you were bleeding the air out of the actuator from the three screws on the back of the actuator! I did find it odd that you were bleeding air so easily because I've always needed to remove the actuator and trigger the gear selection solenoids to make sure the air was bled out properly. I thought you were just circling that for reference, I didn't think you were actually milking it. Can you remember exactly how you found it as far as do you remember how many turns it was in or out? I thought it was a set adjustment screw for controlling pressure, at least that's what it resembled to me. Let me see if I can find it in the service manual to see if that's correct of not. I've never adjusted it or removed it before so I've never looked up what it was for or whether that's what it controlled or not. But if my postulation is correct then you actually could of completely shut the system like closing a faucet from allowing the correct psi/bar pressure fluid from going through like it's suppose to. The correct pressure hold is right about 45-48 psi but how are we going to know that now unless you can remember exactly where that set screw was at or if you have a computer that will show you hydraulic pressure reading like the Leonardo or etc.?

I guess you already know now that I was talking about #35 on the diagram? (Well you had two diagrams up there to begin with now there's only one, the bleed valve is #35 on that other diagram you had up not this one.) I'm very sorry Olly had I been home I would of just posted photos from the beginning it makes it so much easier to follow. Let's hope we are wrong about the pressure screw let me see if I can find it in the service manual.
 

CraigWaterman11

Sponsor
Messages
762
Olly, I think you will be fine. I couldn't find anything in the service manual about a pressure port or set adjustment. Also from just digging around it seems even the parts suppliers are saying it's just a nut albeit a weird one that really resembles a pressure set screw. I sent all of my old hydraulic set up to another forum member who's an air craft mechanic and was familiar with hydraulics so he can take my other actuator apart. If I was home and still had it I would just go look it over for you but if it was truly a pressure set screw it would of said it either in Maseratipartsusa, or Eurospares, at least I would hope so. I know when I looked it over initially that was the first thing I thought to myself. Give me another day, I will be home tomorrow I have another mechanic I know who I'm going to ask about it. I will be back in Boston tomorrow night.
 

Evo Cymru

Member
Messages
688
Cheers again Craig for all your help - feeling a right numpty here!:frusty5::frusty5::frusty5:

I'm hoping that it's just a nut to close that part of the system rather than setting the pressure - the pressure switch should do this I think.

Oh well a person who never made a mistake never made anything...plus I've learnt lots about the F1 system!
 

CraigWaterman11

Sponsor
Messages
762
No worries Olly, it's in mistakes we learn a lot of things. I wouldn't think twice about it if I was you......btw I already contacted the guy about it. I'm hoping he will get back to me by tomorrow. I honestly don't think you have messed up anything to seriously. Did you attempt to bleed it out yet?

Here's some photos for you since I'm home now. This is the left side of the bell housing, look up through you're exhaust, it's the yellow box with the line running to it. That's a rubber dust cover on the nipple that comes right off:

IMAG1730.jpg


IMAG1929.jpg

Here's the one on the side of the gear box, it's right under the Actuator, in the photo I have the actuator removed, but you can see the dust cap on the end of this one as well.

IMAG1841.jpg

Here's a photo under the car of it with the gear box intact and Actuator in place....look at the bottom of the photo and you can see the dust cap:

IMAG1697.jpg
 

Evo Cymru

Member
Messages
688
Hi Craig,

Much thanks again! Very useful photos there - will have another closer look later in the week. Too much work pressing until then unfortunately!

Olly