Radiator, are you aware !!!!!

deano

Junior Member
Messages
235
just thought ide share this with you,and accept my oppologies if its been discussed on here before,
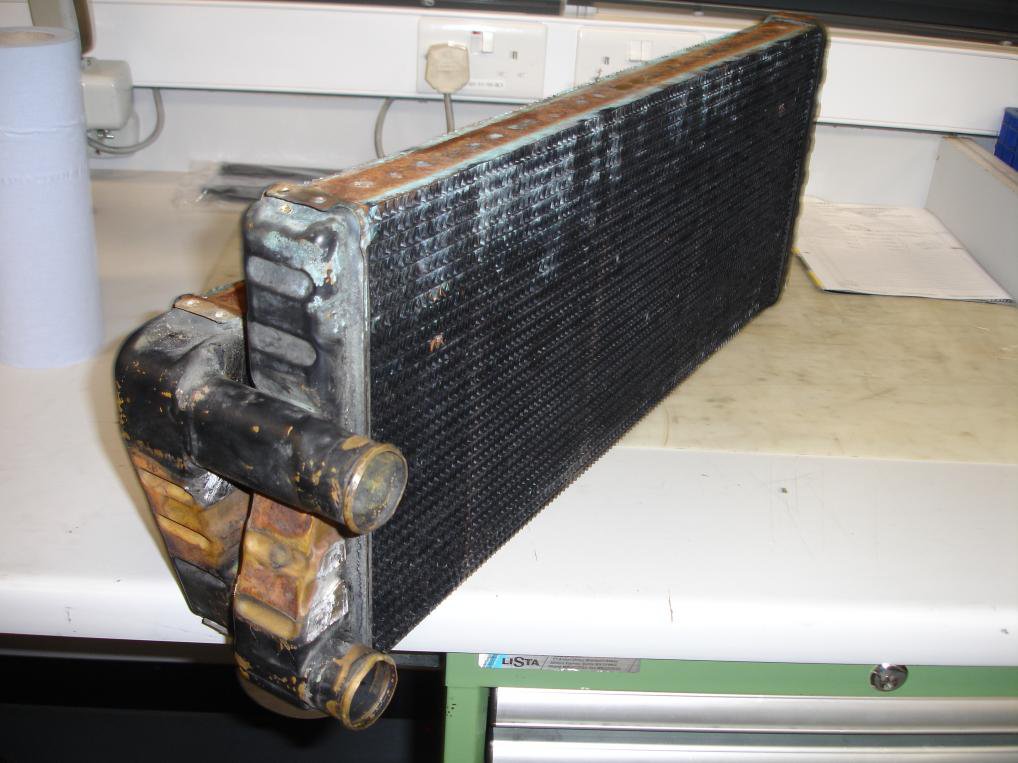
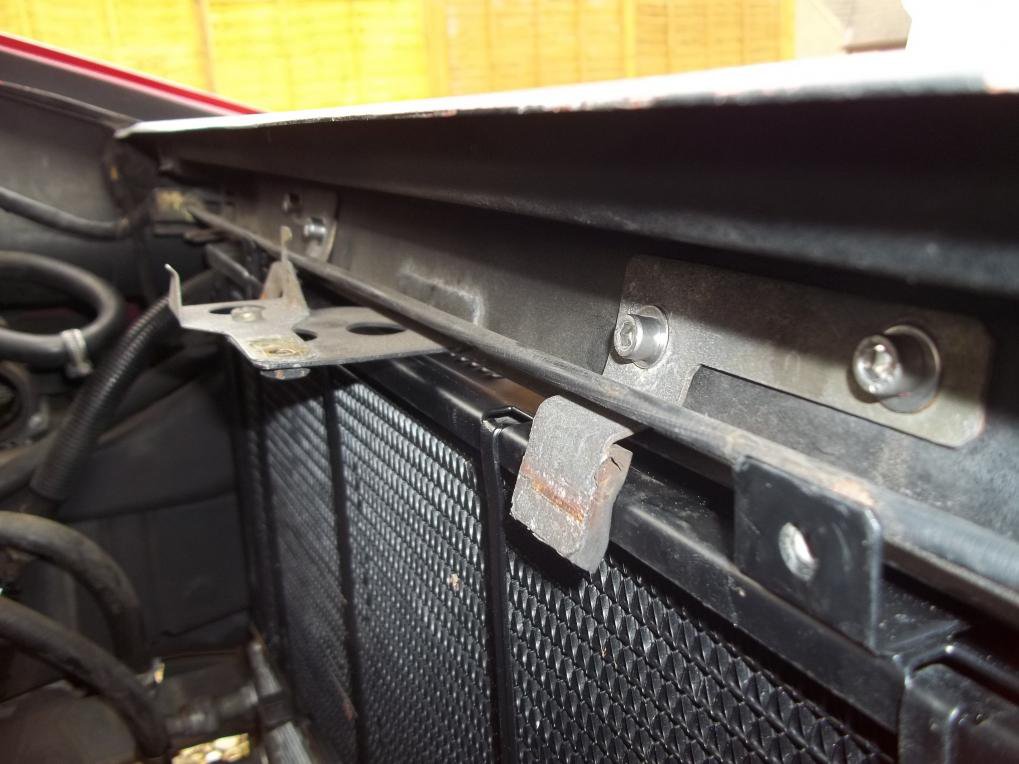
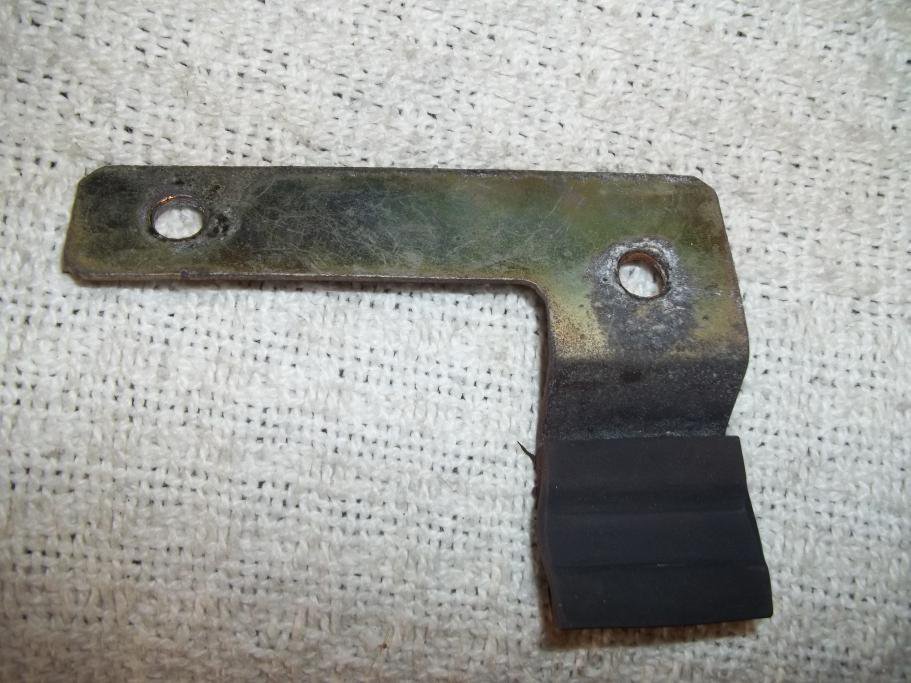
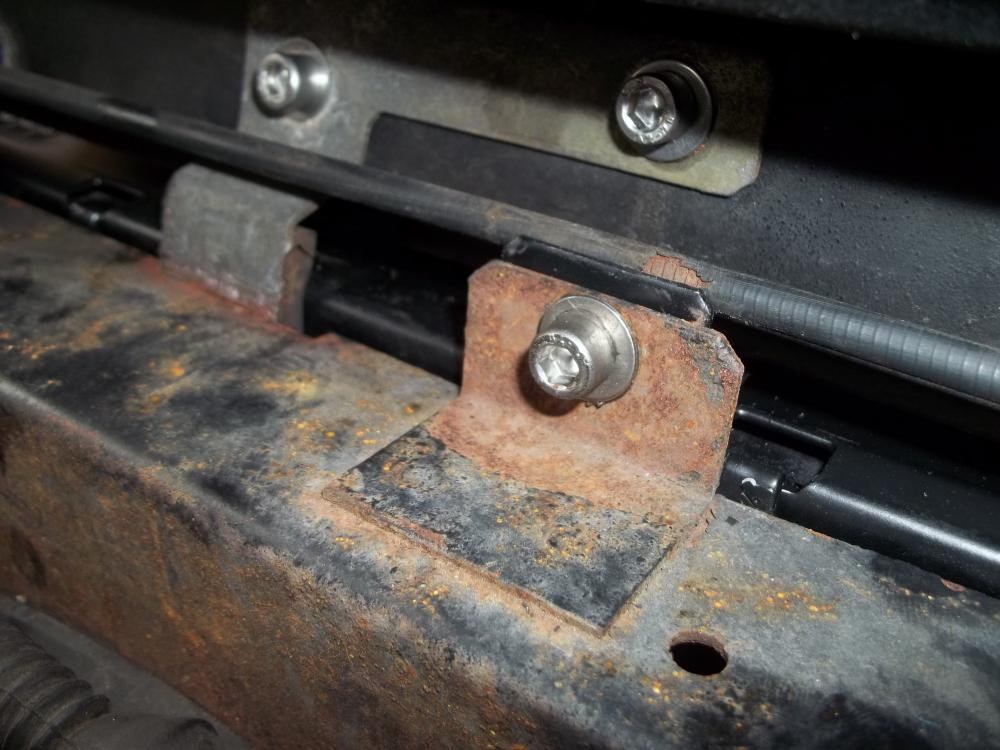
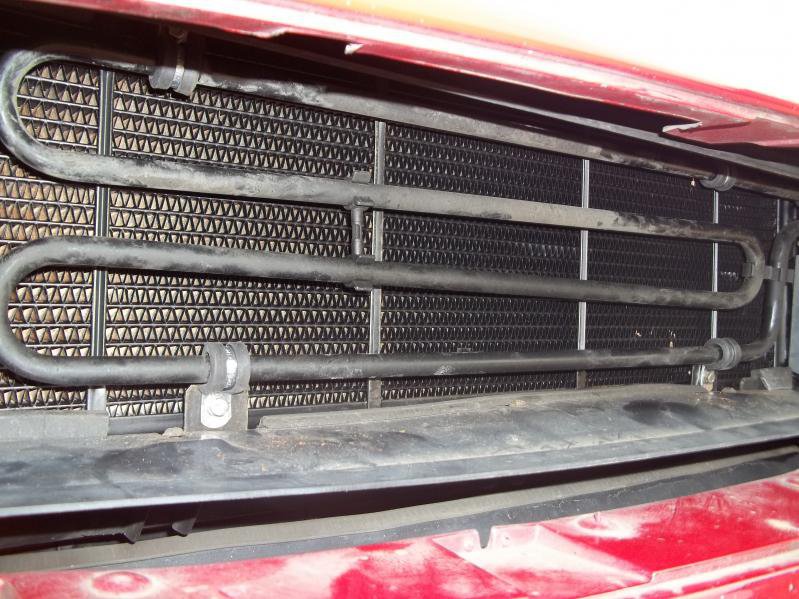
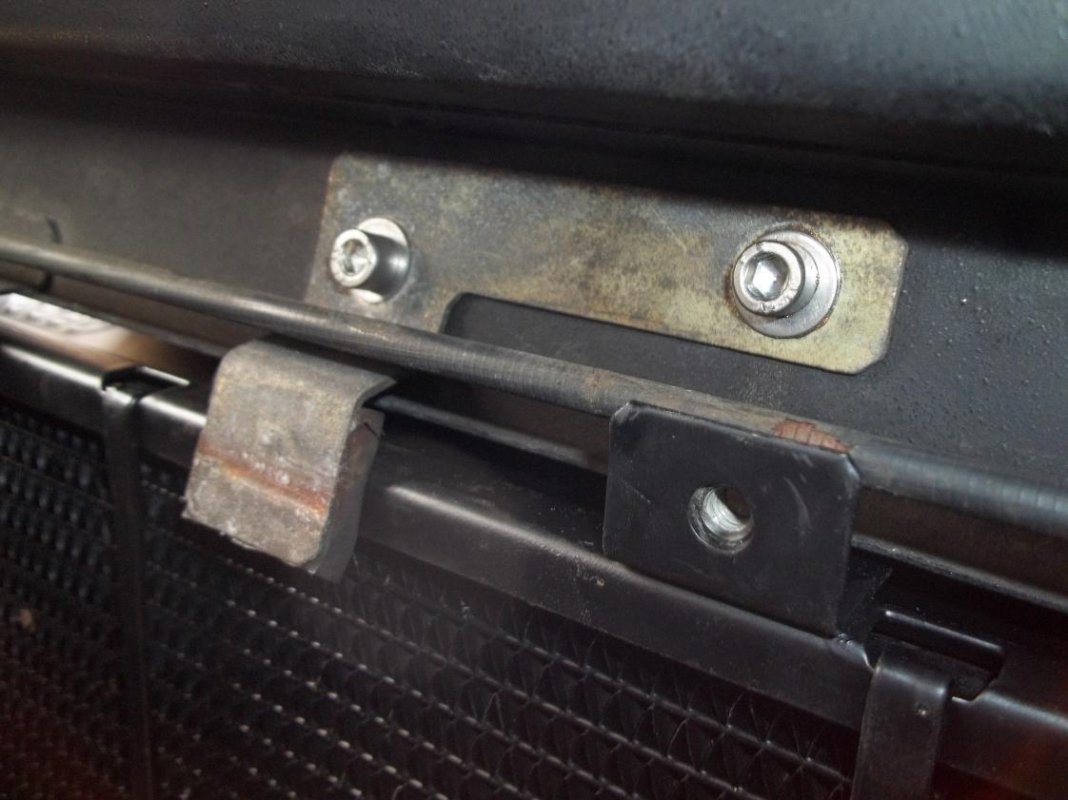
Having experiancing a coolant leak from my radiator on my 3200.and in the line of work i am in i decided to take a closer look at the radiator in veiw of possibly re core'ing it,If you are not aware this is a double radiator ith no visible signs on how the two radiators are linked,upon removing the pop rivets and solder securing the frame work all became apparent,
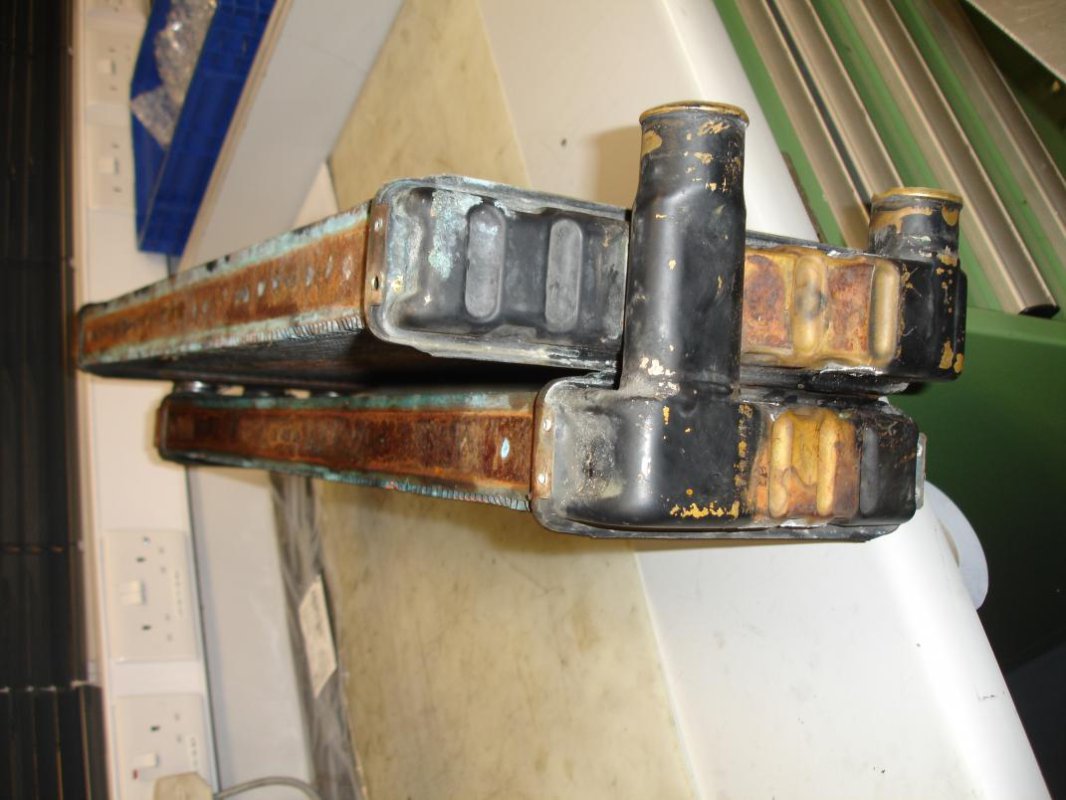
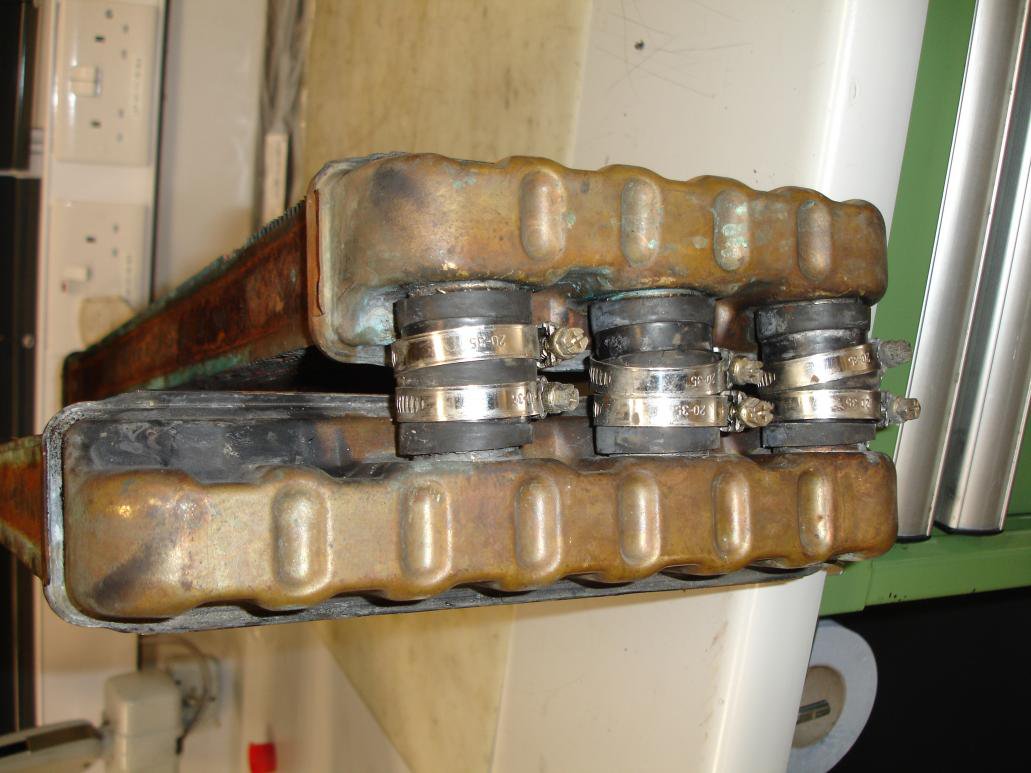
The two radiators are linked together behind the framework via 3 of stub tubes joined useing 3 very short rubber hoses,As these cannot be seen until the radiator framework is removed and seeing how mine have slight signs of cracking (though not leaking from here) suggest that anyone who has been diagnosed with a leaking radiator check these hoses before buying a new rad that may not be needed.
This appears to do bone this way to aid assembly of the radiator even though a poor engineering solution to the problem,especially without access or visibility to change them.
 

conaero

Forum Owner
Messages
34,639
Nice one Deano, I did not know that.

Whilst its out, get the main hose flanges strengthened too, this is where most usually go.
 

davy83

Member
Messages
2,826
Thanks for this, definitely one to remember BEFORE changing radiators! I have just replaced the AC and oil radiator on mine and they are a pest to get into for sure.
 

deano

Junior Member
Messages
235
the problem is you cannot check them unless you un solder and de pop rivet the framework,ill upload images once ive sorted out how to do it,lol
 

deano

Junior Member
Messages
235
only visible when framework removed,clearly showing the double radiator and the rubber connector pipes,which are not visible or accesable,but a potential failure and cause for alarm
 

Attachments

  • DSC09114.jpg
    DSC09114.jpg
    91.3 KB · Views: 264
  • DSC09115.jpg
    DSC09115.jpg
    87 KB · Views: 258
  • DSC09116.jpg
    DSC09116.jpg
    90 KB · Views: 262

bill

Junior Member
Messages
247
Mine were leaking; had them re-cored and replaced the hoses with silicone for durability as the original ones looked well past their best. all for £120
 

rs48635

Member
Messages
3,181
Mine were leaking; had them re-cored and replaced the hoses with silicone for durability as the original ones looked well past their best. all for £120

That sounds like a bargain! Did you strip and re-fit yourself?

Deano

Are those rubber hoses at the N/S (passenger seat) of the engine bay?
 

bill

Junior Member
Messages
247
Yes, I took it out myself. by the end though I thought it might have been easier to take the engine out before hand!! Took it to a local radiator man. Unfortunately, he has since retired!! Have you had any quotes?
 

deano

Junior Member
Messages
235
i didnt think it was a bad job removing it,just the amount of items you have to remove prior to getting at it,
 

Paul L

Sponsor
Messages
471
Hi Deano,

Great bit of info on this and look forward to seeing a step by step guide, if possible.
 

deano

Junior Member
Messages
235
Right here goes with boring you all on a radiator removel.It is a simple job but time consuming,due to the amount you have to remove just to get at it,though if a comprehensive toolkit is available to hand then it should take slightly less time,unfortunately mine was at work,
Firstly start by removing the fromt grill.this is retained by four of self tapping screws on the top underside face and retained at the bottom by four push fit clips,Once the grill is removed you will see the Power steering cooler bolted to the main radiator using four of M5 hex head bolts and P clips,remove these bolts and the power steering cooler will support itself whilst the main radiator is removed.
The throttle body intake pipes then need to be removed,this was kept as a unit aswell by removing the flexi hose to throttle body then trace the black compressor pipes back and release from the charge cooler out rubber connector pipes.
then remove the top and bottom radiator hose,i kept these in as big a unit as i could to save on work,remove the jubilee clips retain the top and bottom hose to the radiator itself and trace back to engine then rome these jubilee clips.the top radiator hose also has a small pipe coming off for the heater bypass,this was removed from the heater return pipe itself.
both airbox covers and filters will need to be removed and the complete airbox on the o/s drivers side will need removing,it is retained with four of bolts,two hidden from within the top of the airbox and two through the side at the bottom,(not a good description i know,)(but all will become clear once youve started).
With all this out the way clear acces is available to the radiator fan pack,which has a wiring loom attached,there are two spade coonectors at the bottom in the centre to be pulled off,both block connectors to the fans themselves need seperating,there is also a rely mounted on the top face of the rad pack also.the loom can then be folded back out the way,
The fan pack is now free to be removed.and is retained by four M6 bolts two at the top into the slam panle and two nuts at the bottom accesable from under the vehicle with the need for a ramp.now the fan pack can be withdrawn.
Access is now available to the radiator itself.this is retained by only two "L" Shaped brackets,retained to the front panel via 2 of M6 bolts on each.once these are withdrawn the radiator is free to be slid towards the engine as i have previously shown the radiator is a"P" SHAPE and the smaller of the two radiators slides slightly into the grille appertureand sits here on two rubber pads which can easliy become disslodged,the larger radiator sits on top of the combined engine and gearbox oil cooler,again on two rubber pads.
whilst the radiator is out it maybe worth checking and or changing the compressor in and out and charge cooler out pipes,as these are easily accesed now,and found mine to be perishing,
fitment was just a reversal of the strip,but well worth renewing nylock nuts that retain the previously removed airboxes,as it does not bear thinking about what will happen if these were to come adrift,
Hope the images help in understanding what i have wrote,and yes given time i would spray my fan pack,LOL.
 

deano

Junior Member
Messages
235
radiator removal images

attached image staken to aid radiator removal and fitment
 

Attachments

  • 100_0890.jpg
    100_0890.jpg
    94 KB · Views: 97
  • 100_0887.jpg
    100_0887.jpg
    88.8 KB · Views: 90
  • 100_0885.jpg
    100_0885.jpg
    93.8 KB · Views: 86
  • 100_0888.jpg
    100_0888.jpg
    95.2 KB · Views: 88
  • 100_0889.jpg
    100_0889.jpg
    91 KB · Views: 88
  • 100_0891.jpg
    100_0891.jpg
    91.2 KB · Views: 88
  • 100_0884 - Copy.jpg
    100_0884 - Copy.jpg
    97.8 KB · Views: 89
  • 100_0886.jpg
    100_0886.jpg
    90.7 KB · Views: 89

SteveM

Member
Messages
542
Deano, great write up and source of info having just repaired my Radiator. Only issue I had was removing the power steering cooler P clips as cross head bolts had rusted in and I had to take a junior hacksaw to the P clips and replace with new.
For those contemplating the job themselves then I replaced the 3 hoses with silicon hoses 28mm ID each 45mm long (Available from Roose motorsport who I have been working with the replacement of the 6 silicon cooling pipes for the 3200). Fortunately only the smaller front radiator required recoring which was done by Advanced Autocooling in Bristol (apparently mine is the 3rd 3200 they have done) for £130 + VAT. They indicated that the larger rad would have cost around £180 to recore.
The other bonus was that I was able to get direct access to replace oil pressure sensor without the radiator in place which avoided need to work from underside to move Air con compressor. The only tricky bit was using spanner on sensor with oil filter in place but with top tip from Mike R I sacrificed an old 19mm spanner and used a grinder to reduce thickness of spanner jaws. So two jobs done and ready from Bristol Auto Italia next weekend.

Steve

DSC_0260.jpg