
You are using an out of date browser. It may not display this or other websites correctly.
You should upgrade or use an alternative browser.
You should upgrade or use an alternative browser.
GS sticky Buttons
- Thread starter safrane
- Start date


adam01
Member
- Messages
- 1,079
Hi all in Oz. Ross can post to you direct if you email parts@maridian and pay direct as the accounts have to show is gone abroad.
Txs Peter
Will contact other 2 & arrange from here
Pls confirm full email if u have it - above is incomplete
safrane
Member
- Messages
- 16,863
Txs Peter
Will contact other 2 & arrange from here
Pls confirm full email if u have it - above is incomplete
parts@meridien.co.uk
adam01
Member
- Messages
- 1,079
Txs msg sent
Fair2
Junior Member
- Messages
- 211
Txs Peter
Will contact other 2 & arrange from here
Pls confirm full email if u have it - above is incomplete
Peter,
Money sent direct to MM as per Adrian's instructions.Thanks again for organizing this.
Robert F
adam01
Member
- Messages
- 1,079
Robert, is that for all three Ozy purchasers?
Will post a how to later today as I will be fitting mine later
Peter
Yes - 3 OZ orders paid direct to MM
txs
safrane
Member
- Messages
- 16,863
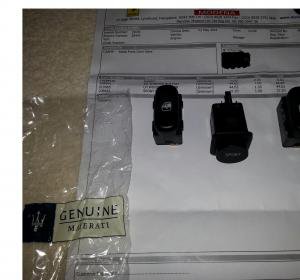
Fitting the new items
Fitting the three new items;
Tools - 2.5mm Allen Key, Slotted Screw Driver, broad lolly-pop stick or flat bladed tool, masking tape, tea.
Time aprox 40-60 mins
Old switches in situ, you can see the damage to the rubberised coating esp on the sports button. This is caused by the use of aggressive cleaners.

1) Turn off the power, as the last thing you want to do is short anything out! - I used the battery isolator in the boot.
2) Mask off the surrounding area as you do not want to slip with the Allen Key and scratch the anodised metal plate or the Carbonfibre above it.
3) Using the Allen Key remove the 4 screws holding the plate. These were a little stiff at first but after a few turns they eased out. Try to keep them upright as the heads could come into contact with the side of the chamfered hole and remove or scratch the paint. Also make sure your key is a snug fit to avoid damaging the head.
4) Once all the screws have been removed I used a lolly-pop stick to leave the unit out taking care not to damage the surround or the leather trim. Do not use a screw driver as the sharp edges may scratch or cut the trim.
5) One out you can turn the unit over and rest on the area in front of the handbrake...and admire how flimsy and cheap it looks! I placed it onto a cloth to avoid any scratches

6) Using the small slotted screw driver undo the 5 small screws holding the centre switch plate in place, they are positioned like number 5 on a dice.

These are very small screws...and easy to drop, and a bugger to find afterwards

7) Once removed you can then pull off the electric connectors. Make a note of what goes to what to avoid confusion at a later time. Be careful with the plastic its thin and flimsy.
8) Once the connectors are off you can then remove the actual switch. It is held in place by two small plastic spring clips, not as you would think by the more heavy duty metal ones on the new switch...however I concluded this was because of the flimsy back plate which would split under pressure if it did and these are obviously a universal part. You will also note that there are two sheaths on the original part that are not on the replacement from Maserati. These have to be removed and fitted to the new ones.
The chrome ones are clipped as per the photos below and I have highlighted the clip point of which there are two. NOTE! these are handed and must be placed on the right switch to the right hole to prevent fouling.
I found it easier to fit the item in place before the chrome surround.


9) Once you have swapped the parts over you can re fit into the plastic backing plate ready for re fitting to the metal one, but not before doing the window switches.
10) The window switches have two small screws holding them in place, one of which is obscured by the multi switch unit. Before you remove them mark each one as again these are handed and have an up/down orientation.
11) Again the window switches have a extra sheath which has to be swapped over, The actual window lifter switch is inserted into the sheath points last from below
You will note the part number if anyone wants to do some goggling at some stage to find an alternate supply.

12) Once you have swapped the parts over, re-fit taking care to ensure your markings line up as if you have them the wrong way round it causes the switch to bind.
13) I decided to swap some of the switch round as the unit is clearly designed for the Left Hand Drive market. This is easy to do, but as pointed out above the chrome surrounds need to stay in the right holes as their pins foul the neighbouring holes.
14) Re fitting is easy, just take your time not to scratch anything...the Allen Screws feel very tight and the small screws look like they could easily strip the threads off the metal backing plate so please take your time
14) Finished article...now for some tea, good luck to you all and drop me a line if you get stuck!

Fitting the three new items;
Tools - 2.5mm Allen Key, Slotted Screw Driver, broad lolly-pop stick or flat bladed tool, masking tape, tea.
Time aprox 40-60 mins
Old switches in situ, you can see the damage to the rubberised coating esp on the sports button. This is caused by the use of aggressive cleaners.
1) Turn off the power, as the last thing you want to do is short anything out! - I used the battery isolator in the boot.
2) Mask off the surrounding area as you do not want to slip with the Allen Key and scratch the anodised metal plate or the Carbonfibre above it.
3) Using the Allen Key remove the 4 screws holding the plate. These were a little stiff at first but after a few turns they eased out. Try to keep them upright as the heads could come into contact with the side of the chamfered hole and remove or scratch the paint. Also make sure your key is a snug fit to avoid damaging the head.
4) Once all the screws have been removed I used a lolly-pop stick to leave the unit out taking care not to damage the surround or the leather trim. Do not use a screw driver as the sharp edges may scratch or cut the trim.
5) One out you can turn the unit over and rest on the area in front of the handbrake...and admire how flimsy and cheap it looks! I placed it onto a cloth to avoid any scratches
6) Using the small slotted screw driver undo the 5 small screws holding the centre switch plate in place, they are positioned like number 5 on a dice.
These are very small screws...and easy to drop, and a bugger to find afterwards
7) Once removed you can then pull off the electric connectors. Make a note of what goes to what to avoid confusion at a later time. Be careful with the plastic its thin and flimsy.
8) Once the connectors are off you can then remove the actual switch. It is held in place by two small plastic spring clips, not as you would think by the more heavy duty metal ones on the new switch...however I concluded this was because of the flimsy back plate which would split under pressure if it did and these are obviously a universal part. You will also note that there are two sheaths on the original part that are not on the replacement from Maserati. These have to be removed and fitted to the new ones.
The chrome ones are clipped as per the photos below and I have highlighted the clip point of which there are two. NOTE! these are handed and must be placed on the right switch to the right hole to prevent fouling.
I found it easier to fit the item in place before the chrome surround.
9) Once you have swapped the parts over you can re fit into the plastic backing plate ready for re fitting to the metal one, but not before doing the window switches.
10) The window switches have two small screws holding them in place, one of which is obscured by the multi switch unit. Before you remove them mark each one as again these are handed and have an up/down orientation.
11) Again the window switches have a extra sheath which has to be swapped over, The actual window lifter switch is inserted into the sheath points last from below
You will note the part number if anyone wants to do some goggling at some stage to find an alternate supply.
12) Once you have swapped the parts over, re-fit taking care to ensure your markings line up as if you have them the wrong way round it causes the switch to bind.
13) I decided to swap some of the switch round as the unit is clearly designed for the Left Hand Drive market. This is easy to do, but as pointed out above the chrome surrounds need to stay in the right holes as their pins foul the neighbouring holes.
14) Re fitting is easy, just take your time not to scratch anything...the Allen Screws feel very tight and the small screws look like they could easily strip the threads off the metal backing plate so please take your time
14) Finished article...now for some tea, good luck to you all and drop me a line if you get stuck!
I did this last year. So much more convenient than having to reach across an extra 4 inches every time you start the car!Oh, and remember to swap your START and HAZARD switches round, they are set up for left hand drive and nobody and the factory though to do this.
safrane
Member
- Messages
- 16,863

")