Window Regulator Repair

lambertius

Banned
Messages
341
So who would've guessed that I had another broken part on my car... The driver's side window reg has been busted since I bought it. At some point in the past it was repaired - and badly. So I've picked a regulator off of a wrecker, and I've dismantled and reassembled it reinforced to replace whatever dodgy repair is on the existing regulator. I didn't want to pull the other one out and try and shove the tooth paste back in the tube.

If the driver's side one goes well, I'll make a video of the passenger side so that there is a clear step by step on everything that I did. To begin with I followed some of what is on Craig Waterman's page:

http://craig-waterman.com/?tag=maserati-window-regulator

A key difference is that I bought a couple of these repair pins - they're made by a forum member on the other forum. He has been super helpful.

https://www.ebay.com.au/itm/Maserat...ndow-Regulator-Repair-Pin-Pair-2/173960767103

70509
70510

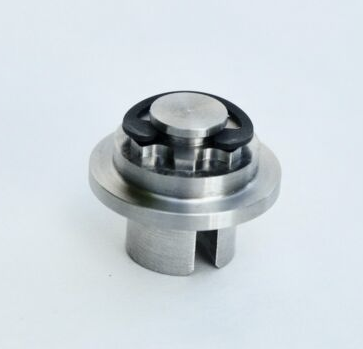
I cut off the existing centre pin:

70511

I've since fitted the new pin. It has a bit of play in it when there is only a bit of tension on the spring, but as the spring loads up the play gets taken up. I'll see how it goes - but I may end up getting the pin welded in place.

I'm still searching for a suitable microswitch as well. I was trying to find something with an IP6X rating so that the switch will never fail again in the future, but so far all the suitably rated switches I've found have a different mounting pattern than a standard microswitch.

70512

70513

I'll also be getting the gear itself welded up tomorrow to make sure it doesn't flex.

It will all get installed in the car over the coming weeks, and I'll report back!
 

hladun

Member
Messages
149
I just repaired my regulator with replacement pivots. They're well made and fit. Recommend them highly. I think a lot of the other damage that happens to regulators is a result of this pin failure.

I rotated the spring slot by 1 tooth to give some added counterbalance force to the weight of the window. I did some measurements to confirm this. This makes it easier for the motor.

Also when you're done make sure the rear of the window fits well into roof slot. This adjustment is done by loosening the two bolts that hold the glass in the regulator. You can also adjust how well the rear corner of the window fits the roof by adjusting the location of the regulator slide in the slot on the door.
 

TimR

Member
Messages
2,731
£50- EACH..! What are they made of- unobtanium ?:lol2:
 

Attachments

  • pin.png
    pin.png
    102 KB · Views: 10

Lozzer

Member
Messages
2,285
Yes they are unobtanium. You need a CNC machine to do the star pattern. If you think they're too expensive then buy a regulator and see what that costs or just tape some plastic in your window.
Was going to say , there's 2-3 hours work easy in making one of those.
 

lambertius

Banned
Messages
341
I ended up buying a couple of IP67 fancy bois. I couldn't find anything locally that matched exactly what I needed so hopefully they don't take too long coming in from Sydney!

I also had the gear welded up for a bit of reinforcement, so once I get my switches it will be ready to go back in the car!

I just repaired my regulator with replacement pivots. They're well made and fit. Recommend them highly. I think a lot of the other damage that happens to regulators is a result of this pin failure.

I rotated the spring slot by 1 tooth to give some added counterbalance force to the weight of the window. I did some measurements to confirm this. This makes it easier for the motor.

Also when you're done make sure the rear of the window fits well into roof slot. This adjustment is done by loosening the two bolts that hold the glass in the regulator. You can also adjust how well the rear corner of the window fits the roof by adjusting the location of the regulator slide in the slot on the door.

I also added a bit of pretension to mine, and thanks for the heads up about fitment!

£50- EACH..! What are they made of- unobtanium ?:lol2:

As the others said, the cost is time. I can confirm that is a reasonable cost considering machining and low volume.
 
  • Like
Reactions: Geo

Twinspark

Member
Messages
460
I've heard that the regulator can be rebuilt using the Alfa GTV part as its the same except that the mechanism is backwards, is that true?
 

Frog3200

Junior Member
Messages
53
Hi, the original GTV (taht looks exactly the same as Mase can be used for sourcing, but the gear is different (the dented plate is welded 3cm dirfferently).
BUT, some guys in France have managed to install the replacement of the original GTV, (see below). It's on this one that there is a question of needing to inverse the wiring. For this question, one says it needs, another says it didn't need.. The goosd thing is that the regulator can be installed, you just need to make 1 new hole as the fixing is a bit different.
https://www.okp.de/xtc2/GTV/Spider/...der/GTV-916-1998-2006::19646.html?language=en
 

lambertius

Banned
Messages
341
Small update, got my fancyboi switches - run it through a few times and it all seems to be engaging properly. Looking forward to getting it installed!

Once the driver's side is sorted, I'll do the passenger side and film the whole process so its more accessible in the future.
 

Mr S

Member
Messages
821
I broke one trying to ultilise parts from a window mechanism that was sold as the correct one, but wasn't. This was my solution. Not elegant admittedly, and I could and would do it better next time, but works fine, and seems to have held up ok. 7088570886
 

hladun

Member
Messages
149
Mr S, the glue obscures what you did, but you needed a larger washer, big enough to cover the star, or else the whole thing will pull apart when you load it.
 

Mr S

Member
Messages
821
Mr S, the glue obscures what you did, but you needed a larger washer, big enough to cover the star, or else the whole thing will pull apart when you load it.
Apologies I was quite liberal with the 9323. Yes so I drilled and tapped the piece where the spring goes, and media blasted it to get good bond prep. Then I used a large washer to spread the load against the flower shaped cut out, and then a smaller washer under the bolt to help spread the load of the bolt head. The ID of the washer was significantly larger than the bolt, so thought it prudent to use another washer to makesure it had an even load across it. Used a liberal amount of glue as you can see.