Replacing rubber gaitors on fuel injector plugs

voicey

Member
Messages
660
The connectors are called Junior Power Timer connectors. They are 2 way and as you've seen there are two types of rubber boots - plain and pleated.

As you've discovered, there is a locking clip on the back of the connector. Undo this and then you need to free the individual pins. There is a special tool but you can fashion one out of a small paperclip. Bend the paperclip into a U shape. Then insert the two ends of the U into the slots above and below the pin (shown in green in piccy).

I have a photo of a new pin which will help - just need icloud to update before I can post it.

Once the pins are free it is easy to replace the boot.

You should reuse the old connector housing as the one you have is not the correct type.
 

Attachments

  • jpt.jpg
    jpt.jpg
    84.7 KB · Views: 29

voicey

Member
Messages
660
Here's a JPT pin - you can see the two locking tabs you need to press in.
 

Attachments

  • jpt pin.jpg
    jpt pin.jpg
    75.4 KB · Views: 27

redsonnylee

Member
Messages
1,549
The connectors are called Junior Power Timer connectors. They are 2 way and as you've seen there are two types of rubber boots - plain and pleated.

As you've discovered, there is a locking clip on the back of the connector. Undo this and then you need to free the individual pins. There is a special tool but you can fashion one out of a small paperclip. Bend the paperclip into a U shape. Then insert the two ends of the U into the slots above and below the pin (shown in green in piccy).

I have a photo of a new pin which will help - just need icloud to update before I can post it.

Once the pins are free it is easy to replace the boot.

You should reuse the old connector housing as the one you have is not the correct type.

I've thought about doing this before, where can you purchase the junior power connectors from -tks
 

voicey

Member
Messages
660
I've thought about doing this before, where can you purchase the junior power connectors from -tks

If you actually want the connectors then this guy has the best ones, I've dealt with him loads of times and he's never let me down: http://www.ebay.co.uk/itm/Genuine-A...567186?hash=item1e7981c752:g:dkoAAOxy3cJTe0XX

If you're looking for just the rubber boot then I prefer the pleated ones, which I buy from here (you want 2 way): http://www.ebay.co.uk/itm/2-3-4-5-6...hash=item33b430154e:m:mQ967PVBouZqbv9_cc5W3QQ
 

redsonnylee

Member
Messages
1,549
If you actually want the connectors then this guy has the best ones, I've dealt with him loads of times and he's never let me down: http://www.ebay.co.uk/itm/Genuine-A...567186?hash=item1e7981c752:g:dkoAAOxy3cJTe0XX

If you're looking for just the rubber boot then I prefer the pleated ones, which I buy from here (you want 2 way): http://www.ebay.co.uk/itm/2-3-4-5-6...hash=item33b430154e:m:mQ967PVBouZqbv9_cc5W3QQ

Thanks & very reasonable. Will be buying the connectors.
 

LDM 3200

Member
Messages
658
Thanks for this the state of the rubber boots on mine have been bugging me foe a while!

The plenum on my 3200 is stove enamelled like that, I wasn't sure initially but have grown to like it.
 

RSM Masser

Member
Messages
2,437
given I do most of my (preventative) maintenance on a vintage aeroplane which I then fly upside down, ...

I'd want to prevent it flying upside down!
Looks like you live near me - so please don't let anything fall out in my garden!
 

Ian H

Member
Messages
167
Many thanks everyone for giving there input on this
In the hope it may help others I have done a little 'how- to' guide below

The rubber boots on the fuel injectors are very prone to split since they are straight boots which need to go around a sharp angle. They do spoil the look of the engine bay.pict 1.jpg

The replacement job is a bit fiddly but is straightforward and needs a couple of very low cost household ‘tools’.
1st of all buy 10 (eight require plus couple of spares) 90 degree boots at the link below for ~£1 each + postage.


http://www.vehicle-wiring-products.eu/product.php/591/angled-boot-for-2-pole-female-connector


These guys can also provide replacement plugs and other parts if required.
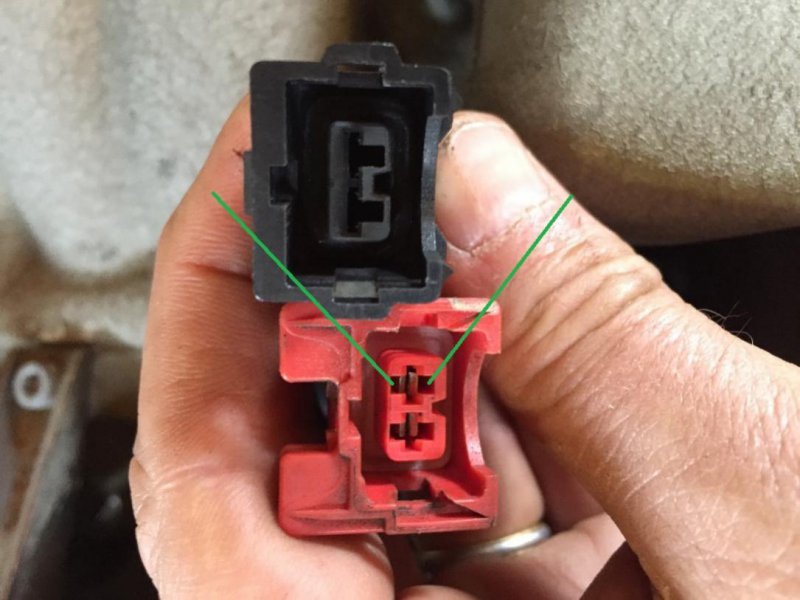
To remove the plug, pull out the retaining clip at its base and they just slide up.

IMG_4723.jpg

Pull back the old rubber boot to reveal the back of the plug. There is a hinged clip on the rear of the plug which can be gently prised open with a small screwdriver.

IMG_4725.jpg

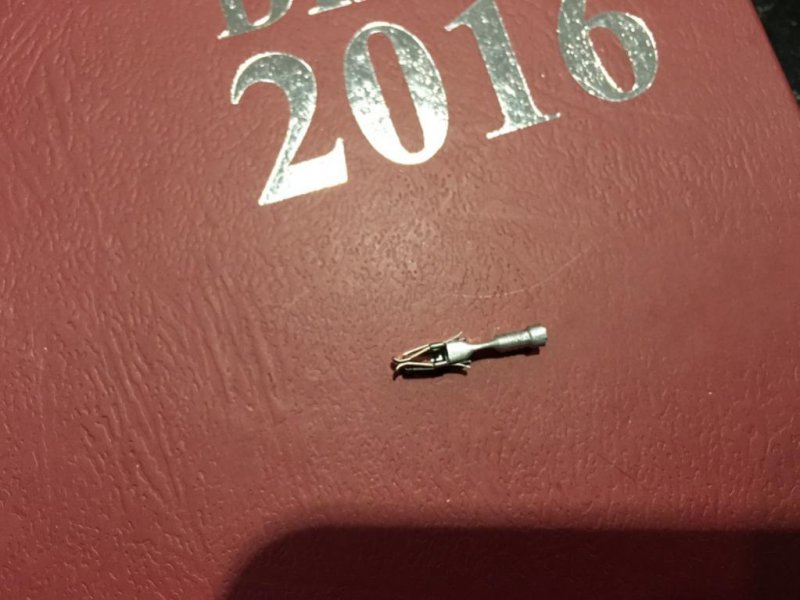
There are two leads with end terminal which are secured into the plug with internal clips. To remove these take a paperclip or split pin and bend so you have a two pronged tool.

IMG_4911.jpg

Gently push each lead forward to take any load off the locking tag, firmly push the split pin/paperclip into the end of the plug above and below the terminal and then gently pull on the lead at the rear of the plug and the terminal and blue sealing tab will slide out of the back of the plug.

IMG_4917.jpg

You will notice the new boots are of a smaller diameter which causes a minor problem in threading the wires through the thinner boot and around the 90 degree bend. It is also a bit more tricky to push the sleeving of the wires into the boot to seal the non plug end.
I took an old pen with a detachable pointed nose. Cut off a short section. Push this through the boot with the point and end and then remove the nose. The wires can then be simply pushed through the pen and boot.

IMG_4920.jpg

At the non-plug end roll the boot back a couple of cm at the end, push the end of the old pen against the sleeving and roll back the boot over the sleeving. Viola job done. Then just gently extract the pen tube.

IMG_4923.jpg

To reinsert the terminal, you simply feed them back into the plug ensuring the lock tabs are aligned correctly. Make sure the red wire goes to the left hand side of the plug as you view the plug with the round cut out facing you. Check that the terminals are fully pushed in and gently pull on each lead to ensure they are locked back in place. Then push the rear tab down to click back into place.

IMG_4924.jpg

Then simply re attach each plug, pushing the retaining clip into place and align the bend of the boot so it smoothly follows the desired wiring direction.

IMG_4925.jpg

As I say a bit fiddly, but shiny new boots within 1 hour …..
 

Moz1000

Member
Messages
821
Did mine this evening. Used the straight boots per Voicey's recommendation. Straightforward but fiddly. Took an hour. Back aches.
Dave
CIMG3827.jpgCIMG3829.jpg
 

Contigo

Sponsor
Messages
18,376
Good work Fellas, looks good, will get round to doing this one day, thanks for the guide!
 

redsonnylee

Member
Messages
1,549
Thanks for the instructions and good photos, have ordered my replacements and will doing the same this weekend if they arrive in time.
 

Almichie

Junior Member
Messages
799
Did mine this evening. Used the straight boots per Voicey's recommendation. Straightforward but fiddly. Took an hour. Back aches.
Dave
View attachment 35738View attachment 35739

Also did mine with the same as original. Started with a bent paper clip, this quickly ended up in the bin. I have a very comprehensive set of Allan keys and the second smallest pair worked perfectly and were far less fiddly than the clip bent.

Total time for 7 was 20 minutes the same time as one with the paper clip.

I am very grateful for the information and the engine looks so much better for a very small and cost effective change.
 

Almichie

Junior Member
Messages
799
Bloody **** they've all been at it! :D

It's the one thing I thought I wouldn't be able to do and have always hated the look of old perished rubber on an otherwise clean engine. So when someone said it could be done my OCD kicked in!! I guess us 3200 owners are the same!
 

RSM Masser

Member
Messages
2,437
It's the one thing I thought I wouldn't be able to do and have always hated the look of old perished rubber on an otherwise clean engine. So when someone said it could be done my OCD kicked in!! I guess us 3200 owners are the same!

I've got to have a go at this! what a simple, inexpensive fix and great photos, always bugged me the split gaiters when you open the bonnet - which is not an unusual occurrence on a 3200

Oil and fluid levels must be checked - so its not always a breakdown