GranSport (Fuji White) Running report

Chris155

Member
Messages
196
Thread update.

MOT passed, No advisories.

Screenshot 2020-10-24 at 01.43.38 by Chris, on Flickr

Pleased with that.

And as I alluded to in one of my recent posts, I've had the exhaust modified.

This thought process started shortly after I acquired the car, I was offered a Larini 'x' pipe for £350. I went off and researched it and found that most people regard it as a worthwhile, almost essential change.

However, nicely welded, the larini part is, in my view it is not worth the asking price, new or 2nd hand. Thusly, I decided to embark on a voyage of welding discovery...

I have a MIG welder that I've not really mastered but I investigated welding Stainless steel using it and, based on internet advice, dismissed it as unviable. I'm not sure why but IIRC it's difficult to get a decent weld and the gas is expensive?

Anyhoo, I decided to buy the cheapest centre box I could find on eBay with the intention of chopping it up for £65. I figured I could chop off the X pipe section and remake the rest using sleeved joints, some straight pipe and some clamps.

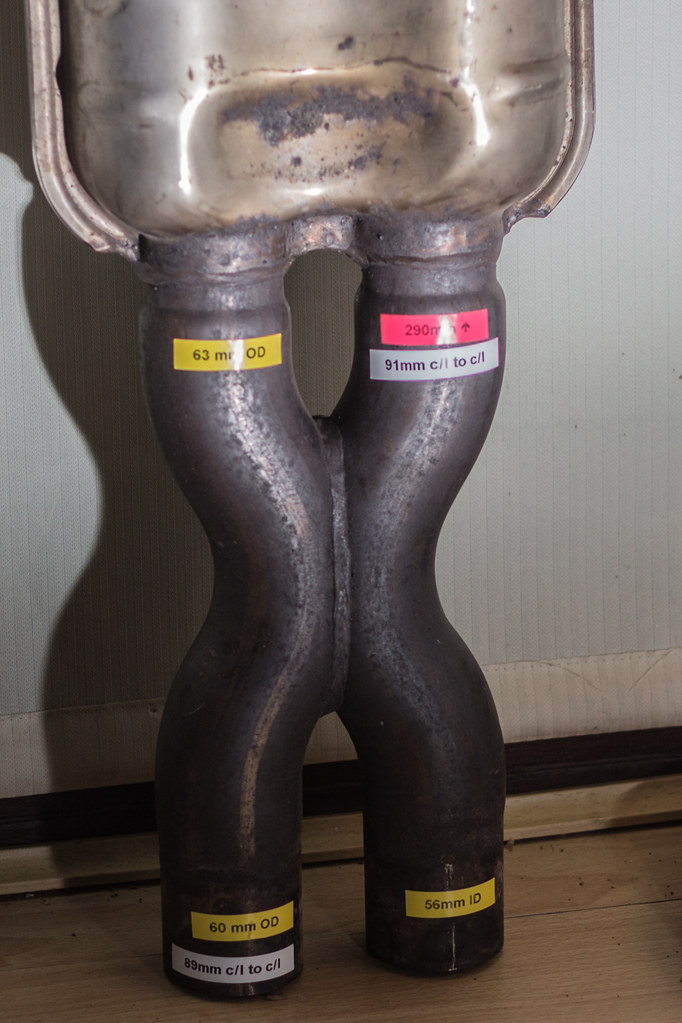
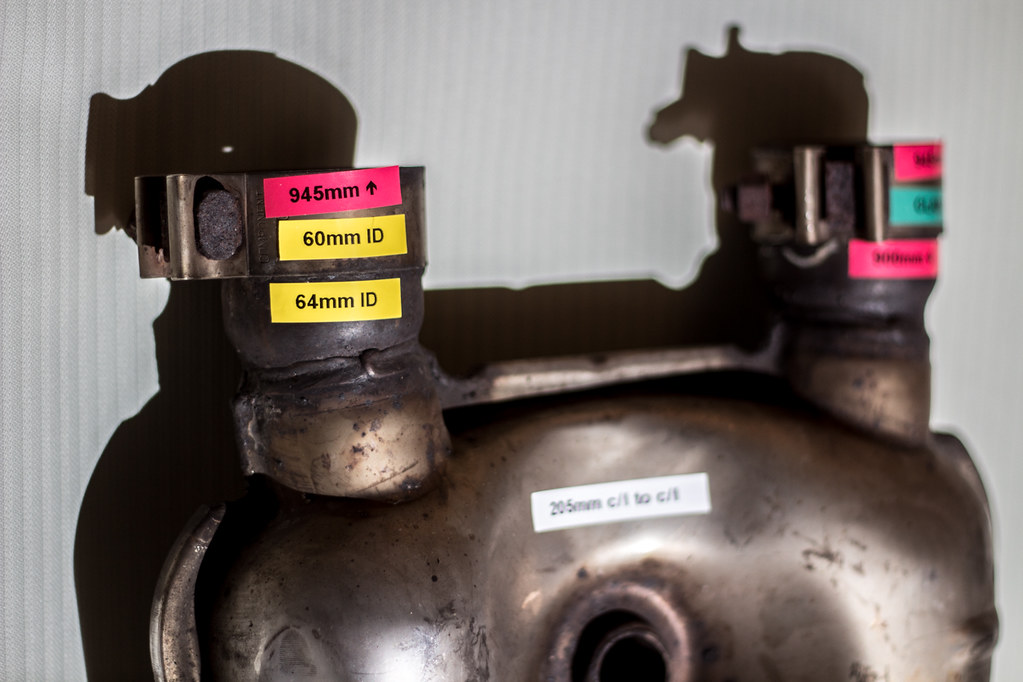
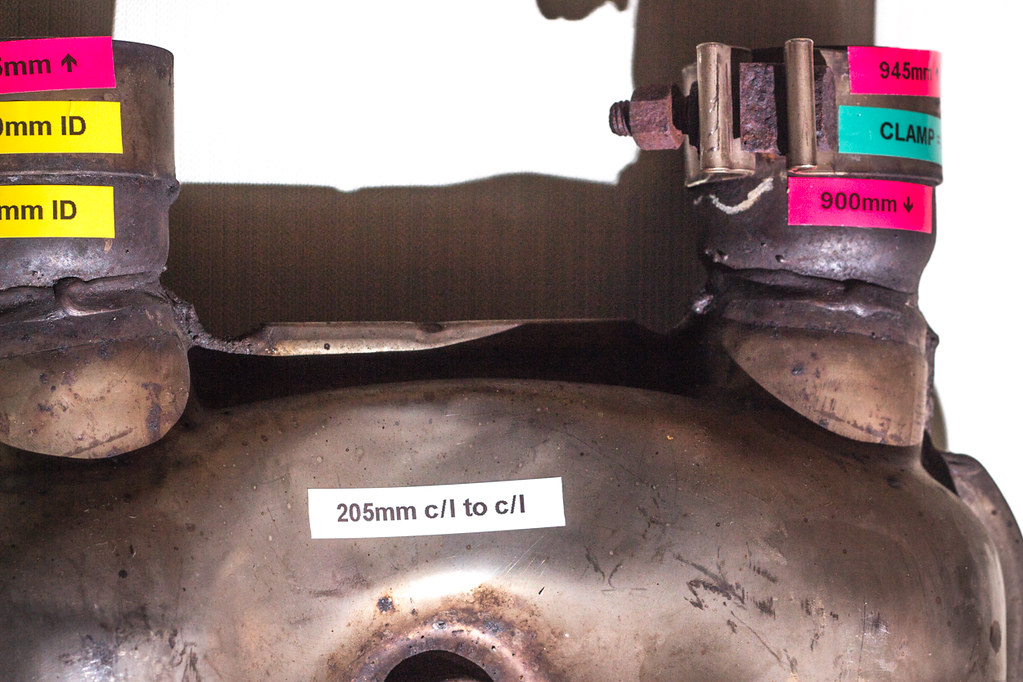
I started off by taking some measurements and labelling the exhaust up (using the base of the x pipe as a datum for length) IDs, ODs and CL distances (Thank you Bad Obsession M/sport for showing us how to accurately find the CL distance)...

IMG_0788 by Chris, on Flickr

IMG_0799 by Chris, on Flickr

IMG_0796-2 by Chris, on Flickr

IMG_0789 by Chris, on Flickr

IMG_0792 by Chris, on Flickr

IMG_0794 by Chris, on Flickr

At this point, I was feeling confident I could make something up as planned using an eBay pipe bender like this;


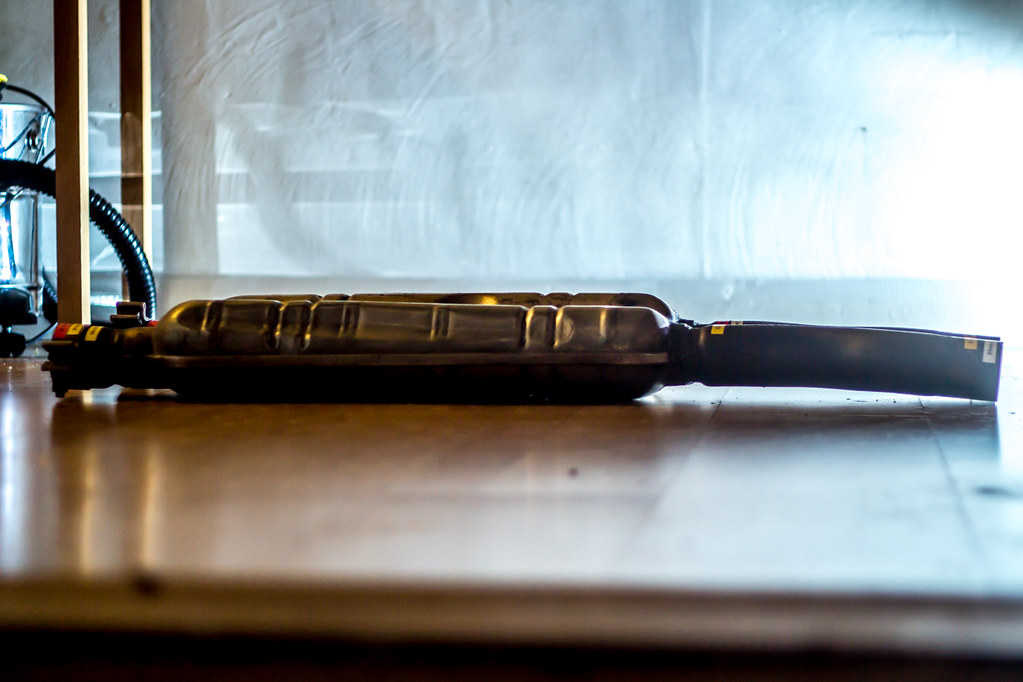
However, I the realised it's not just the C/L difference end to end that I'd have to account for in the horizontal plane, it's also convex, bending upwards in the vertical plane, presumably to gain ground clearance;

IMG_0806 by Chris, on Flickr

IMG_0818 by Chris, on Flickr

Placing it upside down probably shows this better?

IMG_0810 by Chris, on Flickr

IMG_0817 by Chris, on Flickr

At this point, I stated questioning whether it was viable in the practical sense and worthwhile financially. Yes I'd gain a pipe bender out of it butIt'd be a PITA to store and it wouldn't be something I'd use often.

Coincidentally, my Dad had taken my mother's Brera to an exhaust fabricator for a new centre section as they can't be sourced easily in the meanwhile. I ended up chatting with the Farbicators about their cars and decided to ask then for a quote to remake the centre box with straight pipes for me.

I ended up going with this option as it cost £130. Bringing the total cost to £200. But I also have the original centre box should I choose to revet back to standard. I suppose that I could sell this for around £100 if I chose to.

Sound wise, it's not much louder, as the internet suggested. What I really like is that the exhaust crackles are now more pronounced - valve overlap, as an engine should sound, not the pretend manufactured nonsense most fast VAG products have.

I'm really pleased with the result in spite of the fact I chickened out out on making it myself.
 
Last edited:

Chris155

Member
Messages
196
I think you made the right choice, although Nik and Richard will probably not be impressed! I but it sounds excellent.

Huh? Why not?

ETA, Ohhhhhhh, THAT Nick and Rich.... Yes, I suspect not!

I suppose now is not the moment to point out that you can buy a forum x-pipe for £220. Or a H pipe for £200.


Oh b*ks! I missed that thread, they look really nicely made too!
 
Last edited:
  • Like
Reactions: Zep

Chris155

Member
Messages
196
Forgot to update this thread...

I have new wiper blades to fit on it. (Now fitted) And the back tyres are worn out - Replacements in the shed, also now fitted. I went for Kumho Ecsta HS51 partly, because it has Kumho's on the front (car came with them), partly because they were reasonably priced and partly because they've had decent reviews;


Has anyone else noticed the price of tyres seems to have increased by around 50% since last year?

It did get a clean in anticipation of the spring though. One thing that attracted me to the car was its import status.

Whilst I am confident it has been serviced, it is in Cantonese. But, being able to work on it, this meant that I could service it myself without impacting it's value. I'm sure anyone who reads this thread will understand the level of work my Dad and I have put into it.

The other positive is that, being from Hong Kong, it's never seen freezing temperatures or road salt. (Apparently they get a couple of days of morning frost per year).

Meaning that, unlike many UK supplied cars, it's immaculate underneath. No rust.

However, I have used it over the winter when there has been some decent dry weather. Therefore, I did give a clean - jacked it up, took the wheels off, cleaned them including the barrel of the wheel, the wheel arch liners and gave the underside a good clean with a softish brush;

IMG_5411-2 by Chris, on Flickr

IMG_5412 by Chris, on Flickr

IMG_5413 by Chris, on Flickr

IMG_5414 by Chris, on Flickr
 

giorgio01

Member
Messages
223
The 3 day saga didn't stop with the planned work as we spotted another problem.

IMG_4784 by Chris, on Flickr

I didn't think to take a pic to frame what that is so kudos to anyone who recognises it as the nearside steering rack boot. We replaced the track rod last year but not the boot, which I'll admit was something we should have considered.

However, it seemed to be in good condition at the time, they only come in pairs, they're £70 and they're know for failing... i.e. being ****.

I decided that I wasn't going to pay that kind of money for an inferior part and went on the hunt for a replacement. This started with taking some measurements:

IMG_4769 by Chris, on Flickr

IMG_4781 by Chris, on Flickr

The overall length is about 192mm. After scratching about on eBay, I found a Volvo part that closely matched the measurements I'd taken. The ID of the rack end is slightly smaller for the Volvo part, but I felt it was worth risking it as a pair of boots was less than £16 delivered.

IMG_4796 by Chris, on Flickr

Here's the PN for future reference - AFAIK, it should fit all 4200 Masers.

IMG_4798 by Chris, on Flickr

On mine, it turned out to be a perfect fit (I used to silicone lube) and seems to be made of a more robust material. Result.

Obviously, with the front end apart, we took the opportunity to clean and upgrade what we could. Side lights being an obvious starting point as they're part of the fog light cluster. The standard filament bulb isn't even a halogen job and is basically s:censored:t

IMG_4764 by Chris, on Flickr

It was replaced with a higher output LED version:

IMG_4763 by Chris, on Flickr

With the whole arch liners out, they were shown the pointy end of the pressure washer and some soap. The inner arches weren't that dad but were given a more sympathetic clean with a stiff brush engine degreaser and a hose pipe.

Before;

IMG_4758 by Chris, on Flickr

IMG_4757 by Chris, on Flickr

After;

IMG_4766 by Chris, on Flickr

IMG_4767 by Chris, on Flickr


Finally, noting that the holes in the discs were blocked with brake pad material I used a slightly undersized 3.5mm drill bit to clean them out. I didn't think it's make much of a difference but it has curbed the slight rumble that was prevalent under hard braking.

IMG_4760 by Chris, on Flickr
Hi, what type of led bulb you've used?
 

TimR

Member
Messages
2,729
Hi, what type of led bulb you've used?
Ive had success with these from fleabay..Quite a few of this seller's bulbs threw out CanBus errors, despite his claims. And its a pain as he's in China...but the sidelight bulbs, and interior lights, they all work okay...!


These halogen bulbs also look a lot better for that matter....
 

Chris155

Member
Messages
196
I think I've mentioned this previously, but I had some new tyres put on the back;

IMG_5588 by Chris, on Flickr

The door locks have been "bouncing" the last few months when I try to lock it. My Dad has a similar issue with his 4200 which helped us idtify the passenger door lock as the culprit. With a new one ordered and delivered some time ago, I found a decent day in February to have a look at this;

IMG_5557 by Chris, on Flickr

IMG_5551 by Chris, on Flickr

IMG_5555 by Chris, on Flickr

It was a fiddly job, with a plethora of actuating rods causing a little confusion but it didn't take that long and it has sorted the problem.

Following on from the advice I received earlier in the thread about the oil filter, I purchased a suitable tool to remove and fit it to the correct tool, so I've also torqued that up (30N.m if I recall correctly);

IMG_5720-2 by Chris, on Flickr

IMG_5723 by Chris, on Flickr

I also noticed some oil misting around this breather hose to the cam cover;

IMG_5725 by Chris, on Flickr

IMG_5726 by Chris, on Flickr

This was caused by the hose clamp being loose - it was not replaced form some reason by whoever took it off last time. We replace it with a correctly sized Clic-R clamp which should solve this;

IMG_5727 by Chris, on Flickr

And last weekend, I decided to have a look at the handbrake. I don't use it when it's parked on my drive - it's level so not really needed and it has the potential to seize on if I leave it. But I have noticed recently that it was weak when the brakes were warm, but more recently, it stopped working altogether.

Hence the attention. I thought it would just need adjusting...

IMG_5732 by Chris, on Flickr

IMG_5729 by Chris, on Flickr


As a bonus, this did give me the chance to use the new toy;

IMG_5728 by Chris, on Flickr

For something so compact, it is stupidly powerful.. It's rated at 580N.m for loosening and 330N.m tightening, which should cover every eventuality at on a car. In fact I imagine I could scare most bolts loose just with the threat of using it.

I'm really pleased with it. It even has modes to undo bolts that mean it unwinds them slowly once they're loose rather than flinging them across the garage.

I suspect most people will know where / how to adjust the handbrake but...

You align the hole in the disc to the 6 O Clock position and stick a screwdriver in, levering a cog up or down;

IMG_5735 by Chris, on Flickr

IMG_5737 by Chris, on Flickr

Of course and expected, this didn't work.

We removed the callipers (from both sides and had a closer look;

IMG_5739 by Chris, on Flickr

The driver's side was a bit of a surprise;

IMG_5742 by Chris, on Flickr

IMG_5744 by Chris, on Flickr

It looks like the shoe friction material has broken away. I found some clumps of material in within the disc bell but not a lot.

The inside of the bell is also scored. But not excessively so.

IMG_5746 by Chris, on Flickr

IMG_5745 by Chris, on Flickr

If it was an actual braking surface I would replace the disc(s) but it's not and the depth of the scoring is very slight.

Curiously, the shoes on the nearside were fine;

IMG_5748 by Chris, on Flickr
 

Chris155

Member
Messages
196
I took some additional photos of the cable actuated mechanism so that I can put it back together correctly...

IMG_5751 by Chris, on Flickr

IMG_5752 by Chris, on Flickr

And the adjuster;

IMG_5763 by Chris, on Flickr

Neither of which turned out to be seized, just recalcitrant.

Some more reference pics;

IMG_5798 by Chris, on Flickr

IMG_5799 by Chris, on Flickr

I've ordered some new shoes (Porsche fitment / bosch parts) and put the car back together for now - With the parts removed, there's nothing to fall apart or get tangled up. Meaning it is completely usable, I just need to leave it in gear if I park anywhere other than home.

In anticipation of the new shoes arriving (tomorrow), I did decide to throw the adjuster / lever / springs into the deep fat fryer for a clean - 30min @50 deg c

IMG_5803 by Chris, on Flickr

IMG_5808 by Chris, on Flickr

For some reason (chemical) the plated parts came out black

IMG_5811 by Chris, on Flickr

But after a quick scrub with a wire brush, they look almost new.

Another update shall follow after the shoes arrive.
 

giorgio01

Member
Messages
223
I took some additional photos of the cable actuated mechanism so that I can put it back together correctly...

IMG_5751 by Chris, on Flickr

IMG_5752 by Chris, on Flickr

And the adjuster;

IMG_5763 by Chris, on Flickr

Neither of which turned out to be seized, just recalcitrant.

Some more reference pics;

IMG_5798 by Chris, on Flickr

IMG_5799 by Chris, on Flickr

I've ordered some new shoes (Porsche fitment / bosch parts) and put the car back together for now - With the parts removed, there's nothing to fall apart or get tangled up. Meaning it is completely usable, I just need to leave it in gear if I park anywhere other than home.

In anticipation of the new shoes arriving (tomorrow), I did decide to throw the adjuster / lever / springs into the deep fat fryer for a clean - 30min @50 deg c

IMG_5803 by Chris, on Flickr

IMG_5808 by Chris, on Flickr

For some reason (chemical) the plated parts came out black

IMG_5811 by Chris, on Flickr

But after a quick scrub with a wire brush, they look almost new.

Another update shall follow after the shoes arrive.
I've done exactly the same thing with my 4200 GT and a few other things. Now working on the exhaust. Good job you're doing there.
 

Ewan

Member
Messages
6,801
Indeed - I do fancy a BF car in GS launch spec. But being sensible I can’t justify having two GS’s and have decided that I’m liking my green one too much to plan a swap just yet.
 

Chris155

Member
Messages
196
This has been annoying me for quite some time now - dirt around the rear badge;

IMG_5834 by Chris, on Flickr

Which I couldn't remove using the usual techniques. Removal of the badge was required, which is a bit of a faff. It involves removal of the boot lid liner;

IMG_5836 by Chris, on Flickr

And faffing about with some spring washers in the depths of the bottled - they latch onto 3 prongs of the badge that poke through from the outside;

IMG_5838 by Chris, on Flickr

It was worth it though;

IMG_5839 by Chris, on Flickr

That was Thursday evening. Another job on the list was to rebuild the (hand)brake as the parts to do so, also arrived Thursday.

It was a simple enough job, mostly because pulling things apart is so easy on a car that HASN'T spent its life on salted roads. Like the brake calliper bolts for instance. All you have to do is crack them loose and they're finger tight all the way out. Which is fortunate as the ARB drop link prevents access with anything other than a ring spanner. It would take 30 min+ to get them out otherwise.

There's nothing special about the handbrake but, being somewhat unfamiliar with drum brakes I took a bunch of pics... Someone might find them useful in the future.

IMG_5842 by Chris, on Flickr

IMG_5843 by Chris, on Flickr

IMG_5844 by Chris, on Flickr

IMG_5850-2 by Chris, on Flickr

Which brings me back up to date.

ish.

I'm having some paintwork issues seen to this week. There's a mark on the OS sill where something looks to have been spilt on it, damaging the laquer, the front nose cone has some noticeable scratches and there is some minor corrosion bubbling beneath the OS rear light.

Consequently, It's going in to be painted this Friday. The body shop its going to painted my Dad's 156 last year and did an amazing job of it, so we know they have experience with the colour and are capable of living up to expectation.

I'm also doing some of the donkey work - removing the bumpers in order to keep the cost down.

As you might expect, pics to follow.
 

safrane

Member
Messages
16,828
This has been annoying me for quite some time now - dirt around the rear badge;

IMG_5834 by Chris, on Flickr

Which I couldn't remove using the usual techniques. Removal of the badge was required, which is a bit of a faff. It involves removal of the boot lid liner;

IMG_5836 by Chris, on Flickr

And faffing about with some spring washers in the depths of the bottled - they latch onto 3 prongs of the badge that poke through from the outside;

IMG_5838 by Chris, on Flickr

It was worth it though;

IMG_5839 by Chris, on Flickr

That was Thursday evening. Another job on the list was to rebuild the (hand)brake as the parts to do so, also arrived Thursday.

It was a simple enough job, mostly because pulling things apart is so easy on a car that HASN'T spent its life on salted roads. Like the brake calliper bolts for instance. All you have to do is crack them loose and they're finger tight all the way out. Which is fortunate as the ARB drop link prevents access with anything other than a ring spanner. It would take 30 min+ to get them out otherwise.

There's nothing special about the handbrake but, being somewhat unfamiliar with drum brakes I took a bunch of pics... Someone might find them useful in the future.

IMG_5842 by Chris, on Flickr

IMG_5843 by Chris, on Flickr

IMG_5844 by Chris, on Flickr

IMG_5850-2 by Chris, on Flickr

Which brings me back up to date.

ish.

I'm having some paintwork issues seen to this week. There's a mark on the OS sill where something looks to have been spilt on it, damaging the laquer, the front nose cone has some noticeable scratches and there is some minor corrosion bubbling beneath the OS rear light.

Consequently, It's going in to be painted this Friday. The body shop its going to painted my Dad's 156 last year and did an amazing job of it, so we know they have experience with the colour and are capable of living up to expectation.

I'm also doing some of the donkey work - removing the bumpers in order to keep the cost down.

As you might expect, pics to follow.
Whilst the front is off check the PAS cooler, I replaced mine and the front rad last year whist the bumper was being refinished.
 

Mr S

Member
Messages
821
This has been annoying me for quite some time now - dirt around the rear badge;

IMG_5834 by Chris, on Flickr

Which I couldn't remove using the usual techniques. Removal of the badge was required, which is a bit of a faff. It involves removal of the boot lid liner;

IMG_5836 by Chris, on Flickr

And faffing about with some spring washers in the depths of the bottled - they latch onto 3 prongs of the badge that poke through from the outside;

IMG_5838 by Chris, on Flickr

It was worth it though;

IMG_5839 by Chris, on Flickr

That was Thursday evening. Another job on the list was to rebuild the (hand)brake as the parts to do so, also arrived Thursday.

It was a simple enough job, mostly because pulling things apart is so easy on a car that HASN'T spent its life on salted roads. Like the brake calliper bolts for instance. All you have to do is crack them loose and they're finger tight all the way out. Which is fortunate as the ARB drop link prevents access with anything other than a ring spanner. It would take 30 min+ to get them out otherwise.

There's nothing special about the handbrake but, being somewhat unfamiliar with drum brakes I took a bunch of pics... Someone might find them useful in the future.

IMG_5842 by Chris, on Flickr

IMG_5843 by Chris, on Flickr

IMG_5844 by Chris, on Flickr

IMG_5850-2 by Chris, on Flickr

Which brings me back up to date.

ish.

I'm having some paintwork issues seen to this week. There's a mark on the OS sill where something looks to have been spilt on it, damaging the laquer, the front nose cone has some noticeable scratches and there is some minor corrosion bubbling beneath the OS rear light.

Consequently, It's going in to be painted this Friday. The body shop its going to painted my Dad's 156 last year and did an amazing job of it, so we know they have experience with the colour and are capable of living up to expectation.

I'm also doing some of the donkey work - removing the bumpers in order to keep the cost down.

As you might expect, pics to follow.
Nice work. Where did you get the handbrake shoes etc from? Feel this is something i need to do
 

Chris155

Member
Messages
196
Now for Sale. If you want to see a grown man cry...


IMG_9659 by Christopher Martin, on Flickr

IMG_9634 by Christopher Martin, on Flickr

IMG_9627 by Christopher Martin, on Flickr

IMG_9621 by Christopher Martin, on Flickr

IMG_9618 by Christopher Martin, on Flickr

IMG_9606 by Christopher Martin, on Flickr

IMG_9603 by Christopher Martin, on Flickr

IMG_9600 by Christopher Martin, on Flickr

IMG_9596 by Christopher Martin, on Flickr

IMG_9579 by Christopher Martin, on Flickr

IMG_9574 by Christopher Martin, on Flickr

IMG_9572 by Christopher Martin, on Flickr

IMG_9568 by Christopher Martin, on Flickr

IMG_9567-2 by Christopher Martin, on Flickr

IMG_9555-2 by Christopher Martin, on Flickr

IMG_9552 by Christopher Martin, on Flickr

IMG_9736 by Christopher Martin, on Flickr

IMG_9725-2 by Christopher Martin, on Flickr