4200 Radio & Satnav upgrade

Sablewolf

Member
Messages
103
Outstanding work and thank you for sharing your project so far.

I am very tempted to do the same thing as you but I would want to retain the NIT and pipe the feed to the new screen.


How much would you budget to do all of this? Minus the speakers i have already installed those along with an amp

Also could you share a link for the solder ring connectors please?
Sure thing Fifty.
Link for the solder connectors on Amazon:

Costs so far:
Binize 7inch android unit £180

Dual FM/DAB amplified antenna £23.99

DC-DC converter(12v to 7v) to power backlights on lower centre console £22.99

DAB+ radio box & cables £28.99

Parkvision Reversing camera £35.99

LED Hazard switch £6.69

USB extension lead £8.30

Remote microphone £19.95

New Bezel 3D print £144.00

Spray paint (primer & finish coat) £33.90

Cables & sundries £25.00

TOTAL: £545.89

hope that helps!
 

Sanmiam

New Member
Messages
6
I love that this came together for you. Kuddos on being the pioneer in bringing Edwin's CAD files to a finished product!

Where did you end up putting the 4-ways button?
 

Sablewolf

Member
Messages
103
I love that this came together for you. Kuddos on being the pioneer in bringing Edwin's CAD files to a finished product!

Where did you end up putting the 4-ways button?
Thanks Sanmiam - it’s been a bit of trial and error but very pleased with how it turned out.
I got the 3D printer folks to modify the file so it could be printed as one piece. Schoolboy error was that I should also have got them to chamfer the inner sides slightly as I found in use that it was awkward to touch the volume and ‘home’ buttons (on the left side of the touch screen). Basically I just filed the edges down (both sides to match) but it would have been much easier if I had got the CAD file modified before printing!
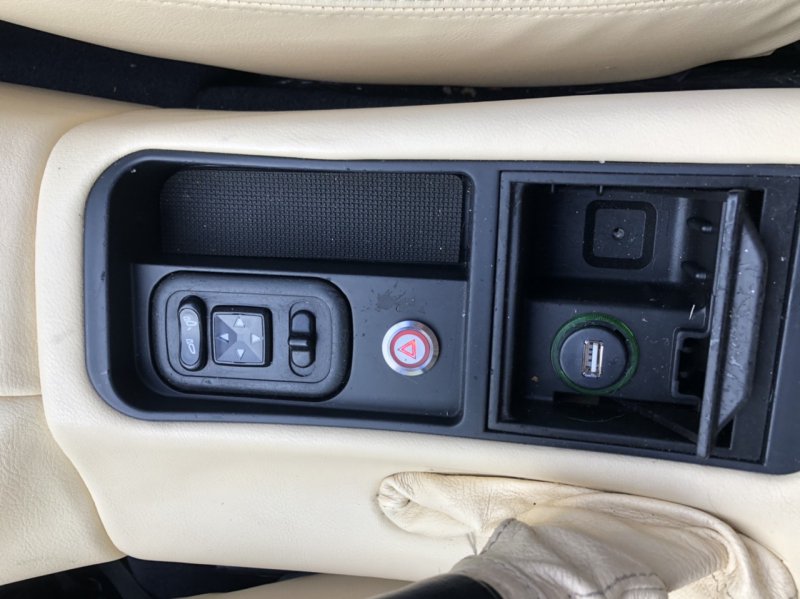
The hazard switch I located just behind the mirror switches in the centre console73434
 

FIFTY

Member
Messages
3,100
Thank you @Sablewolf very helpful

I'm going to order those solder rings to tidy up my amp wiring as I originally used crimp connectors and I think I can do a little better.

Thinking about potentially doing the screen upgrade over winter or spring next year as I am trying to enjoy a cheap(er) year of Maserati motoring in 2020 after a lot of outlay last year
 
Last edited:

Sanmiam

New Member
Messages
6
Schoolboy error was that I should also have got them to chamfer the inner sides slightly as I found in use that it was awkward to touch the volume and ‘home’ buttons

If you are having them re-print and potentially modify, why not provide the dimensions of the head unit for it to fit flush? I took several hours and did this manually from the original print-out (I ordered the bezel directly from Edwin before he made the drawings available), but if you have the CAD files with should be a pretty easy exercise for the printer. Plus, it gives you another 3/8" worth of clearance in the back by bringing the HU to the front of the bezel.
 

Sablewolf

Member
Messages
103
If you are having them re-print and potentially modify, why not provide the dimensions of the head unit for it to fit flush? I took several hours and did this manually from the original print-out (I ordered the bezel directly from Edwin before he made the drawings available), but if you have the CAD files with should be a pretty easy exercise for the printer. Plus, it gives you another 3/8" worth of clearance in the back by bringing the HU to the front of the bezel.
That could work but the lip helps the unit I have sit tight and I’ve not had an issue with the depth. However, changing the size of the opening could possibly mean that a 9 inch screen could maybe fit? Just a thought - but I’ll leave someone else to explore that possibility!!
 

Sanmiam

New Member
Messages
6
However, changing the size of the opening could possibly mean that a 9 inch screen could maybe fit?

I have the same unit that I was planning on mdifying the bravetry to mount, but ended up making the tolerances close enough to press fit. If you like it the way you have it no reason to open a can of worms.

I highly doubt a 9" screen would fit. You may have the width for it, but there simply is not enough real estate on the height to accommodate. If you were to start from scratch in designing the bezel it would be a different story - but that is (presumably) more work than it is worth.
 

Sablewolf

Member
Messages
103
I have the same unit that I was planning on mdifying the bravetry to mount, but ended up making the tolerances close enough to press fit. If you like it the way you have it no reason to open a can of worms.

I highly doubt a 9" screen would fit. You may have the width for it, but there simply is not enough real estate on the height to accommodate. If you were to start from scratch in designing the bezel it would be a different story - but that is (presumably) more work than it is worth.
Indeed! I’m pretty happy with how it all turned out and a 7inch screen is a huge improvement on the original. So far I’m most impressed with the DAB radio and reversing camera as they get most use. I have made ‘Waze’ the default satnav and that works very well too. There are a couple of setup/defaults that I’m working through (e.g. make DAB the default radio rather than the FM tuner) but have been busy with other things.
 

Gooner

Member
Messages
446
Indeed! I’m pretty happy with how it all turned out and a 7inch screen is a huge improvement on the original. So far I’m most impressed with the DAB radio and reversing camera as they get most use. I have made ‘Waze’ the default satnav and that works very well too. There are a couple of setup/defaults that I’m working through (e.g. make DAB the default radio rather than the FM tuner) but have been busy with other things.

I’m really impressed by what you have done here, basically exactly what I have been trying for figure out for ages. You seem to have put it all together very quickly and made a great job of it.

Do you think your 3D printer company would run off further copies of the bezel (the one-piece version you are planning)?
 

Sablewolf

Member
Messages
103
I’m really impressed by what you have done here, basically exactly what I have been trying for figure out for ages. You seem to have put it all together very quickly and made a great job of it.

Do you think your 3D printer company would run off further copies of the bezel (the one-piece version you are planning)?
Hi Gooner,
I’m sure he would. If you do want one, I have one available (made a spare in case I messed it up). The cost was £120 plus VAT so £144 total per ‘print’.
PM me if you’re interested and I can take some photos. Essentially it’s Edwin247’s CAD just amended to be one piece - I can do some measurements of the opening to give you an idea of the size as I also increased the rear of the opening slightly (at the bottom only) to accommodate the screen unit size (but the ‘frame’ opening viewed from the front is the same as in the original CAD). Alternatively I can send you the printer contact details (local to me here in Bromsgrove).
 

MrJoshua

Member
Messages
175
Hi Gooner,
I’m sure he would. If you do want one, I have one available (made a spare in case I messed it up). The cost was £120 plus VAT so £144 total per ‘print’.
PM me if you’re interested and I can take some photos. Essentially it’s Edwin247’s CAD just amended to be one piece - I can do some measurements of the opening to give you an idea of the size as I also increased the rear of the opening slightly (at the bottom only) to accommodate the screen unit size (but the ‘frame’ opening viewed from the front is the same as in the original CAD). Alternatively I can send you the printer contact details (local to me here in Bromsgrove).
Could you share the SDL file for the print, please?

I'm interested in modifying it to fit the detachable 10" Ultrawide touchscreen from my Joying Android head unit :)

Thanks!

Josh
 

Sablewolf

Member
Messages
103
Could you share the SDL file for the print, please?

I'm interested in modifying it to fit the detachable 10" Ultrawide touchscreen from my Joying Android head unit :)

Thanks!

Josh
I only have the original Edwin247 file (in two parts) Josh. The printer modified it to make it one but I guess if you're going to modify it then the Edwin247 file will be OK?

I tried to upload the files but the site blocked them ('The uploaded file does not have an allowed extension') but if you PM me an email address I can forward forthwith
 
Messages
346
Hi Gooner,
I’m sure he would. If you do want one, I have one available (made a spare in case I messed it up). The cost was £120 plus VAT so £144 total per ‘print’.
PM me if you’re interested and I can take some photos. Essentially it’s Edwin247’s CAD just amended to be one piece - I can do some measurements of the opening to give you an idea of the size as I also increased the rear of the opening slightly (at the bottom only) to accommodate the screen unit size (but the ‘frame’ opening viewed from the front is the same as in the original CAD). Alternatively I can send you the printer contact details (local to me here in Bromsgrove).

This is a bandwagon I will gladly chase down if at all possible. Have had Edwin247’s posts bookmarked “for future improvements” for far too long. The steps you have taken here have lowered the level of uncertainty considerably.

Please let me know if there is a path by which I could also obtain a bezel from your fabricator. I’m in the US, adding to the degree of difficulty, and I don’t want to treat you as a vendor. Happy to make all of the calls work the details, but requesting the fabricator shop contact info and any reference that would help the fabricator identify the correct version of what he produced for you. Or, I’ll request to purchase a copy of his one-piece modified file and produce locally in Seattle.

Thank you for the inspiration to press on, and greatly appreciate the beauty of what you’ve done.


Sent from my iPhone using Tapatalk
 

Sablewolf

Member
Messages
103
This is a bandwagon I will gladly chase down if at all possible. Have had Edwin247’s posts bookmarked “for future improvements” for far too long. The steps you have taken here have lowered the level of uncertainty considerably.

Please let me know if there is a path by which I could also obtain a bezel from your fabricator. I’m in the US, adding to the degree of difficulty, and I don’t want to treat you as a vendor. Happy to make all of the calls work the details, but requesting the fabricator shop contact info and any reference that would help the fabricator identify the correct version of what he produced for you. Or, I’ll request to purchase a copy of his one-piece modified file and produce locally in Seattle.

Thank you for the inspiration to press on, and greatly appreciate the beauty of what you’ve done.


Sent from my iPhone using Tapatalk

I'm sure the fabricator would be happy to help and could certainly fabricate and ship to you but its probably just easier to get the files and get them printed locally to you- I don't think they did any major work to them apart from 'sticking it together' but they are called Central Scanning
https://www.central-scanning.co.uk/

My contact there was Nick G the MD - he was very helpful and I think the price (for UK!) was fair for a 'one-off' where they had to adjust the original files. He should remember the job as it was only last week that I last spoke to him. Just ask him for a copy of the file of the second print he did for me (Tony)

If you don't have any luck when you contact them just let me know and I'll help out

(BTW - don't forget to put some metal thread inserts in the holes in the rear of the bezel to take the four location pins - I don't think I mentioned that anywhere).
 
Messages
346
I'm sure the fabricator would be happy to help and could certainly fabricate and ship to you but its probably just easier to get the files and get them printed locally to you- I don't think they did any major work to them apart from 'sticking it together' but they are called Central Scanning
https://www.central-scanning.co.uk/

My contact there was Nick G the MD - he was very helpful and I think the price (for UK!) was fair for a 'one-off' where they had to adjust the original files. He should remember the job as it was only last week that I last spoke to him. Just ask him for a copy of the file of the second print he did for me (Tony)

If you don't have any luck when you contact them just let me know and I'll help out

(BTW - don't forget to put some metal thread inserts in the holes in the rear of the bezel to take the four location pins - I don't think I mentioned that anywhere).

Thank you for sharing your experiences and allowing me to stand on your shoulders to press forward on this project. Still have some work to do on my end to prepare for the wiring side of things, but the bezel fab was the largest hurdle.


Sent from my iPhone using Tapatalk
 

Sablewolf

Member
Messages
103
Thank you for sharing your experiences and allowing me to stand on your shoulders to press forward on this project. Still have some work to do on my end to prepare for the wiring side of things, but the bezel fab was the largest hurdle.


Sent from my iPhone using Tapatalk
Glad to be of help. I found the members on here and ML really helpful and supportive when I was working through the options. It took a bit of research to find all the info and a bit of ‘trial & error’ but it’s come together nicely so I’m pretty happy with the outcome
 
Messages
346
Glad to be of help. I found the members on here and ML really helpful and supportive when I was working through the options. It took a bit of research to find all the info and a bit of ‘trial & error’ but it’s come together nicely so I’m pretty happy with the outcome

Got in touch with the printer, so all is well on that front. Going to gather all requisite materials and then press pause until the weather turns sour in October or so before disassembly (and buttons to Lorenzo)

If you do end up consolidating all of your notes, please post them here, and I’m sure Catman will pin it for easy reference for all.


Sent from my iPhone using Tapatalk
 

Sablewolf

Member
Messages
103
Will do - I’ve consolidated and posted most of the info but I’ll try to review/update it again and repost when I get a minute but in the meantime if anyone has any questions, please just get in touch directly
 

Gooner

Member
Messages
446
Kudos and thanks to Sablewolf for the 3D printed bezel he sent me. Now I just need get on with the rest of it...