3200GT Gear Linkage Refurb

Oneball

Member
Messages
11,117
My gear linkage is rather sloppy so while I'm waiting for it to dry out I thought I'd sort it out by replacing some bits and pieces. I've done it before but not on a Maser so know it's only a few bits around £40 if it was a BMW but :eek: looking at Maserati parts it's £300 just for the selector rod joint at the gearbox!!

From what I can see it looks like the type fitted to an BMW E30 with a Getrag (pic below)

shifter_parts_lg.jpg


Can anyone confirm if they used something other than a Maserati part?
 

Oneball

Member
Messages
11,117
Got the linkage off and the only real play is in the pin holes in the selector rod joint.

4F98579E-8E8C-4EDD-AC1B-D41019AB84C7.jpeg

Going to order one for a late model BMW E30 and see if it fits.

2045CC48-FAAA-41F9-88C9-FE61EF3D0C1A.jpeg
 

dunnah01

Member
Messages
648
Fingers crossed. If it means saving £250 for a small polythene bag with a few Tridents on it I'd make it fit...
 

SteveM

Member
Messages
541
Intrigued by this post as possibly on my winter to do list - are you able to do this with gearbox in situ. A How to would be greatly appreciated.
 

Oneball

Member
Messages
11,117
You actually have to disconnect the linkage to take the gearbox out as it is connected to both the box and the body. It would be easier to do with no exhaust or prop shaft but removing the heatshield under the prop gives you enough access.

IMG_2912.JPG

To remove the linkage rod and the shift rod link:

1. Remove the 4 bolts holding the heat shield on, 8mm socket
2. Remove the shift linkage, the clips push off by hand.
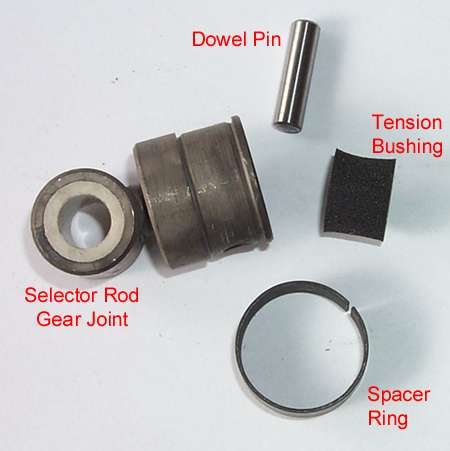
3. Remove the shift rod link, the retaining collar is a pain to push off, needs a short screw driver and the pin needs to come out downwards, mine was loose enough that a bit of wiggling caused it to fall out by gravity.

To remove the gear lever:

4. Remove gearknob, 3 grub screws
5. Undo the single nut at the rear mount to the body, 13mm socket UJ and very long extension
6. Undo the bolt at the front mount on the gearbox, 17mm spanner and 10mm socket
7. Withdraw the bolt from the front mount, up until this point it hadn't been too hard but getting this bolt out took almost 2 hours as it was welded to the rubber bush and there's not a lot of room to lever, a good soaking with WD40 helped.
8. Slide the rear mount forwards to detach from body pins and pull front mount out of gearbox, you can now detach the rubber grommet in the transmission tunnel and pull the whole thing down.


It is however really fiddly and not easy without a lift, if someone said they'd do it for me for £100 labour I'd say yes.

I'm going to order a new shift rod link from BMW tomorrow (£35 instead of £320 from Maserati), I've ordered a poly front bush from Powerflex (BMW E30 £16), a new plastic ball carrier (£9 wasn't noticeably worn but while I'm there..) and a new rear mount from Eurospares (strangely enough they list it at £10 and BMW want £70)
 
Last edited:

SteveM

Member
Messages
541
That's brilliant thanks - my prop is due for swapping to a lower mileage one I have now obtained so while I'm under the car I might tackle this - interesting to see if you notice much improvement.
 

Oneball

Member
Messages
11,117
Should be a breeze with the prop out ;).

We’ll see when it’s done. I forgot to take a video of the play at the lever but there was about 1-1.5 inch of left right play before you could feel any spring and the change especially 2nd to 3rd wasn’t good.
 

SteveM

Member
Messages
541
Fortunately I dont have that much play on 97K - what kind of miles has yours done? If you have found a cheap alternative then it might well be worth doing as preventative
 

Oneball

Member
Messages
11,117
25k on mine. The shift rod link where the pin goes though was quite worn, almost all of the free play could be felt there.
 

Oneball

Member
Messages
11,117
Got the new rod joint and pin from BMW and looks to be dimensionally the same. £300 saved :) and the front mounting bush from Powerflex just waiting for the rear mount from Maserati

B6B45C84-6E5D-427F-BDA1-D4924208ADD5.jpegFC31DD85-1C35-4BC6-B382-686845D8C260.jpeg65C34487-4138-4572-A637-EEA81D2BB91A.jpeg6CC3D12A-5969-49E1-B3AA-8EF6A62DADF6.jpeg15380D95-E46B-43CE-A978-8A15C948A772.jpeg
 

Oneball

Member
Messages
11,117
Finally got all the bits.

57890648-0EE0-4561-B8D1-6E0A3F095AF8.jpeg

The bolt for the front mount has been unbelievably difficult to get in, 2 hours and still not all the way through. I’d replaced it with a poly one as it was really hard to get out of the old rubber bush and poly is usually easier but guess not.

Seems to have made a massive difference to the amount of play but not driven it yet as still haven’t got the interior back in from the water leak and it’s not fully done up
 

Oneball

Member
Messages
11,117
Finally all back together and the change has definitely improved.

For the first time in a month it’s moving and got me to a cafe without throwing a hissy fit or any dash lights, still need to fix the amp.

8EA81B20-743F-4D2B-BE7B-F67CD09B25E9.jpeg
 

Oneball

Member
Messages
11,117
The majority of the play in mine was in the link, the holes in it where the pin goes has worn oval. If I was doing it again I’d probably just do that and see if it made it better. The front mount and bolt were a right pain.