SM Apple CarPlay / Android Auto

Prestige

New Member
Messages
8
56744

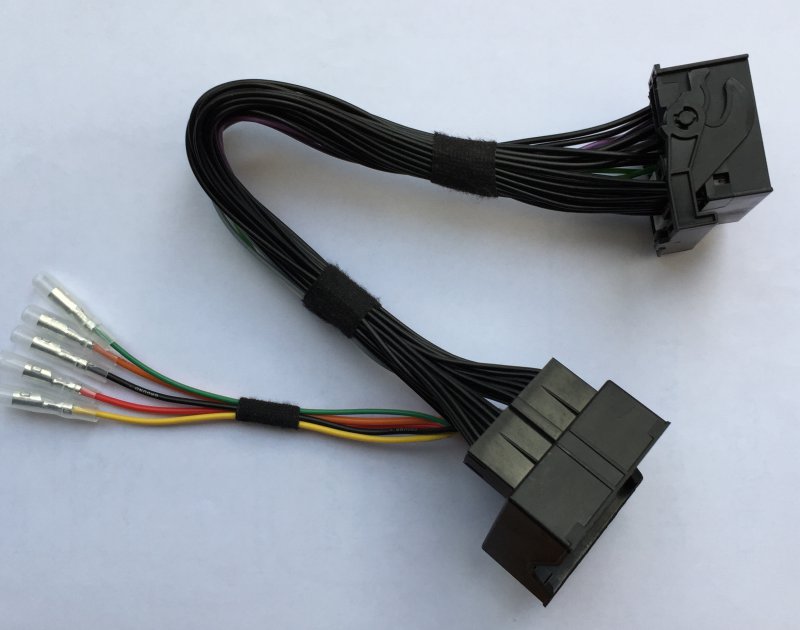
So here it is, T-Harness with the appropriate taps. The main cost is that the harness is fully populated. Although not all pins are used, they differ from car to car depending on extras, etc. So to play it safe they are all populated.

The first cars are being installed with these this weekend.
 

jw38

Member
Messages
130
I take it we’ve all received our kits?

The US ones should be a few more days.

I've received mine and I sent an email to you a little while ago, asking about the harness. I should have looked at this thread before I sent the email!

The instructions are extremely well-done and I've talked to a local installer who is confident that he can do the job. I'd prefer to have the harness so...

View attachment 56744

So here it is, T-Harness with the appropriate taps. The main cost is that the harness is fully populated. Although not all pins are used, they differ from car to car depending on extras, etc. So to play it safe they are all populated.

The first cars are being installed with these this weekend.
Is there any way to have a harness shipped to the US? The link on the website provides for shipment only to the UK.
 

Mancserati

Member
Messages
118
View attachment 56744

So here it is, T-Harness with the appropriate taps. The main cost is that the harness is fully populated. Although not all pins are used, they differ from car to car depending on extras, etc. So to play it safe they are all populated.

The first cars are being installed with these this weekend.
The instruction booklet shows 5 connections to be made:

Red x 2 (to the same pin)
Yellow
Orange
Green

The harness pictured has 5 wires but one of them is black marked ground. Are there actually 6 connections to be made or is the black wire to be used for the additional red?

Is there plenty of room behind the MM unit for the harness?
 

nsh50a

New Member
Messages
24
any clearer photos of the dash removal process for a 2011 QP or similar model (no din removal tool slots and the interior pieces do not appear to come out in the same was as the instructions. I'm struggling a bit.
 

nsh50a

New Member
Messages
24
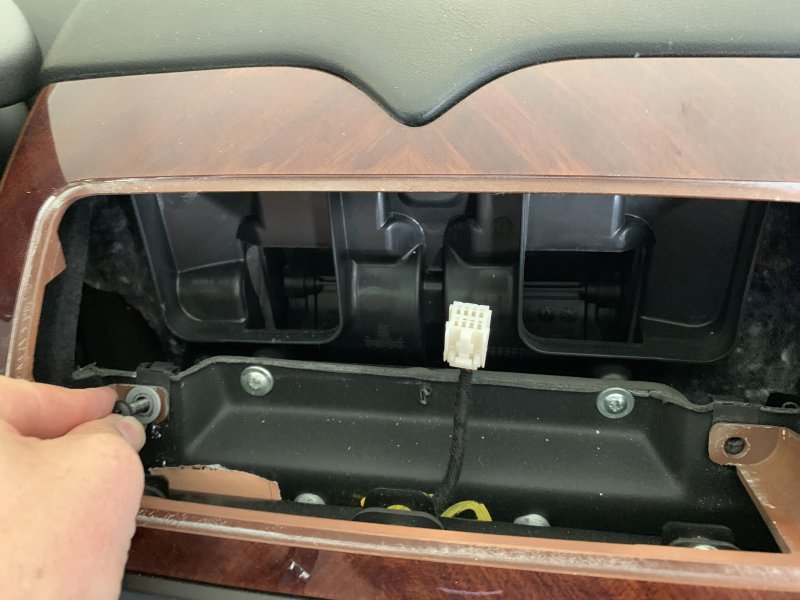
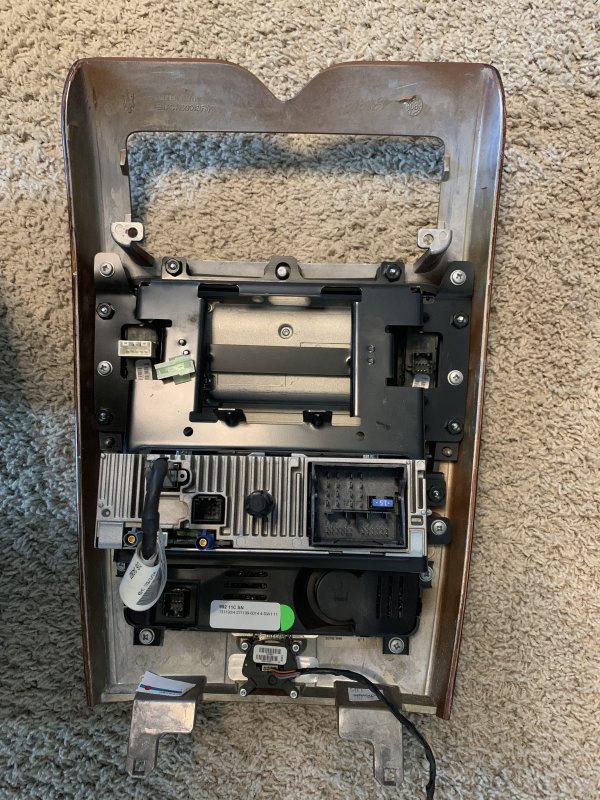
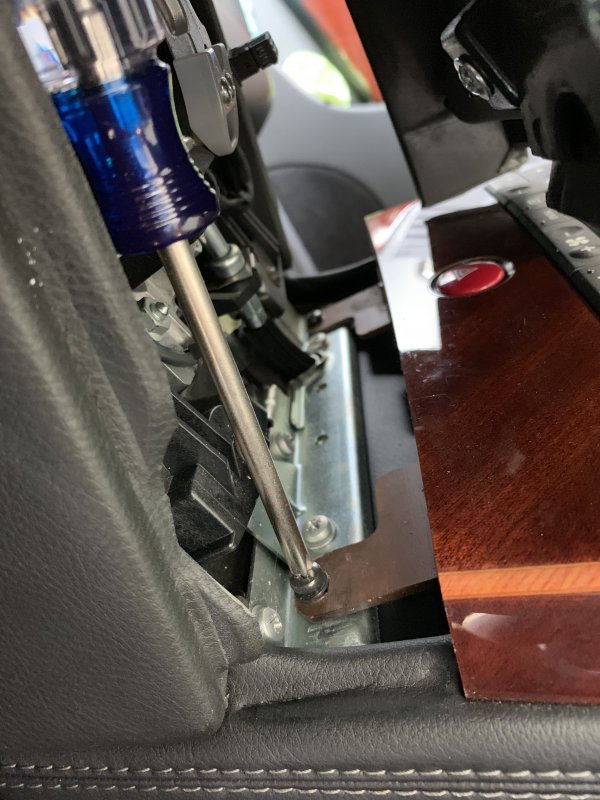
hopefully this helps some people. If you have a newer unit that doesn't have the stereo removal pins, it's a bit more complicated. Start by taking off the cupholder trim as instructed. You can use a soft trim removal tool to pry up the gear indicator to reach the fourth bolt. Once that is partially removed (cant fully remove with the gear shifter in tact) look behind it to find the 2 bolts holding the bottom of your stereo/ac trim (the big wood piece or piano black or carbon fiber depending on your trim level). On the top, take a soft trim removal tool and pry out the vents/clock assembly and unclip the clock wires. There are 2 more bolts up there holding on the front trim piece. With those 4 trim pieces removed, you can take out the entire trim/screen/radio/ac piece by slowly unclipping each wire (take tons of photos to document where everything goes. It does not appear that you have to remove any of the side trim pieces
 

nsh50a

New Member
Messages
24
some pics
 

Attachments

  • IMG_1249.jpg
    IMG_1249.jpg
    3.1 MB · Views: 27
  • IMG_1262.jpg
    IMG_1262.jpg
    2.4 MB · Views: 25
  • IMG_1248.jpg
    IMG_1248.jpg
    1.8 MB · Views: 23

linescanner

Member
Messages
299
Hi Guys,

Just a quick post to introduce myself to the forum. The harness lead to prevent any cutting is now available to purchase on the website:
Maserati T-Harness HERE

My UK based supplier has unfortunately changed the pricing and is going to be retailing at £60 per unit. As an introduction, I have a discount running on the website for £15 off until the end of May. Use Code: SM2019 at checkout.

If I can guarantee 15 units, I would be able to negotiate the price with my supplier but the pricing currently is on a one-off basis.

You can order online and have it dispatched directly to you, or I can bring it with me to any installs I am doing and just add it to the final bill.

In regards to people asking about the forward facing camera, unfortunately I do not recommend this.
The way the system works, you either need to:
  1. Have a switch fitted to trigger the camera to appear on the screen
  2. Like changing source or your TV, you have to press the phone button to activate the CarPlay then the same button again to select the camera, for example, if you were listening to the radio and wanted to switch to the front camera you would switch to Carplay, then Camera, then back to radio.
Another point, a forward facing camera is NOT the same as any other camera. It has to be an extra wide fish-eye camera for the image to be any different to what you see out of the windscreen. Field of vision would have to be roughly 180 degrees.

If your vehicle does NOT have the AUX option please read the following. The CarPlay uses the AUX to play the sound through the system so if this isn't factory fitted an FM modulator is needed for the sound to play as if a radio station. Not a problem, but obviously an extra expense of roughly £75.

I take this opportunity to also highlight that I do offer a wide range of services e.g Alarms, Dash Cams, etc
If you have any questions please feel free to ask.

Paul,

thanks for this. I think I will leave the front camera then.

In regards to this, is there a way to tweak the sensitivity of the front parking sensors. They go screaming red with an acre still to go (as do rear ones)

Regards

Andy
 

Devonboy

Member
Messages
1,291
Paul,

thanks for this. I think I will leave the front camera then.

In regards to this, is there a way to tweak the sensitivity of the front parking sensors. They go screaming red with an acre still to go (as do rear ones)

Regards

Andy


I had this - check the brackets aren’t bent....it transpires on mine - after 3 inspections- that the bonnet itself was causing the the sensors to go off....new brackets are (for Maserati) fairy cheap!
 

nsh50a

New Member
Messages
24
Next question re newer QP install. Got the touch screen installed, ran the mic, starting to sort out the rest: there does not appear to be space enough behind the glove box for either module. Any other recs for placement short of in the glove box?


Sent from my iPhone using Tapatalk
 

conaero

Forum Owner
Messages
34,626
Next question re newer QP install. Got the touch screen installed, ran the mic, starting to sort out the rest: there does not appear to be space enough behind the glove box for either module. Any other recs for placement short of in the glove box?


Sent from my iPhone using Tapatalk
Ok, the QP must be different from the GT as there is loads of room. The other location Paul fits them is at the base of the centre consul, under all the oem navy unit.
 

Blox

Member
Messages
1,057
View attachment 56744

So here it is, T-Harness with the appropriate taps. The main cost is that the harness is fully populated. Although not all pins are used, they differ from car to car depending on extras, etc. So to play it safe they are all populated.

The first cars are being installed with these this weekend.
Hi Paul - I’m hoping that you are still fitting mine this Friday down in Portsmouth. Can I order one of these please and settle up on the day ?
Thanks
Ian
 

nsh50a

New Member
Messages
24
Ok, the QP must be different from the GT as there is loads of room. The other location Paul fits them is at the base of the centre consul, under all the oem navy unit.

That’s what I figured, the one hesitation I have had is that it would not allow the programming switch to be easily accessed in the future. What type of stuff is it used for after the install is finished?


Sent from my iPhone using Tapatalk
 

nsh50a

New Member
Messages
24
That’s what I figured, the one hesitation I have had is that it would not allow the programming switch to be easily accessed in the future. What type of stuff is it used for after the install is finished?


Sent from my iPhone using Tapatalk

I just realized that switch only uses two wires. I think I’m going to splice into it and run a longer cable all the way to my glove box with the auxiliary audio input. That way I can plug-in a pigtail there if I ever need access I’ve been taking lots of pictures of the process so hopefully i can give you updates for models like mine once finished.


Sent from my iPhone using Tapatalk
 

conaero

Forum Owner
Messages
34,626
I just realized that switch only uses two wires. I think I’m going to splice into it and run a longer cable all the way to my glove box with the auxiliary audio input. That way I can plug-in a pigtail there if I ever need access I’ve been taking lots of pictures of the process so hopefully i can give you updates for models like mine once finished.


Sent from my iPhone using Tapatalk
Good idea and tuck it away in the glove box. You shouldn't need it again.