


JAGPURR
New Member
- Messages
- 91
AUXILLIARY DRIVE BELT CHANGE ON MASERATI 4200
Having purchased an auxiliary drive belt as part of a service kit last year, which included an air filter, oil filter and belt for £70 from euro-spares, saving about £30 on buying these separately. I thought it about time it was fitted. The belt should be inspected at each service and replaced at least every three years. The job took 4 hrs from driving into the garage to driving out, and I spent a lot of time messing around with the camera and note pad, to say nothing of coffee drinking and biscuit dunking.
It was one of those jobs that only takes about 10 minutes to do but a couple of hours to get at it and a couple of hours more to replace those bits you removed. This procedure would need to be followed for a number of jobs. I.E. changing the Alternator, Steering pump, Air conditioning compressor and any noisy pulleys, therefore if you need to do any of these jobs you should do the belt at the same time.

These are the tools I used and you will need a similar arrangement. Various cross head drivers, medium flat driver, side cutters, pincers or similar, 10mm & 8mm sockets or spanners and a 15mm ring spanner.

Remove all the engine plastic covers, 10 screws if they are all present.

You will need to unclip the bonnet stays to get the side covers off so just do one at a time and replace it, otherwise you will get a rather heavy bonnet on your head.

Next we need to remove the front underskirt. Jack up the car so the wheels are about 6 inches off the floor. Remove three screws at the bottom front of each wheel arch. Using a stubby or angled driver, if these screws have not been out for a long time you may need to remove the wheel to get a better purchase. Mine have been out before and have been replaced with stainless steel screws.

Three screws toward the engine sump; these were 10mm but not sure if the original ones were cross head.

About twelve screws around the front bumper, again if they are all there.

Now you can see the job in hand from underneath and the bad cracking of the old belt. If you have a pit or car lift and the hands of a 10 year old it is possible that you could do the job from here, but I wouldn’t recommend it, especially if you like the present look of your knuckles.

Looking from above there is virtually no access either so we have to create some.

It’s a good idea to protect the front of your car from zippers and buttons etc. You can get fancy proper rubber covers especially made for this task but I have resorted to the old faithful curtain and two large magnets to hold it in place. Cloths and large magnets are quite handy for makeshift protection of bodywork unless you own an alloy Bentley or maybe a fibreglass Lotus, or Reliant Robin!

Firstly we need to remove the throttle body and the mass air flow meter. These are held in place by a type of metal band /clip. These are meant to be used once and replaced but it is possible to re-use them if you are careful. You could of course just buy new or replace with a standard 4” jubilee clip. You often find these types of bands on drive shaft bellows.

First insert a medium flat screwdriver or something similar and move from side to side in order to spread the crimped area as shown, this will allow you to open and pop the clip apart to remove.

You only need to remove the two clips either side of the throttle body. Gently ease this out and lay on top of the engine somewhere safe, leaving the wires attached. Good time to inspect it and clean if necessary.

Ease the corrugated rubber connection piece off the mass air meter and lift it slightly to expose a jubilee clip on a breather pipe underneath. Slacken this and remove.

Unclip the mass air flow meter from the air filter box and gently lay somewhere safe with the wires still attached.

You will now be able to see the job from above but in order to get easier access I decided to drop the fan assembly out of the way. Unplug the two fan power connectors from the top and a tie-wrap holding the cable to the centre of the fan assembly. Cut these tie-wraps and pull out the strap part leaving the stud part intact, you can then use an ordinary tie-wrap threaded through the hole in the original stud.

From below unplug the two connectors from the fan low speed resistor, put a mark on one plug and socket so you don’t mix them up. I’m certain it would make no difference but better safe than sorry. Don’t miss another tie- wrap just above these connectors.

While you are on your back, now remove the two 8mm screws from either side fixing the fan assembly to the radiator housing.

Now get up let the dizziness go and remove the two bolts, one either side, holding the top of the assembly. It may drop so hold it!

Gently lower the assembly until it rests its self about half way down. There is no need to remove completely and it’s a pig to get out anyway.

You can now see we have much more access and you are going to need it!

If you look under the front you will see the radiator assembly hanging down, this green thing is the cooling fans low speed resistor should you ever need to find it.

Now you can see the belt tensioner, it’s the pulley in the centre with the rusty nut. This is our means of removing the tension from the belt and we need to get a 15mm ring key onto it, or a socket would do.

Place the ring key on the tensioner pulley centre and lift the end, i.e. you are turning anticlockwise. This you will take the tension off the belt.

Whilst lifting the spanner, with the other hand slide the belt off the alternator pulley and let the spanner go down and the tensioner will come to rest.

Now you can safely remove the old belt. I had to slacken this pipe clamp to get the belt off more easily.

My belt was in an appalling state. I just cannot believe that it has ever been changed and the car should be on its third by now.
Whilst the belt is off check the pulleys for any wear. Especially the tensioner pulley and the black idler pulley above it. Spin them and any signs of rumbling, binding or squealing, then now is the time to replace them.
Tensioner complete (175436) £70. Idler pulley (172537) £55. Belt (175446) £24 all from Euro spares.

Fit the new belt referring to the picture above or the sketch you of course made prior to removal. I must say it’s like doing battle with a cobra; a snake charmer would come in very handy about now.
Fit over all pulleys leaving the top alternator pulley to last. Fit this whilst lifting the tensioner with the spanner as before. No further adjustment is necessary as the Auto Tensioner does that job for you, so no need to worry about over tightening or under tightening which are both equally bad.

Check that the belt is fitting snugly on all pulleys from above and below.

Refit the mass air flow meter and clip in place. It’s much easier to do this without the throttle attached.
Now the rubber connection piece not forgetting the breather pipe underneath.

Ease the throttle body in place, a smear of lube if needed will help, and align as in picture. Refit clips by hooking in place and re-crimping the clip with a pair if snipers as shown. No snipers? Then use your side cutters.

Now it’s just a matter of refitting those engine bay covers and the under shield. Dropping the car and giving it a test run after checking you haven’t left any tools under the bonnet.
Congratulate yourself on a job well done and saving yourself about £400-£500 labour at a dealers. It’s probably this cost and the awkwardness of the job that means it is often neglected until it snaps, and the first you know is an ignition light on and heavy steering as you lose the pump.
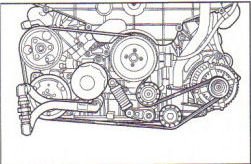
This guide is obviously for the 4200 but all aux drive belts work on the same principal. I believe that also applies to the 3200 and the only main differences are, the tensioner is a slightly different design and is moved clockwise with a 3/8” socket bar and requires locking in place with a pin to release the tension. And the belt it’s self is twice as long. The picture below is of the belt layout on the 3200, the tensioner is in the centre to the right of the oil filter and I see no reason why it couldn’t be tackled in the same manner as we have done. I’m sure someone with a 3200 might do it one day and record the procedure for us.
Now I’m all set for the spring and a return to the permanent grin whilst driving. Until heaven forbid, something goes wrong or I feel like ripping something apart just for the fun of it, bye for now.
Keith.
The pic below is of the 3200 engine and shows the difference
Having purchased an auxiliary drive belt as part of a service kit last year, which included an air filter, oil filter and belt for £70 from euro-spares, saving about £30 on buying these separately. I thought it about time it was fitted. The belt should be inspected at each service and replaced at least every three years. The job took 4 hrs from driving into the garage to driving out, and I spent a lot of time messing around with the camera and note pad, to say nothing of coffee drinking and biscuit dunking.
It was one of those jobs that only takes about 10 minutes to do but a couple of hours to get at it and a couple of hours more to replace those bits you removed. This procedure would need to be followed for a number of jobs. I.E. changing the Alternator, Steering pump, Air conditioning compressor and any noisy pulleys, therefore if you need to do any of these jobs you should do the belt at the same time.
These are the tools I used and you will need a similar arrangement. Various cross head drivers, medium flat driver, side cutters, pincers or similar, 10mm & 8mm sockets or spanners and a 15mm ring spanner.
Remove all the engine plastic covers, 10 screws if they are all present.
You will need to unclip the bonnet stays to get the side covers off so just do one at a time and replace it, otherwise you will get a rather heavy bonnet on your head.
Next we need to remove the front underskirt. Jack up the car so the wheels are about 6 inches off the floor. Remove three screws at the bottom front of each wheel arch. Using a stubby or angled driver, if these screws have not been out for a long time you may need to remove the wheel to get a better purchase. Mine have been out before and have been replaced with stainless steel screws.
Three screws toward the engine sump; these were 10mm but not sure if the original ones were cross head.
About twelve screws around the front bumper, again if they are all there.
Now you can see the job in hand from underneath and the bad cracking of the old belt. If you have a pit or car lift and the hands of a 10 year old it is possible that you could do the job from here, but I wouldn’t recommend it, especially if you like the present look of your knuckles.
Looking from above there is virtually no access either so we have to create some.
It’s a good idea to protect the front of your car from zippers and buttons etc. You can get fancy proper rubber covers especially made for this task but I have resorted to the old faithful curtain and two large magnets to hold it in place. Cloths and large magnets are quite handy for makeshift protection of bodywork unless you own an alloy Bentley or maybe a fibreglass Lotus, or Reliant Robin!
Firstly we need to remove the throttle body and the mass air flow meter. These are held in place by a type of metal band /clip. These are meant to be used once and replaced but it is possible to re-use them if you are careful. You could of course just buy new or replace with a standard 4” jubilee clip. You often find these types of bands on drive shaft bellows.
First insert a medium flat screwdriver or something similar and move from side to side in order to spread the crimped area as shown, this will allow you to open and pop the clip apart to remove.
You only need to remove the two clips either side of the throttle body. Gently ease this out and lay on top of the engine somewhere safe, leaving the wires attached. Good time to inspect it and clean if necessary.
Ease the corrugated rubber connection piece off the mass air meter and lift it slightly to expose a jubilee clip on a breather pipe underneath. Slacken this and remove.
Unclip the mass air flow meter from the air filter box and gently lay somewhere safe with the wires still attached.
You will now be able to see the job from above but in order to get easier access I decided to drop the fan assembly out of the way. Unplug the two fan power connectors from the top and a tie-wrap holding the cable to the centre of the fan assembly. Cut these tie-wraps and pull out the strap part leaving the stud part intact, you can then use an ordinary tie-wrap threaded through the hole in the original stud.
From below unplug the two connectors from the fan low speed resistor, put a mark on one plug and socket so you don’t mix them up. I’m certain it would make no difference but better safe than sorry. Don’t miss another tie- wrap just above these connectors.
While you are on your back, now remove the two 8mm screws from either side fixing the fan assembly to the radiator housing.
Now get up let the dizziness go and remove the two bolts, one either side, holding the top of the assembly. It may drop so hold it!
Gently lower the assembly until it rests its self about half way down. There is no need to remove completely and it’s a pig to get out anyway.
You can now see we have much more access and you are going to need it!
If you look under the front you will see the radiator assembly hanging down, this green thing is the cooling fans low speed resistor should you ever need to find it.
Now you can see the belt tensioner, it’s the pulley in the centre with the rusty nut. This is our means of removing the tension from the belt and we need to get a 15mm ring key onto it, or a socket would do.
Place the ring key on the tensioner pulley centre and lift the end, i.e. you are turning anticlockwise. This you will take the tension off the belt.
Whilst lifting the spanner, with the other hand slide the belt off the alternator pulley and let the spanner go down and the tensioner will come to rest.
Now you can safely remove the old belt. I had to slacken this pipe clamp to get the belt off more easily.
My belt was in an appalling state. I just cannot believe that it has ever been changed and the car should be on its third by now.
Whilst the belt is off check the pulleys for any wear. Especially the tensioner pulley and the black idler pulley above it. Spin them and any signs of rumbling, binding or squealing, then now is the time to replace them.
Tensioner complete (175436) £70. Idler pulley (172537) £55. Belt (175446) £24 all from Euro spares.
Fit the new belt referring to the picture above or the sketch you of course made prior to removal. I must say it’s like doing battle with a cobra; a snake charmer would come in very handy about now.
Fit over all pulleys leaving the top alternator pulley to last. Fit this whilst lifting the tensioner with the spanner as before. No further adjustment is necessary as the Auto Tensioner does that job for you, so no need to worry about over tightening or under tightening which are both equally bad.
Check that the belt is fitting snugly on all pulleys from above and below.
Refit the mass air flow meter and clip in place. It’s much easier to do this without the throttle attached.
Now the rubber connection piece not forgetting the breather pipe underneath.
Ease the throttle body in place, a smear of lube if needed will help, and align as in picture. Refit clips by hooking in place and re-crimping the clip with a pair if snipers as shown. No snipers? Then use your side cutters.
Now it’s just a matter of refitting those engine bay covers and the under shield. Dropping the car and giving it a test run after checking you haven’t left any tools under the bonnet.
Congratulate yourself on a job well done and saving yourself about £400-£500 labour at a dealers. It’s probably this cost and the awkwardness of the job that means it is often neglected until it snaps, and the first you know is an ignition light on and heavy steering as you lose the pump.
This guide is obviously for the 4200 but all aux drive belts work on the same principal. I believe that also applies to the 3200 and the only main differences are, the tensioner is a slightly different design and is moved clockwise with a 3/8” socket bar and requires locking in place with a pin to release the tension. And the belt it’s self is twice as long. The picture below is of the belt layout on the 3200, the tensioner is in the centre to the right of the oil filter and I see no reason why it couldn’t be tackled in the same manner as we have done. I’m sure someone with a 3200 might do it one day and record the procedure for us.
Now I’m all set for the spring and a return to the permanent grin whilst driving. Until heaven forbid, something goes wrong or I feel like ripping something apart just for the fun of it, bye for now.
Keith.
The pic below is of the 3200 engine and shows the difference
Attachments
Last edited:


